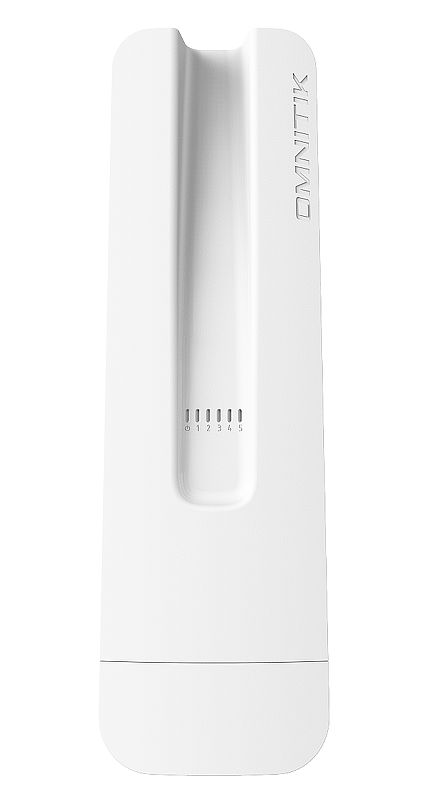
MikroTik OmniTik 5 POE AC
The Omnitik 5ac is an outdoor switch/router with a built-in 5Ghz 802.11ac access point, omnidirectional antenna, and 5 gigabit ethernet ports. Be sure to get the POE version. Here are the config instructions
The OmniTik serves as a central rooftop hub with several purposes:
- As a switch to connect multiple apartments or other rooftop devices (LiteBeam, SXTs etc.)
- Can output POE power to power LiteBeams or other antennas.
- It acts as an WiFi Access Point for the rooftop, and runs our config of WDS and OSPF so it will mesh with other OmniTiks or SXTsqs within a few blocks
- Provides remote management, a console interface and allows speed/traceroute/ping testing of the hub.
Please be sure to see MikroTik Specifics for extra info about Mikrotik devices, how to connect, etc.
The PoE version accepts 12-57V passive PoE on port 1 and can be configured to provide PoE out to ports 2-5.
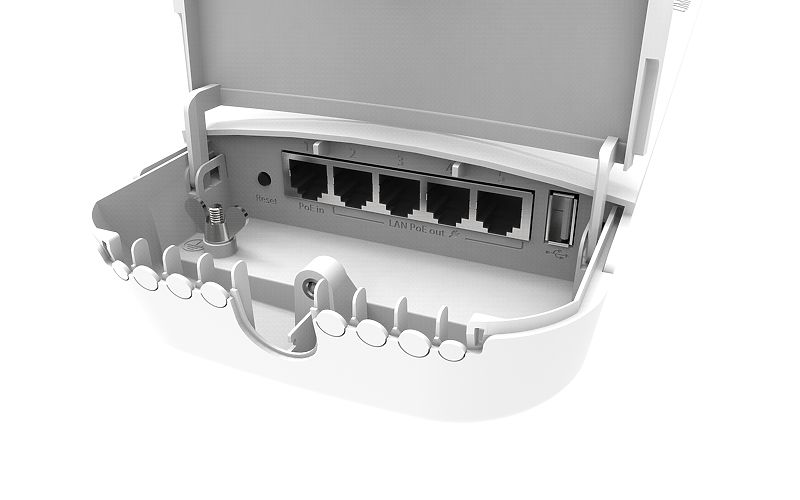
The small round plastic tabs, shown in the picture above, should be removed for those cable ports you will use - push them firmly inwards to remove. Leave the tabs in unused ports to prevent water entry.
Device specs are available at Mikrotik.com
Uses
- Hub node routing or AP ( for standard 802.11ac hubs )
- Rooftop installations for multi-tenant houses
- Providing public access via the omnidirectional antenna
How to reset
- Press reset
- Apply power
- Watch the power led, once it blinks, STOP pressing the reset button
- It will beep one time
- Once you hear two beeps, you should be able to access it.
How to upgrade the firmware
- Upload the routeros-mipsbe-x.x.x.npk file in http://192.168.88.1/webfig/#Files
- Select System Reboot
How to downgrade firmware
- Upload the routeros-mipsbe-x.x.x.npk file in http://192.168.88.1/webfig/#Files
- Go to Terminal and type
/system package downgrade;
Configurations
Omnitik config
Here are the current config instructions. As discussed in the MikroTik Specifics page, these devices need a script to be generated and loaded onto the device rather than a saved config file.
We now have a script generator you can find here https://configgen.nycmesh.net/
Here is a slideshow of configuring an OmniTik
Wireless interface explanation
wlan1- SSID example:
nycmesh-136-omni - AP bridge (MikroTik term)
- manually connected to by other Omni's to avoid route flapping behavior exhibited by the automatic mesh (
wlan3)
- SSID example:
wlan2- SSID example:
-NYC Mesh Community WiFi- - Also ap bridge
- only difference to
wlan1is bridge filter and and ip firewall rule
- SSID example:
wlan3- SSID example:
nycmesh-wds - wds slave
- all automatic mesh connections communicate through this interface
- wds bridge
- is not running a dhcp server
- OSPF will route to other connections first since bridge for this interface is higher at 100
- SSID example:
wlan4- station bridge for connecting to an access point ex.
wlan1
- station bridge for connecting to an access point ex.
Expand for `OLD nycmesh-omnitik-v3.2.rsc` example
The is our obsolete 3.2 template script which needs some variables filled in.
This script only works on the OmniTik 5ac PoE model
Version 3.2 Changelog:
- Separation of Public vs Tenant subnet
- Fixed BGP sync missed config parameter
- Startup delay ( ref Mikrotik forums )
- Tada sound effect
- Better firewall rules
:global nodenumber 1111
:global bgpasn 61111
:global ipprefix "10.70.111"
:global iptenantsrange 10.70.111.5-10.70.111.119
:global iptenantsgw 10.70.111.1
:global ippublicrange 10.70.111.130-10.70.111.180
:global ippublicgw 10.70.111.129
:global dns 10.10.10.10,1.1.1.1

/delay 15

:for j from=1 to=4 step=1 do={
  :for i from=2000 to=50 step=-400 do={
    :beep frequency=$i length=11ms;
    :delay 11ms;
  }
  :for i from=800 to=2000 step=400 do={
    :beep frequency=$i length=11ms;
    :delay 11ms;
  }
}

:foreach x in=[/interface wireless find] do={ /interface wireless reset-configuration $x }

:for t from=1200 to=350 step=-50 do={
  :beep frequency=$t length=33ms;
  :delay 33ms;
}

:beep frequency=500 length=100ms

/ip address add address=192.168.88.1/24 interface=ether3 network=192.168.88.0

:beep frequency=600 length=100ms

/interface ethernet
set [ find default-name=ether5 ] poe-out=forced-on

:beep frequency=700 length=100ms

/interface wireless security-profiles
add authentication-types=wpa-psk,wpa2-psk management-protection=allowed mode=\
    dynamic-keys name=nycmeshnet supplicant-identity=nycmesh \
    wpa-pre-shared-key=nycmeshnet wpa2-pre-shared-key=nycmeshnet

:beep frequency=800 length=100ms

/interface wireless
set [ find default-name=wlan1 ] band=5ghz-a/n/ac channel-width=20/40/80mhz-Ceee disabled=no distance=indoors frequency=auto mode=ap-bridge security-profile=nycmeshnet ssid=("nycmesh-" . $nodenumber . "-omni")  wireless-protocol=802.11 wps-mode=disabled
add disabled=no master-interface=wlan1 name=wlan2 ssid="-NYC Mesh Community WiFi-" wps-mode=disabled

:beep frequency=900 length=100ms

/interface bridge
add auto-mac=yes name=publicaccess
add auto-mac=yes name=tenants

:beep frequency=1000 length=100ms

/ip address
add address=($ipprefix . ".1/25") interface=tenants network=($ipprefix . ".0")
add address=($ipprefix . ".129/26") interface=publicaccess network=($ipprefix . ".128")

:beep frequency=1100 length=100ms

/interface bridge port
add bridge=tenants interface=ether1
add bridge=tenants interface=ether2
add bridge=tenants interface=ether3
add bridge=tenants interface=ether4
add bridge=tenants interface=wlan1
add bridge=publicaccess interface=wlan2

:beep frequency=1200 length=100ms

/ip pool
add name=tenants ranges=$iptenantsrange
add name=publicaccess ranges=$ippublicrange

:beep frequency=1300 length=100ms

/ip dhcp-server
add address-pool=tenants disabled=no interface=tenants name=tenantsdhcp
add address-pool=publicaccess disabled=no interface=publicaccess name=publicaccessdhcp

:beep frequency=1400 length=100ms

/routing bgp instance
set default as=$bgpasn disabled=no

:beep frequency=1500 length=100ms

/routing bgp network
add network=($ipprefix . ".0/24") synchronize=no

:beep frequency=1600 length=100ms

/ip dhcp-server network
add address=($ipprefix . ".0/25") dns-server=10.10.10.10 gateway=($ipprefix . ".1") netmask=25
add address=($ipprefix . ".128/26") dns-server=10.10.10.10 gateway=($ipprefix . ".129") netmask=25

:beep frequency=1700 length=100ms

/ip firewall filter
add action=accept chain=input protocol=icmp
add action=drop chain=forward in-interface=publicaccess out-interface=tenants
add action=drop chain=input in-interface=publicaccess
add action=accept chain=forward
add action=accept chain=input

:beep frequency=1800 length=100ms

/system clock set time-zone-name=America/New_York
/system identity set name=("nycmesh-" . $nodenumber . "-omni")

:beep frequency=500 length=200ms;
:delay 500ms;
:beep frequency=500 length=200ms;
:delay 200ms;
:beep frequency=800 length=500ms;
:delay 50ms;
How to apply config:
- Acquire config parameters ( BGP ASN, IP range, node number, etc. )
- Fill in config file parameters at the top of the script.
Save as nycmesh-omni-####.rsc where #### is your node number.
The file must be named with.rscat the end.
- Factory Reset device if needed ( see MikroTik Specifics for details )
( Connect to a port besides Port 1 ) - Update firmware to latest on your device ( see Mikrotik Firmware )
- Upload the rsc file
- The file needs to be in the
flash/folder. However, there is no way to create a folder from the device. - Instead you need to upload the file using scp.
- From a Mac or Linux desktop, upload the file using scp:
scp nycmesh-omni-####.rsc admin@192.168.88.1:flash/
You may need to confirm the SSH key ( typical with SSH ) - From a Windows desktop, you must have PuTTY installed and run the following command from the command prompt:
pscp -scp nycmesh-omni-####.rsc admin@192.168.88.1:flash/ - You should see the file in the WebUI as
flash/nycmesh-omni-####.rsc
- The file needs to be in the
- Factory Reset the device with the option to restore this script.
- From Web UI:
- WebFig > System > Reset Configuration. Select:
- No Defaults
- Run After Reset:
flash/nycmesh-omni-####.rsc - Apply
- Or from CLI:
/system reset-configuration run-after-reset=flash/nycmesh-omni-####.rsc no-defaults=yes- Dangerous Reset anyway? Y
- From Web UI: