6 - Services & Software
Lists and information about services hosted on the mesh
- Alerting and monitoring system
- Bookstack Wiki
- Connection Troubleshooting
- Jon (SN3 Dev Box)
- Grafana Monitoring
- OSPF Data API
- Overview
- Phone System and Configuration
- Call Termination: Google Voice and Callcentric
- Callcentric Inbound/Call Treatments
- Callcentric IVR Setup
- Security (outdated)
- Slack Support Follow Up Bot
- Software services list
- Wiki (Bookstack)
- Zabbix
- Website
- MeshDB
- MeshDB Schema Design
- MeshDB Status Values
- How to onboard API clients to MeshDB
- How to Onboard Users to MeshDB
- SQL Explorer (formerly PGAdmin)
- How to bulk create installs for large buildings
- How to avoid manually entering latitude/longitude/altitude when constructing Node objects
- How to assign a "vanity" network number
- How to add potential Hubs and Links to the map
- How to update MeshDB when an install is completed
- How to update MeshDB to indicate the loss of an install
- New Application Integration Guide
- Environments
- Maintenance Mode
- Observability
- Admin Panel
- MeshDB Domains
- Feature Flags
- Panoramas
- How to Import/Export CSV files of MeshDB data
- How to View the Edit History for an Object in MeshDB
- Grand Street Services
Alerting and monitoring system
Work in progress
Existing systems
Accessible from within the NYC Mesh network only:
- UISP: https://10.70.76.21/nms/login (Statistics, alerts and monitoring of Ubiquiti wireless antennas)
- Grafana: http://10.70.90.82:3000
- Prometheus General: http://10.70.90.82:9090
- Prometheus Omni only: http://10.70.90.142:9090
- snmp-exporter: http://10.70.90.82:9116 (general)
- snmp-exporter: http://10.70.90.142:9090 (omni only)
- UNIFI: https://10.70.90.158:8443/ (old: https://10.70.95.63:8443) (Control and monitoring of Ubiquiti Unifi WiFi APs and switches)
- support report generator
Zabbix
- IP:http://10.70.73.58/
- Details: Runs on Quincy's server, connected to Beta Slack
Requirements
- Must:
- alert Slack team when key infrasture goes offline within 5 minutes
- Should:
- be easy to update for new equipment
- be easy to configure to notify new volunteers
- be easy to deploy
- be reliable
- be configurable though a version controlled config to enable easy updates
- be editable by multiple volunteers
Questions
- Major
- What key metrics should we alert based on?
- Minor
- frequency? ~1 point/hour
Proposed software
Next Steps
Log
- prompted by this Slack discussion on Grand St. outage
- added Zabbix server during Hack night,
Bookstack Wiki
Bookstack Wiki hostes the NYC Mesh Wiki which you are currently viewing.
Introducing NYC Mesh Wiki
This page is intended as a catch page for people who follow old docs links which no longer lead anywhere.
NYC Mesh Wiki has replaced NYC Mesh Docs:
If you've landed on this page, you were probably trying to follow a link to something on nycmesh.net/docs. That section of our website has now been replaced by this wiki and the specific page you were looking for no longer exists, so you were redirected here.
You are now on the NYC Mesh wiki, our new central repository of information. We apologize we weren't able to link you directly to the article you were looking for. Please see the following information to help find what you need.
How to find what you are looking for:
Using the wiki is easy! You can either search for the topic you need with the search bar at the top, or browse individual sections with the sidebar on the left.
The Wiki is organized into Books, Chapters and Pages.
- Books organize overall sections, grouping related sub topics together.
- Chapters group individual pages containing information about related topics.
- Pages cover specific topics and may include various sections.
To search for a topic, click the search bar above and type in a few key words about your topic.
You can browse to different pages on a subject with the sidebar on the left:
To "Start at the Top" and view the whole wiki as a whole, click the NYC Mesh Wiki logo at the top left.

From there you can explore individual sections and topics, diving deeper into the categories with each following layer.
Why we made this change:
Our previous documentation section of our website (nycmesh.net/docs) used Github as the hosting and editing back end.
This was great for allowing multiple people to work on our website and provide edits, however it required knowledge of Github and some basic coding experience (markdown language) to use. It also required installing Hugo (the website engine) on your system and setting up a local copy of the website to test your changes.
Following feedback from our members that the docs were hard to edit and difficult for new people to use, we decided to move to a different system.
This Bookstack Wiki site allows easy editing from any device with a simple to use interface.
Anyone can make an account and contribute to the side, no web design or coding experience required. Please see How to edit the Wiki for step by step instructions.
The Wiki also has an audit log, allow previous revisions and changes to be seen, managed and rolled back to if required.
The goal of this change is to encourage more engagement and frequent updates to our documentation by making editing and updating them easier for anyone to do.
How you can contribute:
We welcome both NYC Mesh volunteers and non-volunteers to help us keep our wiki up to date and add new pages. Editing is open to anyone who registers an account, all you need to do is provide your email address. (We won't send you anything, it's only used to log into the wiki)
To learn how to edit the wiki, please see How to Edit the Wiki.
If you find errors you aren't able to fix yourself or have other suggestions about the wiki in general, please provide your feedback in the #wiki channel on slack.
How to Edit the Wiki
How to create an account:
The first step to being able to edit the wiki is to create an account. We require all editors to have an account to be able to track changes and to avoid spam and malicious edits. Creating an account is easy and only requires your email.
(Your email is only used to verify and log you into your account. We won't send you any other emails)
Step 1:
Click "Sign Up" in the top right corner of the screen.

Step 2:
Enter your name, email and create a password for your account.

Once you click "Create Account" you will automatically be signed in to your new account.
How to create a new page:

Step 2: From the right hand menu select "New Page".

Step 3: Edit the page and select "Save Page" from the right hand menu.

If you aren't ready to post the page yet, you can click "Save Draft" to save a draft of the page for you to come back to later.
(This is also useful when making edits to an existing page.)

How to edit pages:
Editing pages is done in the same way as creating a new page. Visit the page you'd like to change and click "Edit Page".

Reorganizing (moving) pages:
Pages can be moved individually by click "Move" on the right sidebar.
This will open a menu where you select the new location for the page.
Adding attachments
Only logged in Editors can add attachments.
Click the paper clip icon on the right menu in edit mode:

Click "Upload File":

Once the file is uploaded click the link button to add a link to the current page:

Bookstack wiki tips
- Enable keyboard shortcuts (ex. press "e" to edit page):
- click profile dropdown on upper right
- click shortcuts
- click checkbox to enable shortcuts
Connection Troubleshooting
This guide is intended for older hardware with custom mesh software that we no longer use. It is not applicable to the RouterOS software that is currently in use by the majority of nodes.
This page should be updated to cover troubleshooting and watchdog configuration for RouterOS
Wireless networks have a bit of a reputation for instability. Modern hardware has fixed most hardware problems, but there is work that needs to be done to make the firmware reliable. You can do this with "watchdog" scripts. I haven't had to reboot a router that is running our watchdog script.
Our firmware image (based on qMp) comes with a "bmx6health" script that checks whether the mesh software is running correctly and restarts it if necessary. This script by default runs once per day. I've found it better to run this every 5 minutes. You can do this by editing the crontab-
ssh into the router and in the terminal-
crontab -e
This opens a vi editor and you can change or add different scripts to run at different times. (The vi commands you need are "i" to insert, "esc" to stop editing, and ":x" to save and eXit.)
For some nodes, their main purpose is to be an internet gateway. To ensure that they always try to be online, you can add a watchdog script that pings a known website and calls "network restart" if it fails. These kind of scripts often ping 8.8.8.8, which is Google's DNS server.
I've discovered 3 ways to recover a qMp mesh router that has functioning wifi but has lost internet- network restart, bmx6 restart and restarting dnsmasq-killall dnsmasq; dnsmasq start. Sometimes the dns forwarder, dnsmasq will stop working correctly letting you ping some things and not others. dnsmasq will then forward bad dns info to the other routers too so it needs to be fixed quickly! killall dnsmasq; dnsmasq start will fix it.
gwck is a qMp utility that is restarted after network restart.
Another problem I've had occasionally is that the wifi will lose connections. Even though the radio is on and the router lights are normal you can't connect. I've written a simple script to restart wifi if both the ad-hoc and access point interfaces have no connections. It is a bit of a hack since the interface may be ok, but since nothing is connected via wifi it doesn't hurt too much to restart it. I've also found that a network restart is necessary to make the wifi stable.
By default wlan0 is the ad-hoc interface that is used to mesh the routers and wlan0ap is the access point. This script checks to see the number of wireless interfaces so it works with dual-band routers and routers that are only ad-hoc or ap.
I'm using "Signal: unknown" to show there is no connection. It seems to work reliably. You could also try iwinfo wlan0 assoclist.
"sleep 5" is usual between "wifi down" and "wifi up". I've found it not necessary when there are no connections, but I'll leave it there in case.
You can download the watchdog here
in the terminal-
vi /root/mesh-watchdog.sh
and paste this:
#!/bin/sh
# mesh-watchdog v1.1.1, NYC Mesh, Brian Hall
restartWifi()
{
wifi down
sleep 5
wifi up
}
restartNetwork()
{
/etc/init.d/network restart
if /etc/init.d/gwck enabled; then
/etc/init.d/gwck restart
fi
/etc/init.d/bmx6 restart
sleep 4
killall dnsmasq
/etc/init.d/dnsmasq start
}
#gets date-time from log and exit if recently run. date-time is first two words of last line
exitIfRecentRestart()
{
if [ -e $LOG ]; then
set -- `tail -1 $LOG`
LASTRUN=`date --date="$1 $2" +%s`
if [ "$?" = "0" ]; then
#don't run for 1200s (20 minutes)
NEXTRUN=$(($LASTRUN + 1200))
NOW=`date +%s`
es=$(($NOW - $LASTRUN))
printf "time since last restartNetwork: "
printf '%dd %dh:%dm:%ds\n' $(($es/86400)) $(($es%86400/3600)) $(($es%3600/60)) $(($es%60))
if [ $NOW -lt $NEXTRUN ]; then
echo "waiting $(($NEXTRUN - $NOW)) seconds, use option -f to force"
exit 1
else
echo "run tests-"
fi
else
echo "invalid date from log, run tests-"
fi
else
echo "no log, run tests-"
fi
}
LOG="/tmp/log/mesh-watchdog.log"
FORCE=0
if [ "$1" = "-n" ]; then
echo "restartNetwork"
restartNetwork
exit 1
elif [ "$1" = "-f" ]; then
echo "force tests-"
FORCE=1
elif [ "$1" = "-w" ]; then
echo "restartWifi"
restartWifi
exit 1
elif [ "$1" = "-b" ]; then
echo "restart wifi, wait, restart network"
restartWifi; wait 60; restartNetwork
exit 1
elif [ "$1" != "" ]; then
echo -e "Usage: `basename $0` [OPTION]\n\nTests wifi and internet connections and restarts if necessary (default)\n\n\t-f\tforce test\n\t-n\trestart network\n\t-w\trestart wifi\n\t-b\trestart both wifi and network\n\t-h\toptions\n"
exit 1
fi
if [ $FORCE != 1 ]; then
exitIfRecentRestart
fi
DATE=`date +%Y-%m-%d\ %H:%M:%S`
IWINFO=`iwinfo`
# find lines containing "ESSID"|get name (previous word)|replace return with ","
WI=`echo "$IWINFO" | grep ESSID | grep -Eo '^[^ ]+' | sed ':a;N;$!ba;s/\n/, /g`
# count the number of wlan interfaces, and number of wlans with 'no signal'
WLAN=`echo "$WI" | wc -w`
NOSIGNAL=`echo "$IWINFO" | grep 'Signal: unknown' | wc -l`
if [ $WLAN -eq 0 ]; then
echo "no wlan interfaces, wifi is probably disabled"
elif [ $WLAN -eq $NOSIGNAL ]; then
# all wlan interfaces are down, so restart wifi
echo "$DATE restart wifi- wlans:$WLAN no-signal:$NOSIGNAL interfaces:$WI" | tee -a $LOG
restartWifi
sleep 60
restartNetwork
exit 1
else
echo "wifi:ok wlans:$WLAN no-signal:$NOSIGNAL interfaces:$WI"
fi
# restart network if ping google.com && 8.8.8.8 fails 4 times
count=1
while [ "$count" -le 4 ]
do
if /bin/ping -c 1 google.com >/dev/null && /bin/ping -c 1 8.8.8.8 >/dev/null; then
echo "wan:ok ping-count:$count"
exit 0
fi
let count++
done
echo "$DATE network restart" | tee -a $LOG
restartNetwork
Make it executable-
chmod +x /root/mesh-watchdog.sh
Afterwards, add the following entry with crontab -e
* * * * * /root/mesh-watchdog.sh
It can run once a minute as it detects whether a network restart has just occurred and will wait 20 minutes before restarting again. I added the 20 minute delay so the router is still functional without an internet gateway.
Thanks to Nitin for help with the wifi problem and Zach for help with dnsmasq.
Email me if you have any questions or suggestions.
Jon (SN3 Dev Box)
Jon is a HP ProLiant DL380p Gen 8 server running the proxmox virtual environment. Mesh service owners can use Jon to run VMs and LXC to host their mesh services. Jon is physically located in the DataVerge data center, network number 713 (SN3).
Jon was graciously donated to the mesh by Willard.
Hardware
- HP ProLiant DL380p Gen 8
- Dual Xeon E5-3670V2
- 128GB of DDR3 ECC memory
- 5x 2TB 3.5" SAS Drives
How It Works
Getting Access
Access can be requested from Willard.
How To Provide Access
The root password should not be shared. Instead, user accounts can be created for each user.
TBD
Resource Pools
Resource pools must be used to group resources. They can be used for easily providing permissions as well as organize resources that belong to a given service.
Tagging
Resources must be tagged to the owner(s) and service. Un-tagged resources are subject to automatic removal.
| Tag Name | Tag Type | Description |
| jameso | Person | Maintained by James |
| meshdbdev | Service | Maintained by to the meshdb project |
| soc |
Service |
Maintained by the MeshDB SOC (a.k.a. James) |
| willard |
Person |
Maintained by Willard |
Available Images
Save future you some time by using a cloud image. This will give you a pre-provisioned linux system without needing to go through the installer. When using these, remember:
- Do not start the template image, this will break it
- When cloning any template image, make sure that "Mode" is "Full Clone" NOT A "Linked Clone"
How debian-cloud (5001) was setup
If you are doing this yourself, you'll need to pick a number in the 5XXX range that is not already taken.
- Get the cloud image, add the guest agent. You may need libguestfs-tools
wget https://cloud.debian.org/images/cloud/bookworm/20240429-1732/debian-12-generic-amd64-20240429-1732.tar.xz tar -xf debian-12-generic-amd64-20240429-1732.tar.xz virt-customize -a disk.raw --install qemu-guest-agent - scp the modified image to jon
scp disk.raw root@10.70.90.52:/root/debian-12-generic-amd64-20240429-1732-qemu-guest-agent.raw - On jon, create a template VM and import the image
qm create 5001 --memory 2048 --core 2 --name debian-cloud --net0 virtio,bridge=vmbr0 qm importdisk 5001 debian-12-generic-amd64-20240429-1732-qemu-guest-agent.raw local-lvm qm set 5001 --scsihw virtio-scsi-pci --scsi0 local-lvm:vm-5001-disk-0 qm set 5001 --ide2 local-lvm:cloudinit qm set 5001 --boot c --bootdisk scsi0 qm set 5001 --serial0 socket --vga serial0 qm set 5001 --ipconfig0 ip=dhcp qm set 5001 --agent 1 qm template 5001 - Find the VM (5001) in the proxmox UI. Look review configuration.
Using debian-cloud (5001)
- Log into proxmox
- Right click VM 5001 and click "Clone"
- Make sure you use "Full Clone"
- In you clone, go to "Cloud-Init" and set the username, password and/or ssh key
- Make sure the disk size is large enough for your needs
- Start the VM, give it a few minutes to go through the cloud-init process and update packages.
- Do something great for the mesh!
Grafana Monitoring
Services
Grafana
- URL: http://10.70.90.82:3000/
- Contents: Dashboards
Prometheus
- URL: http://10.70.90.82:9090
- Contents: Main hub data
- Datesource name: Prometheus
Updating SNMP Data Scraper
- Enable SNMP on the device
- login to RouterOS with the device IP
- in webfig go to IP>SNMP and enable
- save
- in quick set note the router ID
- Update Prometheus config
ssh root@10.70.90.82nano /opt/prometheus-2.39.1.linux-amd64/prometheus.yml- add IP for device at the end and use router ID from above in the comments
- save the file
systemctl restart prometheus.service- if anything is unclear feel free to look at the command history with the
historycommand
- Update Grafana
- Go to a Grafana page where you want to add the new panel, ex. http://10.70.90.82:3000/d/EfHFIMWSz/nostrand-5283?orgId=1
- login with standard password
- duplicate panel
- right click panel header > more > duplicate
- right click panel header > more > duplicate
- rename using router id above
- replace the IP
- not all devices have the same metrics, so you may have to select a different one
- Make sure to save the dashboard!
- If everything worked you should see data
Prometheus-1
- URL: http://10.70.76.98:9090
- Contents: Omni data
- Datesource name: Prometheus-1
OSPF Data API
bird? Look no further than the OSPF JSON API:> curl http://api.andrew.mesh/api/v1/ospf/linkdb {"areas": {"0.0.0.0": {"routers": ... }}}
Data Available
The full state of the entire OSPF network on the mesh is available via this endpoint. The format is as follows:
{
"areas": {
"0.0.0.0": {
"routers": {
"<router_id>": {
"links": {
"router": [
{"id": "<other router id>", "metric": <integer link cost>},
{"id": "<other router id>", "metric": <integer link cost>, "via": "<another router id>"},
...
],
"external": [
{"id": "<external CIDR>", "metric": <integer link cost>},
...
],
"stubnet": [
{"id": "<stubnet CIDR>", "metric": <integer link cost>},
...
],
"network": [
{"id": "<network CIDR>", "metric": <integer link cost>},
{"id": "<network CIDR>", "metric2": <integer link cost>},
...
]
}
},
...
},
"networks": {
"<network CDIR>": {
"dr": "<router id>",
"routers": [
"<router id>",
...
]
},
...
},
}
},
"updated": <integer epoch timestamp>
}For each router, you can see the OSPF links it is advertising, and which type of link they are. Some links have a metric2 value instead of a metric value. This represents a semantically meaningful difference in that router's configuration and the OSPF behavior for that node, but one that is is beyond the scope of this document to explain.
Update Frequency
The server refreshes the JSON data blob once per minute, see the updated field in the top-level JSON object to confirm data freshness.
Authentication
None. This data is publicly available to any OSPF node, so no authentication is needed when accessing from the mesh private IP space.
Source Code?
Contact
The OSPF data API is maintained by Andrew Dickinson. Reach out to @Andrew Dickinson on slack for questions and comments. I'd love to see what you build.
Overview
This page intends to list the services "hosted" on NYC Mesh and available directly to NYC Mesh members. Some may be available only to NYC Mesh members while some may as well be available from the Internet via a Public IP address (or through Public DNS)
They are different type of services. Some are network specific or meant for devices, such as DNS or NTP, others are more people oriented such as an email server or video chat server.
If you do host a service that you would like to make available to the Mesh Community please let us know so we can add it here.
You can also discuss services on our slack channel #mesh-services
Network services
Public services
- NYC Mesh Meet by @Zach
- ExcellentFiles by @Eric Zhu.
It is a free file host hosted on sn3. Anyone can get 10G of free storage. It can support around ~25 users for now.
"I choose Nextcloud because it is very user friendly, and there is a nice mobile app, and desktop sync app. I have also enabled contacts + calendar sync. I use it myself coz i want to rely on other services less; to be more autonomous :)"
- Mastodon on @Daniel Heredia's server at SN3, open to all.
- NYC Building KML Tool by @Daniel Heredia, takes two address and uses NYC DCP and DOB databases to create a KML line between the rooftops to determine LoS (code).
Projects Services that are in development...
- Support Bot on Slack to automatically respond to #support channel inquiries
- Chat app by @George on slack
Phone System and Configuration
Call routing and automation flow spanning two third-party services for Voice-over-IP (VoIP) operation from publicly switched telephone network (PSTN) to virtual and physical endpoints.
Call Termination: Google Voice and Callcentric
Background
Early 2022 the 833-NYC-MESH number was parked at NumberBarn until further research could be done on how to implement the number. In the meantime the Google for Nonprofits platform was used to get access to Google Voice for a preliminary IVR/auto-attendant solution for routing calls to particular Google Workspace users and email to Slack for voicemail.
Google Voice does not support porting-in toll-free numbers for terminating calls and thus an external provider must be used in conjunction with the 833-NYC-MESH number. Currently, Callcentric has been chosen as our SIP provider due to widespread adoption, low rates, and positive testimonial, though the features it provides can all be replicated using a SIP Trunk->IP PBX architecture.
Routing
The 833-NYC-MESH number is ported into Callcentric for inbound termination and outbound origination. Currently, the Call Treatments feature forwards all incoming calls to the Google Voice auto-attendant "Hotline - Main", though the beta IVR setup through Callcentric's internal portal is partially configured and can be switched over at any time for testing.

Pricing
After a rigorous cost-benefit analysis on the plans available through Callcentric compared to the cost of expanding the Google Voice service further, multiple scenarios were drawn out to compare the price per a fixed number of minutes per month.
This Google Sheet has the pricing for pay-as-you-go inbound and outbound calls (which results in a double charge due to the forward to the Google Voice Hotline Root is billed as well as the inbound to the toll-free number), the 500-minute package for outbound calls (to eliminate the double charge for forwarding to Google Voice and regular outbound calls, and eliminating forward to Google Voice all together and handle calls entirely internally.
Based on findings after testing the plans and billing behavior in Callcentric, it was determined that the 500-minute package makes the most sense for preserving Google Voice auto-attendant integration while saving a small amount of funds, while switching entirely to Callcentric for IVR handling is most cost-effective, though there are drawbacks to needing to manually configure SIP endpoints for all users (though those endpoints are more flexibly configured than Google Voice Users.
Callcentric Cost Calculator - Google Sheets
Callcentric Inbound/Call Treatments
Call Treatments in this context are practically synonymous with Inbound Routes, which may be more commonly seen in VoIP configuration software. NYC Mesh owns two direct-inbound-dialing (DID) numbers registered with Callcentric, toll-free DID 833-NYC-MESH (18336926374) and local DID 13475147546. For more information about how calls are routed through the Callcentric portal, see this separate page, but this page outlines both currently used and unused options that can and are be used in routing NYC Mesh calls.
Interface

"Treatments"
- 833 to GV: Catches calls coming from the toll-free DID and forwards to the Google Voice "Hotline - Main" auto-attendant.
- 347 Ring Group: Catches calls coming from the local DID and does a simultaneous ring between the Mesh Room desk-phone and the voice@nycmesh.net Google Voice User, which is responsible for voicemail.
- 833 to IVR: Future setup to catch calls coming from the toll-free DID and forwards to the internal IVR: 1 - Main - Language.
- 347 IVR: Testing route to catch calls coming from the local DID and forwards to the internal IVR: 1 - Main - Language. This is not for production use, but to avoid incurring costs when configuring the Callcentric IVR through the toll-free rate plan.
Parameters
The Callcentric-provided documentation can be found here.
The main nuance with the currently-implemented setup is the use of "Ring for (seconds)". In all Treatments and IVRs, any SIP extensions are set to time out at 20 seconds of ringing, while the forward to the Google Voice endpoints is set to 60 seconds of ringing. This is to allow the Google Voice endpoint to connect the call to its voicemail for now.
Callcentric IVR Setup
Callcentric has a built-in IVR utility that allows for practically infinite permutations of menus, auto attendant scripts, and scriptable interactive call flows using Call Treatments. The flow itself can be found here, but this page is solely to contain the scripts for uploaded recordings for all announcement and menu audio files when read through NaturalReader software "Guy Online (Natural) (Free)" voice read at x1 speed extracted using Audacity software using the Windows WASAPI loopback device as an audio recording into a WAV file, which can be easily uploaded through the portal as described below.
Setup

On the left, you can add and configure IVRs and their menu trees which follow the structure and naming convention listed in the below section. On the right, MP3 or WAV audio files below 1Mb can be uploaded to be used within the IVRs. There is a built-in validator to ensure there are audio files in the mandatory places for calls to be handled correctly.

When adding an IVR or clicking "modify" on an existing IVR, the Edit IVR screen will open. On the left, the Announcement Audio selection is for audio files to be played only once when entering the IVR, and the Menu Audio selection is for audio files to be played after the Accountment Audio, and repeatedly after User error events such as timeout or invalid entry. This audio can be controlled in the User error audio selection, which currently only plays a built-in female voice "Sorry".
On the right, there are multiple options to route calls based on user entry, between direct transfers to extensions, sending to other IVRs, or connecting to other menus through a transfer. Depending on the setting of Repeat on error, after the error limit is reached the call will terminate.
Call Tree Key
Audio file names are based off of the menus where they are used, either as a menu option or as an announcement. Files that begin with 0 refer to common elements shared among multiple root hotlines. Items in red are options are either planned but not implemented or ideas pending discussion.
IVRs in the 0 zone:
- 0. a. iv. Common - English - Org Info
Non-Default Parameters: Timeout: 0 sec
Comment: with no Last Route setting configured, the call just drops per the documentation. It would be nice to send this back "up" a menu but unfortunately it doesn't appears that there is any option that allows you to select the previous IVR menu.
Hotline Roots:
- Main - Language (Root Hotline)
a. Main - English - Menu
Non-Default Parameters: Repeat on error: 3, User error audio: Sorry
i. To Get Connected: Simultaneous ringing to Mesh Room and Marco/VM
ii. Tech Support: Single forward to Marco/VM
iii. Buildings Projects Fiber: Single foward to Mesh Room
iiii. Org Info: Special forward to IVR 0.a.iv - Org Info
b. Grand - Spanish- Menu (doesn't exist yet!)
c. Grand - Chinese- Menu (doesn't exist yet!) - Grand - Language (Root Hotline)
a. Grand - English - Menu
Non-Default Parameters: Repeat on error: 3, User error audio: Sorry
i. To Get Connected: Simultaneous ringing to Mesh Room and Marco/VM
ii. Tech Support: Single forward to Marco/VM
iiii. Org Info: Special forward to IVR 0.a.iv - Org Info
b. Grand - Spanish- Menu (doesn't exist yet!)
c. Grand - Chinese- Menu (doesn't exist yet!)
Text-to-Speech Audio Files and Scripts
Comment: The pound keys are not truly configurable in Callcentric, and despite the script advising its use to repeat the menu, it triggers the User error audio and subsequently the Last route if pressed after the third failure, which disconnects the call.
0a - Root - Language - English
To continue in English, press 1.
0ai - Root - English - Get Connected
To get connected to the mesh, press 1.
0aii - Root - English - Tech Support
For technical support, press 2.
0aiv - Root - Org Info
For more information about our organization, press 4.
0aiv - Root - Org Info - Info
NYC Mesh is a community network offering fast, affordable, and fair access to the Internet for all New Yorkers. By joining NYC Mesh, you can access the Internet while helping your neighbors get better and more accessible internet access. NYC Mesh is a neutral network and we do not monitor, collect, or store any user data or content.
For more information about our community network, visit our website at n y c mesh dot net, and find a list of frequently asked questions and answers at n y c mesh dot net slash f a q.
1 - Main - Language - Thank You
Thank you for calling NYC Mesh.
1aiii - Main - English - Buildings Projects Fiber
For buildings, projects, and fiber installs, press 3.
2 - Grand - Thank You
Thank you for calling NYC Mesh at Grand Street Guild.
Incomplete Recordings
The Callcentric call handling only has IVRs with English. The entry points for other languages would be formatting along the lines of the below:
0b - Root - Language - Spanish
0C - Root - Language - Chinese
Security (outdated)
Security
The goal of this document is to provide the most useful information for anyone interested in the security of the network. If there is missing information that would help understand and improve our network, please reach out to contact@nycmesh.net or join our slack.
We are actively looking for ways to improve the security, resiliancy, and ease-of-use of the network to help the widest range of use cases. If you have ideas on how to improve anything, please join our slack
Our current threat landscape is most concerned with in-mesh security - once traffic is routed over an IXP, provider gateway, or peer, its equivalent to what people are used to.
In mesh threats include:
- DoS by announcement of bogus routes
- MiTM attacks on SSL servers using letsencrypt (should be alleviated by multiroute verification if we interconnect in more places)
- Visibility of who you talk to when using unencrypted HTTP, DNS queries, SNI, etc for someone along the route chain
Data
- We do not keep logs of anything in-mesh. However anyone along the route chain could view unencrypted data or metadata (just like any ISP can).
- The organizers of nyc mesh can see a spreadsheet of signup information volunteered by participants on the join nycmesh page (name, email, phone, address all but email are optional)
- We create a map using map-nodes, from the above spreadsheet
Wifi
A typical home install creates two wireless networks - one open 802.11 access point (with a captive portal), and one WPA2 encrypted upstream gateway. You can change the open access point to be encrypted if you wish.
DNS
The default setup routes .mesh tld DNS requests to 10.10.10.10, which is anycast. Multiple people are running our knot-dns setup available on github (including supernode 1 at 10.10.10.11), but a malicious actor that is closer could take advantage of this.
Slack Support Follow Up Bot
Features
-
- ticket created on 1st support thread
- - subject includes “follow-up-bot: ”
- if no slack response - every 48 hr nag up to 3 times and then reopen osticket and email nag with auto-re-close.
Problems to solve
- member has issue that gets forgotten about after reporting on slack thread
- support thread is never responded to by a volunteer
- atypical support threads
- volunteer message to many people
- Is this a community announcement?
- if no or no response, then run support bot
- if no or no response, then run support bot
- Is this a community announcement?
- volunteer message to many people
Complication
- slack threads are not structured causing false positives, identical treatment for different types of threads
- someone responds out of thread
Programming
- need database
- ignore multiple threads
Process
- content matches goes to funnel
- automated follow up after 48 hours
- is issue resolved?
- if no response after 3 cycles then reopen ticket
- reopen in OS ticket and send message and recloses
- false positives
- if yes, then say thank you and do nothing (maybe record analytics somewhere)
- stop nagging
- if no
- should stay in slack
- if no response after 3 cycles then reopen ticket
- is issue resolved?
Diagram
out of date
Software services list
Incomplete list - add your service!
| Name | Purpose | Link | Active? | Maintained by |
| Supportbot | Help diagnose support issues | Yes | Andrew + Andy | |
|
Grafana Private |
http://10.70.90.82:3000/dashboards | Olivier + Andy | ||
|
Millimeter Outages |
On Grafana Private (dashboard link) | Andy Baumgartner | ||
|
Grafana Public |
https://stats.nycmesh.net | Zach | ||
|
Mastodon |
Self hosted Twitter alternative | Yes | Daniel | |
|
Wiki |
Evergreen docs, etc. | Yes | Andy Baumgartner | |
|
UISP |
Manage Ubiquity devices | https://uisp.mesh.nycmesh.net | Yes | Olivier |
| Access OSPF Link DB data without running an OSPF node | http://api.andrew.mesh.nycmesh.net/api/v1/ospf/linkdb | Yes | Andrew Dickinson | |
|
OS Ticket |
Support and install tickets | https://support.nycmesh.net/scp/login.php | Jason | |
|
Node Explorer |
Shows OSPF Graph | http://node-explorer.andrew.mesh.nycmesh.net/explorer | Yes | Andrew Dickinson |
|
Node Impact Analyzer |
Show downstream nodes affected by outage | http://outage-analyzer.andrew.mesh.nycmesh.net/ | Yes | Andrew Dickinson |
|
Contacts Map |
Shows emails of nodes associated with a hub | http://10.70.178.21:5000/ | Yes | Andy Baumgartner |
|
Uptime Kuma |
Monitor Mesh services uptime and alert in slack | http://10.70.178.21:3001/ | Yes | Andy Baumgartner |
|
Status Page |
Mesh Status Page |
http://status.mesh.nycmesh.net |
Yes |
Willard + Andy + Lydon |
|
Zabbix |
Metrics and Alerting |
http://zabbix.mesh.nycmesh.net |
Yes |
Willard |
|
UISP2Zabbix |
UISP -> Zabbix Broker |
zabbix.mesh.nycmesh.net |
Yes |
Willard |
|
OSPF2Zabbix |
OSPF Device Enroller and Noise Report Generator |
zabbix.mesh.nycmesh.net |
Yes |
Willard |
|
Mesh DB |
Database to hold mesh network information | https://db.nycmesh.net/ + related-services | Yes |
Willard + Andrew |
|
Invoice Ninja |
Payments |
https://ninja.nycmesh.net/ | Yes |
|
Wiki (Bookstack)
Bookstack is a user friendly Wiki software which the NYC Mesh Wiki is built on.
MVP Wiki Launch Features
Before the Wiki can be more broadly used (and and possibly replace docs.nycmesh.net) we must add some key features:
Required
- Simple introduction
- Ensure everything a new volunteer/stakeholder would benefit from seeing is linked in the introduction book.
- Hardware page to show extent of documentation and another "book".
- Ensure everything a new volunteer/stakeholder would benefit from seeing is linked in the introduction book.
- Support for old users
- Old to new mapping
- 1. sitemap mapping of old page to new?
- 2. update all docs pages with a link to the wiki equivalent.
- Page redirects on docs
- Old to new mapping
- Full duplicate of docs.nycmesh.net content - to avoid information fragmentation, we should migrate a full copy of all existing docs content
- Merge any dupe Docs and Wiki pages (ex. hubs?)
- Replace high level links to docs (nycmesh.net header "Docs" replaced with "Wiki"
Nice to have
- Mesh hosting - Currently on AWS, but we could move to Mesh hosting fairly easily.
- Mesh LAN based user creation - Ideally a member on the mesh should be allowed to create an editor account without involving admins. This is possible with a custom theme but needs more development. A disabled in-development theme file is included in the themes directory.
Zabbix
Zabbix lives at http://zabbix.mesh.nycmesh.net
Zabbix is used primarily for historical data collection and Slack. There are a handful of dashboards configured for a few devices, but for the most part, the rest of its configuration is unused.
Data Collection
Zabbix is fed through the following sources:
- Data gathered via SNMP from various OSPF devices (mainly OmniTiks) discovered through OSPF2Zabbix
- Data forwarded from the UISP API by UISP2Zabbix
Custom Templates
We have a variety of custom templates, some of which were set up manually at one point, the rest either auto-generated or managed by one of the above tools.
Alerting
The main purpose of Zabbix is Alerting. Alerting can be found in the #zabbix-alerts channel. Alerts need to be tuned to what we really care about, such as the antennas on the larger links.
To make a trigger show up in Slack, add the slack tag to it.
The trigger can be any severity level. By default, many triggers are straight-up disabled. Alerting is, unfortunately, a manual process. We're still figuring out what is important and what isn't.
Weekly reports of noisy triggers are published in #zabbix-reports, where the top 20 noisiest triggers are aggregated. This can help us identify problems over time.
Todos:
- There is a plan to use certain triggers to automatically switch over links. For example, we'd like to disable the AF60xr on Vernon and use a backup link when it rains.
- (Willard): I was working on a service to generate Zabbix templates from MIB files using the Zabbix API. I'd like to tailor it towards specific Ubiquiti devices and use it + the UISP API to discover compatible antennas and use the SNMP data to enrich our DataLink data.
- (Willard): Expand UISP2Zabbix to cover more than just DataLinks. It would be cool to get all kinds of data out of it and into Zabbix for analysis
- (Willard): Problem heatmap. If I could overlay problems on top of Andrew's Node Explorer, we could see problem areas within the mesh.
- (Willard): Integrate Grafana with Zabbix. I know this is possible, the question is what's the best way to do this? And, if we're primarily doing this for UISP, then why not build something that integrates with UISP? (Couldn't be that hard to just query UISP's database directly, right?)
More Info
For (outdated-ish) information on how this was set up, including how Slack alerting was configured, refer to this doc: https://docs.google.com/document/d/1mJI8DWe882P6GCEGdT0xazxwrrCQZD7qEBcsDEjDU7Q/edit?usp=sharing
Website
https://www.nycmesh.net/
Website Update Ideas
Add your website update ideas!
Branding
- Clean but playful design: Incorporate hand drawn graphics using standard Mesh color palette
- Photo integration: show our physical network
- Photos of our diverse member community
- Photo visualization of mesh: like the below example, but with more playful hand draw lines etc. to highlight our community values:

- Clear graphics for most important topics (also good for non English speakers)

Consistency
- avoid repeating information (e.g., the $290 install fee is mentioned on a number of pages, sometimes referred to as a donation and sometimes as an equipment cost). use links to an authoritative page instead, so updates will be reflected.
Interactive interface
Users could benefit from interactive design
- pre-join/new member presentation
- troubleshooting flowchart
- install-team sign-up
Media Ideas
- [add your photo, graphic, video, etc. ideas here!]
MeshDB
MeshDB Schema Design
(updated September 2024 based on schema changes)
Background
MeshDB is an software application which replaces the New Node Responses Google Sheet (the spreadsheet) as the source of truth for NYCMesh member, install, geolocation, device, and connection information via a proper SQL database. It is built in the Django ORM, using Python Model objects to represent underlying database schema structures. In this document, we summarize the database schema and explain a variety of edge case that occur on the mesh, detailing how the edge case is represented under the MeshDB schema
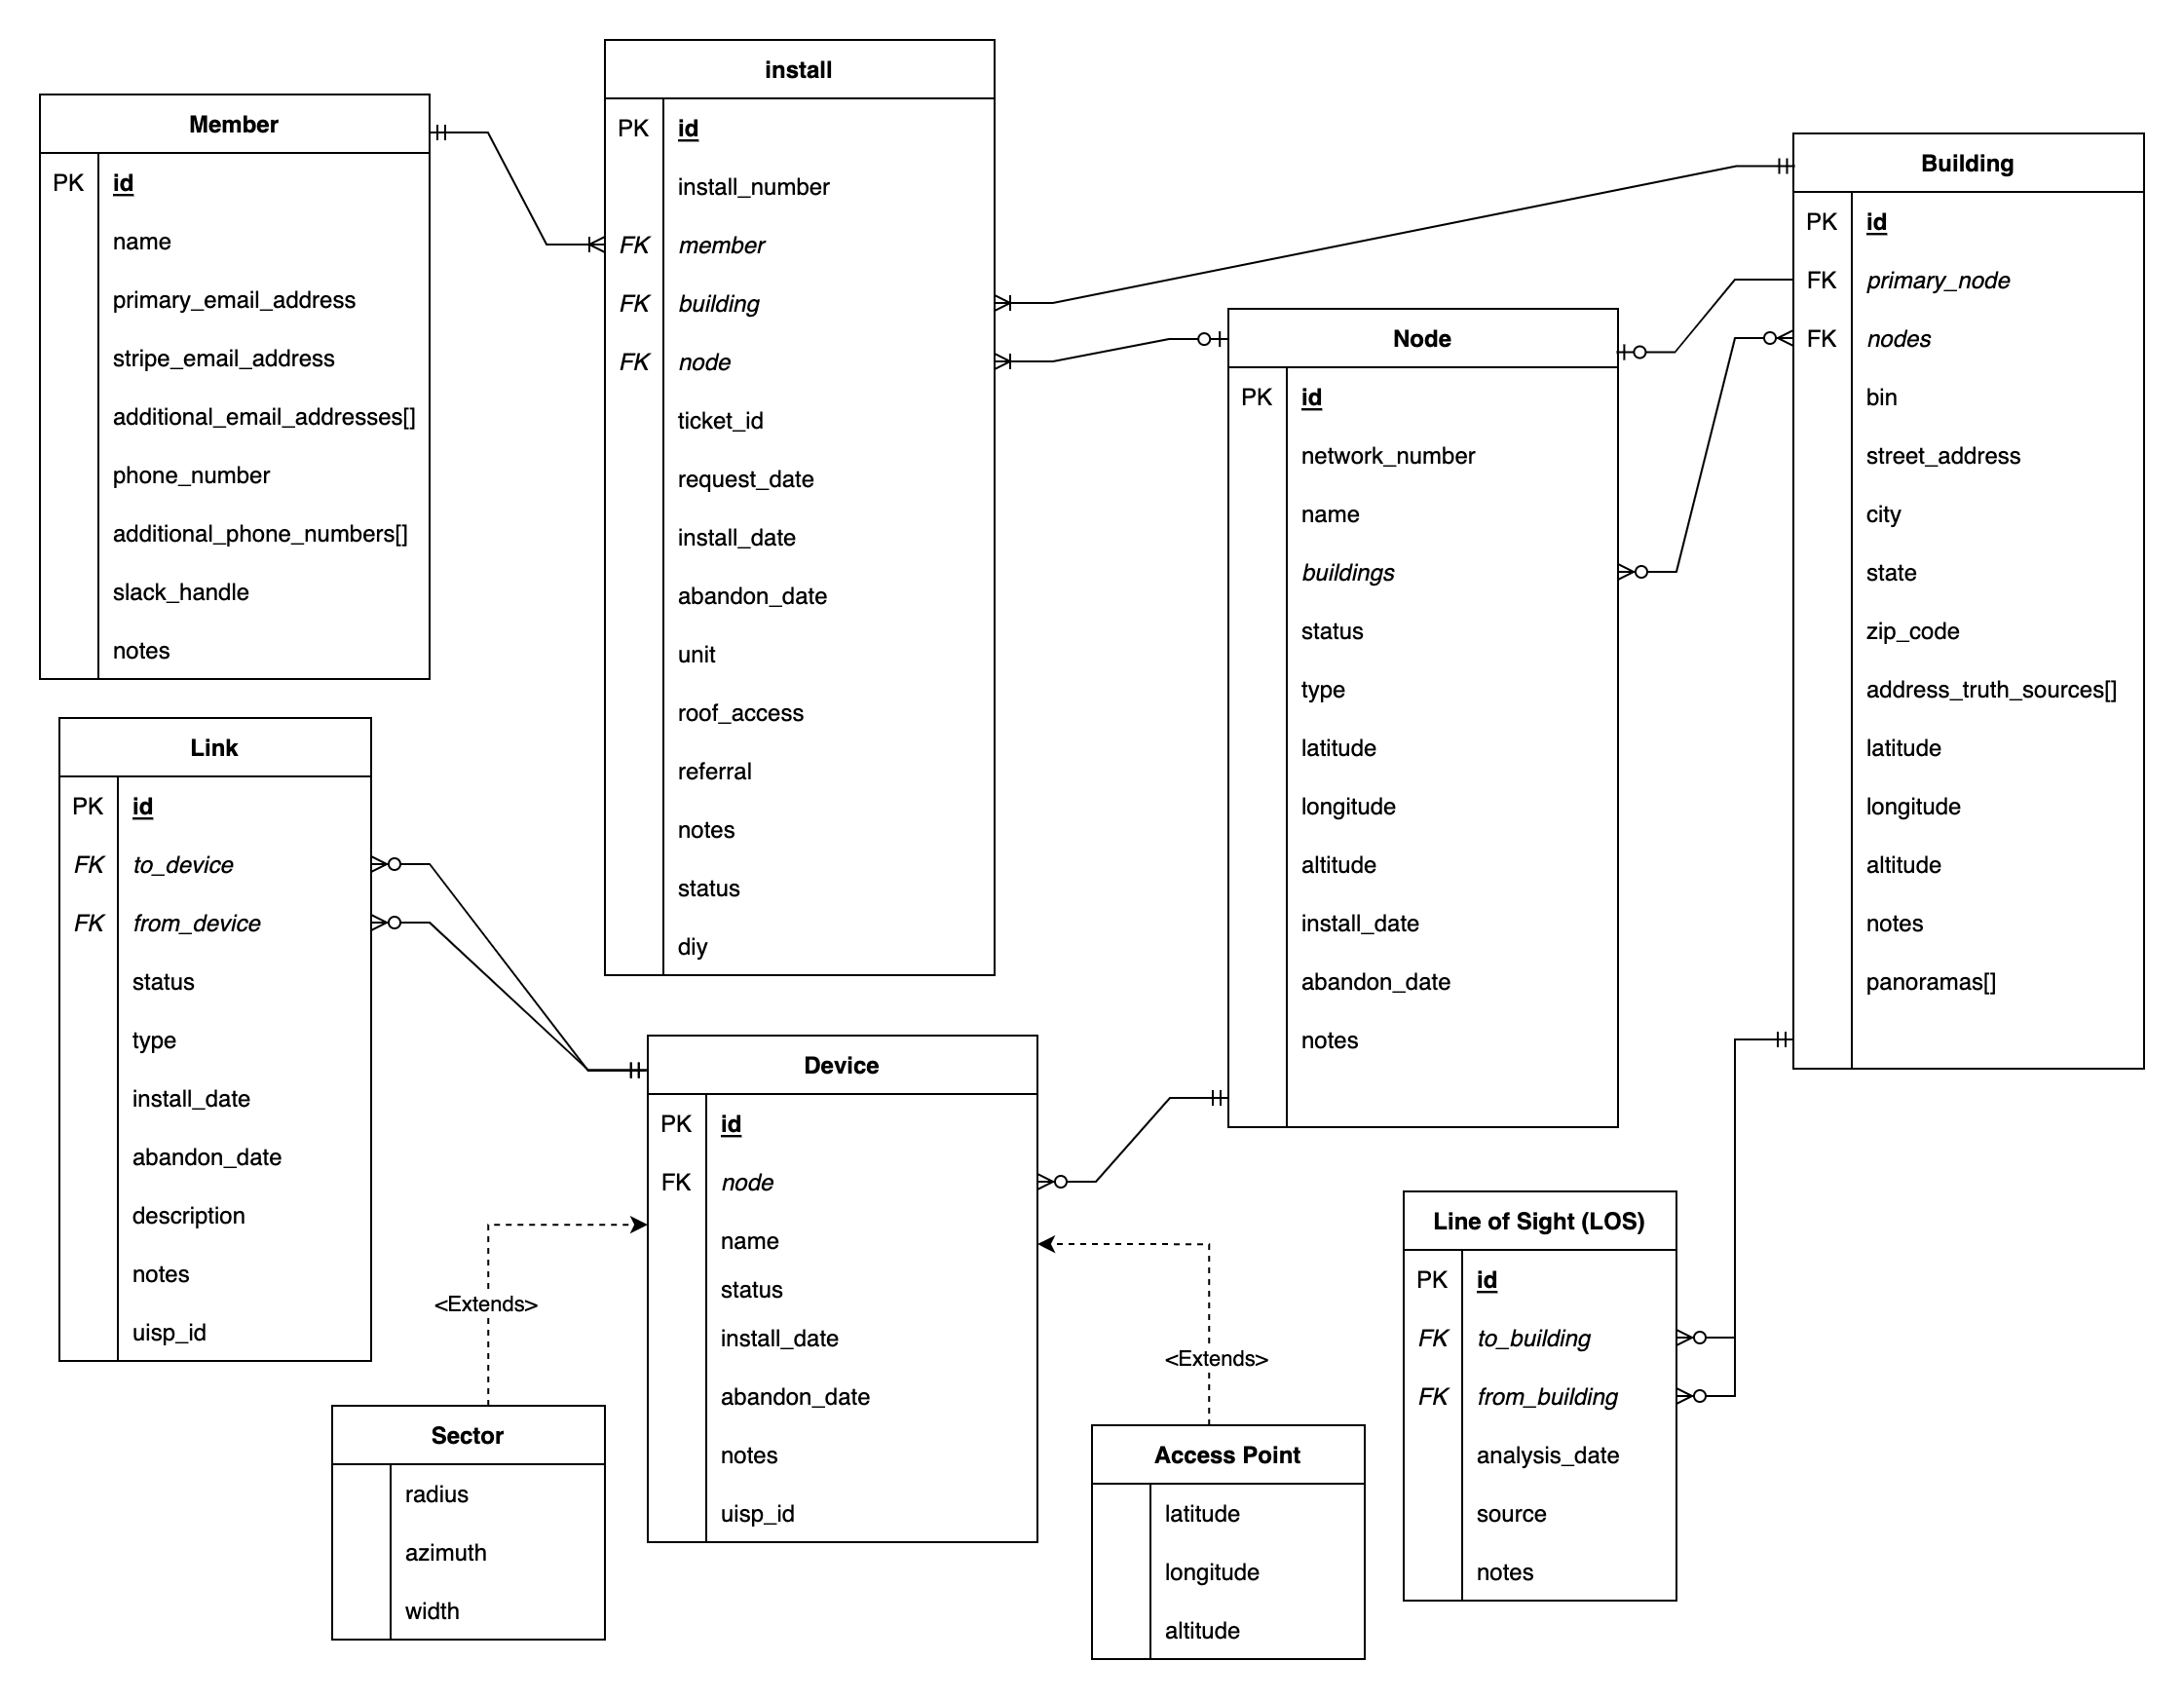
The Schema (simplified)
The following diagram depicts the schema, showing the relationships between models (SQL tables), and some key attributes of each model. For clarity, non-essential attributes are omitted (see appendix A for a comprehensive diagram).
See MeshDB Status Values for more information on the possible values of the status field on each model. An editable copy of all diagrams on this page can be found here
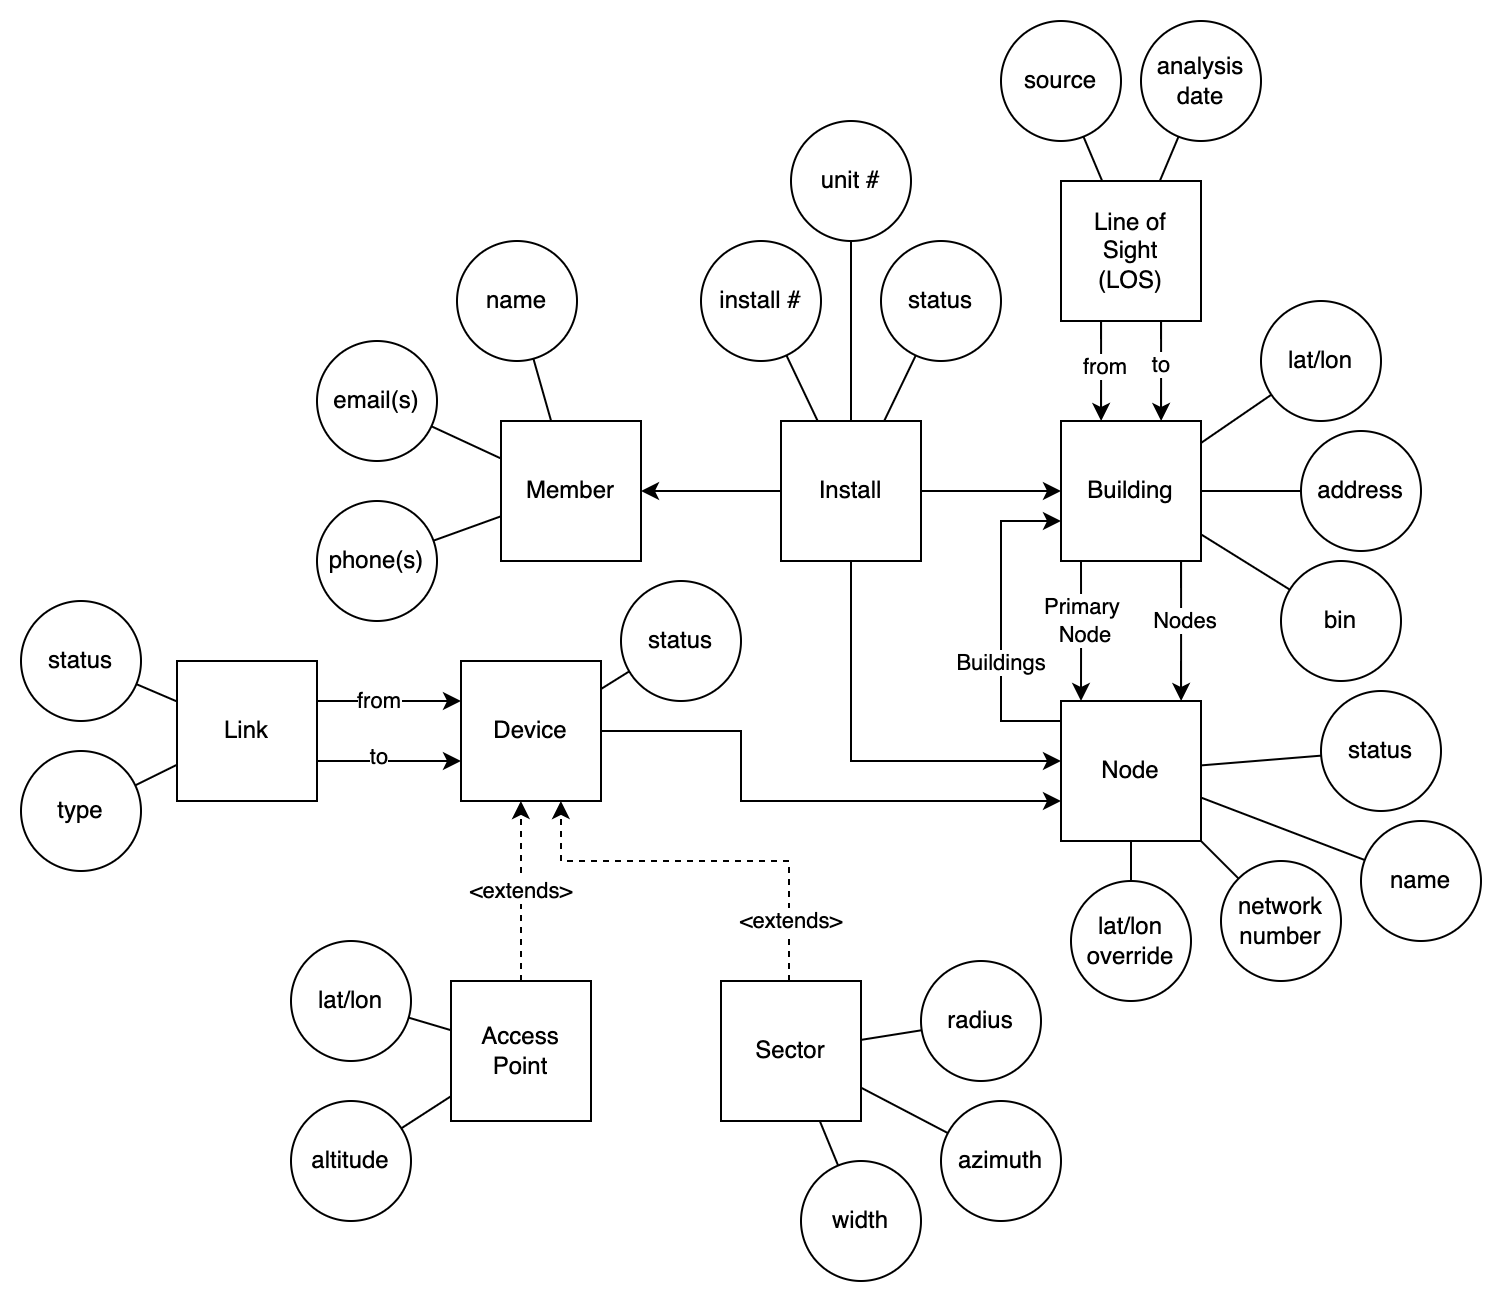
We have the following models:
- Member - Represents a single NYC Mesh Member (even if they have moved between multiple addresses and therefore have multiple installs or "own" multiple active installs ). Tracks their name, email address, and other contact details
- Install - Represents the deployment (or potential deployment) of NYC Mesh connectivity to a single household. This most closely maps to the concept of a row in the spreadsheet. Tracks the unit number of the household, which member lives there, and which building the unit is located within. It also contains an install number, which corresponds to row number on the spreadsheet. With foreign keys to Member, Building, and Node, it acts as the central model, tying most of the schema together. Many objects have a status field, but the install status field maps most closely onto the status tracked in the spreadsheet.
- Building - Represents a location in NYC identified by a single street address (house number and street name). In the case of large physical structures with more than one street address, we will store one Building object for each address that we have received Install requests for. Buildings track a primary node, to represent the "colloquial network number" used by volunteers to describe the site. In the case that a building has more than one network number, the primary node will be set based on the network number that volunteers designate as the “primary” (usually the first assigned, busiest router, etc.)
- Node - Represents the abstract concept of a an NYC Mesh "site". Most closely corresponds to a dot on the map. Most concretely, this refers to a collection of NYC Mesh devices with the same network number. Each node has a single network number. A node can be assigned to multiple "building" objects, in the case that a single device powers multiple adjacent buildings or in the case that a single physical structure has more than one street address.
- Device - Represents a networking device (router, AP, P2P antenna, etc.). Contains a mandatory foreign key to node, which will be set based on the NN of the device, or of the “first hop” router used by this device (for devices like APs which have no NN assigned).
- Sector - A special type of device (using Django Model Inheritance to inherit all fields from device) which adds additional fields related to the display of sector coverage information on the map (azimuth, width, and radius)
- Access Point - A special type of device (using Django Model Inheritance to inherit all fields from device) which adds additional fields related to the display of APs on the map. It contains lat/lon override fields, which can be used to refine the exact location of this device for map display
- Link - A connection between devices, which represents a cable or wireless link, whether directly between the devices or via other antennas not represented with their own device objects
- LOS - Identifies a pair of building objects which can see each other. Renders as a "potential" link on the map display (if not superseded by an active Link object connecting the same dots). This can be populated manually by volunteers, or in the future, automatically by analysis tools
UUID Keys, Omitted Columns & Tables, and State Drift
NB: the examples used in this document reference integer primary and foreign keys. This is for simplicity of understanding only. The real system uses UUID based keys for all tables. For brevity, we also use comma separated foreign keys in place of a join table for the Node <-> Building M2M relationship. We omit tables and columns that are not directly relevant to the edge case (e.g. Member, LOS) but these are likely present in the real dataset. Additionally, these sites may have evolved since this document was written (September 2024). Please use the site descriptions below as the source of truth for the "real world" state of these locations, rather than say, climbing up on a roof and checking for yourself.
Overall, this document is conceptually accurate, but to get the full implementation details for a database migration, code change, etc. please consult the Python model definitions, and the Postgres SQL DDL directly.
Example 1 - NN492 - Typical Multi-Tenant Install

In this simple example, we have two tenants in a single building with a single address, both connected via cables directly to an omni on their shared roof. They are connected to the rest of the mesh via an LBE to Saratoga. The database tables for this scenario look like this:
| Installs | ||
| Install Number | Node | Building |
| 13134 | 492 | 101 |
| 13276 | 492 | 101 |
| Nodes | ||
| Network Number | Buildings | Name |
| 492 | 101 | - |
| Buildings | ||||
| ID | Primary Node | Nodes | Address | BIN |
| 101 | 492 | 492 | 216 Schaefer Street | 3079532 |
| Devices | ||
| ID | Node | Name |
| 101 | 492 | nycmesh-492-omni |
| 102 | 492 | nycmesh-lbe-492 |
| Links | ||
| ID | From Device | To Device |
| 101 | 102 | < saratoga sector device id> |
Example 2 - NN 4734 - Cross-Building Installs

In this example, members in 3 adjacent buildings, each with their own address, are connected via a single omni, with cable runs across the roofs directly to the member’s apartments. They are connected to the rest of the mesh via an mant 802.11 sector at 4507. The database tables for this scenario look like this:
| Installs | ||
| Install Number | Node | Building |
| 4734 | 4734 | 201 |
| 6972 | 4734 | 202 |
| 13663 | 4734 | 203 |
| Nodes | ||
| Network Number | Buildings | Name |
| 4734 | 201, 202, 203 | - |
| Buildings | ||||
| ID | Primary Node | Nodes | Address | BIN |
| 201 | 4734 | 4734 | 31 Clarkson Av | 3115982 |
| 202 | 4734 | 4734 | 25 Clarkson Av | 3115985 |
| 203 | 4734 | 4734 | 27 Clarkson Av | 3115984 |
| Devices | ||
| ID | Node | Name |
| 201 | 4734 | nycmesh-4734-omni |
| Links | ||
| ID | From Device | To Device |
| 201 | 201 | < 4507 sector device id> |
Example 3 - 7th Street (NN 731) - Multiple Omnis on one building

In this example, we have one regular tenant in a single building with a single address. However there is also a rooftop office with its own omni, connected wirelessly to the primary one. They are connected to the rest of the mesh via a GBELR to Grand. The database tables for this scenario look like this:
| Installs | ||
| Install Number | Node | Building |
| 731 | 731 | 301 |
| 12985 | 731 | 301 |
| Nodes | ||
| Network Number | Buildings | Name |
| 731 | 301 | 7th Street |
| 311 | 301 | - |
| Buildings | ||||
| ID | Primary Node | Nodes | Address | BIN |
| 301 | 731 | 731, 311 | 190 East 7th Street | 1086499 |
| Devices | ||
| ID | Node | Name |
| 301 | 731 | nycmesh-731-omni |
| 302 | 311 | nycmesh-311-omni |
| Links | ||
| ID | From Device | To Device |
| 301 | 301 | 302 |
| 302 | 301 | < 1932 sector ID > |
Example 4 - Vernon (NN 5916) - Courtyard APs
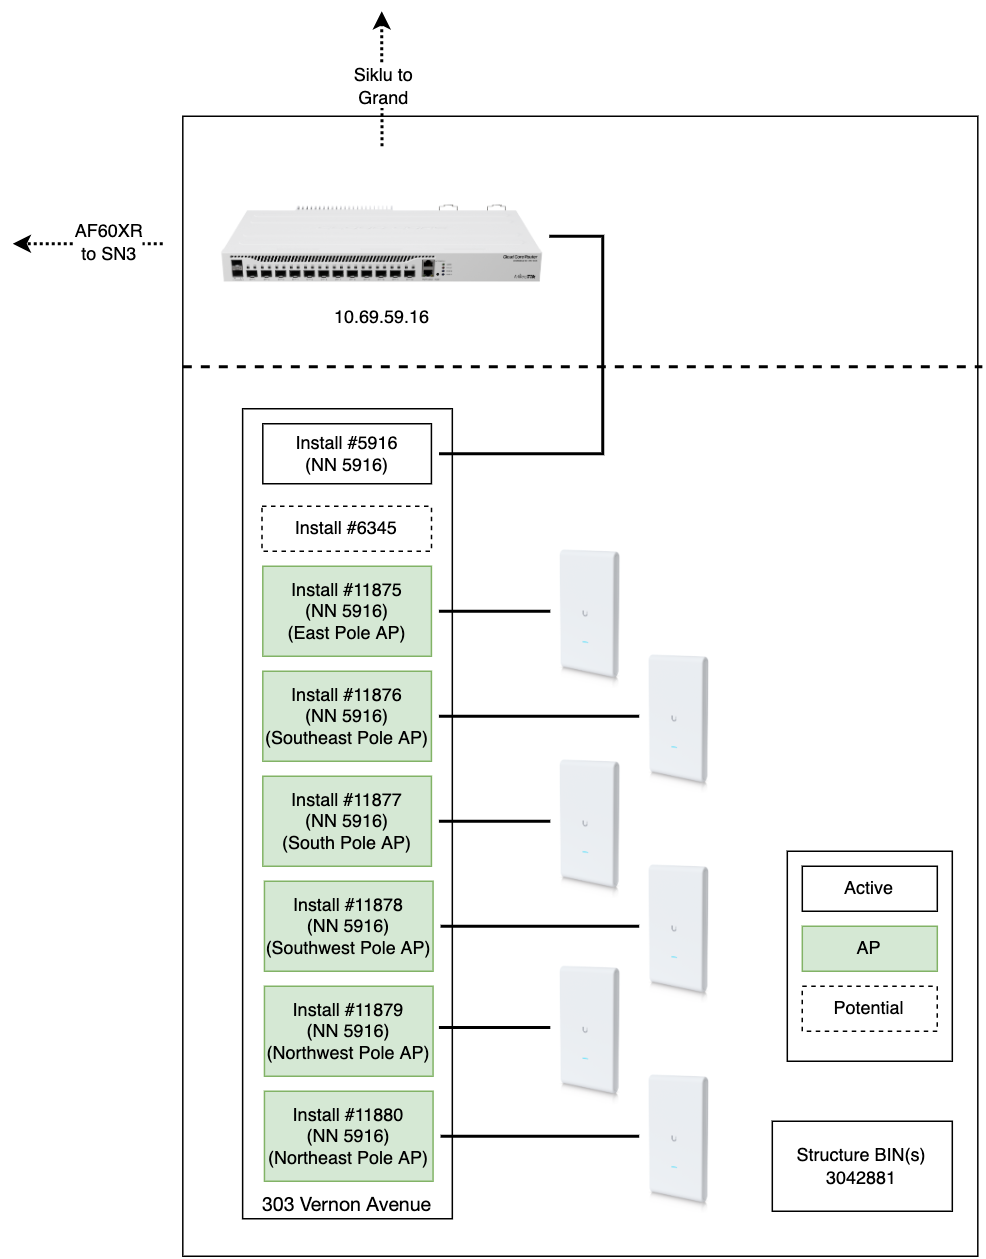
In this example, we have a core hub site in a single building with a single address. However, there are many Access Points (APs) on light poles in the building’s courtyard. These light-poles are unquestionably associated with the same building/address as the core router of this hub, but need to be shown separately on the map.
Here we use the Access Point object to represent each AP, and we use the lat/lon on these rows to specify the location for the map dots. Also, for legacy reasons, the installs for these APs are included from the spreadsheet (but are not needed, the AP devices alone are sufficient)
| Installs | ||
| Install Number | Node | Building |
| 5916 | 5916 | 401 |
| 6345 | 5916 | 401 |
| 11875 | 5916 | 401 |
| 11876 | 5916 | 401 |
| 11877 | 5916 | 401 |
| 11878 | 5916 | 401 |
| 11879 | 5916 | 401 |
| 11880 | 5916 | 401 |
| Nodes | ||
| Network Number | Buildings | Name |
| 5916 | 401 | Vernon |
| Buildings | ||||
| ID | Primary Node | Nodes | Address | BIN |
| 401 | 5916 | 5916 | 303 Vernon Avenue | 3042881 |
| Access Points | |||
| ID | Node | Lat / Lon | Name |
| 400 | 5916 | x, y | nycmesh-5916-gbep1-roof |
| 401 | 5916 | x, y | East AP |
| 402 | 5916 | x, y | Southeast AP |
| 403 | 5916 | x, y | South AP |
| 404 | 5916 | x, y | Southwest AP |
| 405 | 5916 | x, y | Northwest AP |
| 406 | 5916 | x, y | Northeast AP |
| Devices* | ||
| ID | Node | Name |
| 409 | 5916 | nycmesh-5916-eh8010-1934 |
| 410 | 5916 | nycmesh-5916-af60xr-162 |
| < many more devices and sectors going all over Brooklyn > | ||
| Links | ||
| ID | From Device | To Device |
| 401 | 400 | 401 |
| 402 | 401 | 403 |
| 403 | 403 | 404 |
| 404 | 409 | < 1934 Siklu device id > |
| 405 | 401 | < 162 XR device id > |
| < many more links going all over Brooklyn > | ||
*there will actually also be entries for each of the APs in the Devices PostgresSQL table and API responses, but we hide these from the admin UI to reduce confusion
Example 5 - Prospect Heights (NN 3461) - Multiple NNs for one building

In this example, we have a core hub site in a single building with a single address. The primary NN, 3461, also serves a member’s apartment as install #3461. However, there is another apartment which could not due to practical considerations be connected via a cable, and had to be connected via an antenna in their window to a sector on the roof. This antenna needed an NN for configen and naming, and so this building received multiple NNs.
The database tables for this scenario look like this:
| Installs | ||
| Install Number | Node | Building |
| 3461 | 3461 | 501 |
| 3921 | 3461 | 501 |
| 6723 | 6723 | 501 |
| 11024 | 377 | 501 |
| 14399 | 3461 | 501 |
| 14960 | 3461 | 501 |
| Nodes | ||
| Network Number | Buildings | Name |
| 3461 | 501 | Prospect Heights (PH) |
| 6723 | 501 | - |
| 377 | 501 | - |
| Buildings | ||||
| ID | Primary Node | Nodes | Address | BIN |
| 501 | 3461 | 3461, 6723, 377 | 135 Eastern Parkway | 3029628 |
| Devices | ||
| ID | Node | Name |
| 501 | 3461 | nycmesh-3461-core |
| 502 | 3461 | nycmesh-3461-southeast |
| 503 | 3461 | nycmesh-3461-af24-713 |
| 504 | 377 | nycmesh-nsl-377 |
| < many more devices and sectors going all over Brooklyn > | ||
| Links | ||
| ID | From Device | To Device |
| 501 | 502 | 504 |
| 502 | 503 | < SN3 AF24 device ID > |
| < many more devices and sectors going all over Brooklyn > | ||
Example 6 - Jefferson (NN 3606) - Multiple NNs for multiple buildings

In this example, we have a building with 4 addresses and 3 omnis on the roof, each with its own network number. There is no clean mapping between NNs and addresses, since each omni serves installs in multiple buildings. The omni of the primary NN, 3606, provides the uplink to Hex House (NN 1417). There are additional backup links, not shown here for simplicity.
The database tables for this scenario look like this:
| Installs (omitting abandoned & potential for brevity) | ||
| Install Number | Node | Building |
| 3606 | 3606 | 601 |
| 5933 | 5933 | 601 |
| 7177 | 5933 | 601 |
| 8152 | 169 | 601 |
| 8274 | 3606 | 602 |
| 8085 | 169 | 604 |
| Nodes | ||
| Network Number | Buildings | Name |
| 3606 | 601, 602, 603, 604 | Jefferson |
| 5933 | 601, 602, 603, 604 | Jefferson-2 |
| 162 | 601, 602, 603, 604 | Jefferson-3 |
| Buildings | ||||
| ID | Primary Node | Nodes | Address | BIN |
| 601 | 3606 | 3606, 5933, 169 | 476 Jefferson Street | 3819572 |
| 602 | 3606 | 3606, 5933, 169 | 488 Jefferson Street | 3819572 |
| 603 | 3606 | 3606, 5933, 169 | 28 Scott Avenue | 3819572 |
| 604 | 3606 | 3606, 5933, 169 | 16 Cypress Avenue | 3819572 |
| Devices | ||
| ID | Node | Name |
| 601 | 3606 | nycmesh-3606-omni |
| 602 | 3606 | nycmesh-3606-gbelr-1417 |
| 603 | 5933 | nycmesh-5933-omni |
| 604 | 169 | nycmesh-169-omni |
| < additional devices not shown > | ||
| Links | ||
| ID | From Device | To Device |
| 601 | 602 | < 1417 GBELR device ID > |
| 602 | 601 | 603 |
| 603 | 603 | 604 |
| 604 | 604 | 601 |
| < additional links not shown > | ||
Appendix A - Full Schema Diagram
The following is a complete schema diagram, showing all fields (editable version here)
See MeshDB Status Values for more information on the possible values for the status field on each model
MeshDB Status Values
This page lists all the possible values for the status field on each MeshDB database object. For more information about the different tables and their meaning, see MeshDB Schema Design
Node Status
| Value | Description |
| Planned |
A mesh node which has not yet been brought online. This happens commonly when planning for new large hubs, but can apply to smaller installs also. May or may not have a network number assigned. Nodes generated by the NN assignment form start in this status and must be manually marked Active at the time of install |
| Active | A nominally routable network number on the mesh |
| Inactive | A node which was active but is no longer connected to the mesh due to disassembly, abandonment, etc. If a node drops offline for a few days, it does not need to be marked Inactive, but if it is offline for a month or more, or is known to have been taken down, it should be marked Inactive |
Install Status
| Value | Description |
| Request Received | Default status when an install is created. It indicates that the join form has been submitted for the specified unit, but not much more has happened |
| Pending | This install has LOS and an install has been scheduled, or is in the process of getting scheduled. We expect to connect this install in the near future. Installs should not remain in this status longer than 6 months. The NN assignment form automatically transitions installs from "Request Received" to "Pending" when submitted |
| Blocked | We have received some kind of confirmation that the install identified by this row is 1) interested in getting connected and 2) is unable to actually go through with an install. Usually due to a landlord not cooperating |
| Active | A nominally connected unit, with active service |
| Inactive | This is a physically connected unit, with equipment in place but the equipment is not communicating with the mesh. This may be due to a power, cable, or software issue. Installs in this status are expected to reactivate at some point the future. If the install has been physically taken down or completely abandoned, it should be marked as Closed instead If an install drops offline for a few days, it does not need to be marked Inactive, but if it is offline for a month or more, this status is likely appropriate Installs should not remain in this status longer than 2 years |
| Closed | This install request is no longer something we are interested in tracking. This could be because the person communicated disinterest, asked to unsubscribe, gave invalid information in the join form. This status is also used for installs that have been abandoned, or physically taken down, and are not expected to be reactivated This could also be a duplicate of another install request |
| NN Reassigned | A special status for low-numbered installs indicating that this install number has been re-used as a network number for another node and is not safe to use as a network number for this install, should the unit associated with this install seek to get connected |
Link Status
| Value | Description |
| Planned | A future link that might be added to the mesh, if the specified devices are deployed. Does not need to be actively scheduled, but should have some chance at feasibly being completed (don't enter planned links that clearly have no LOS for example) |
| Active | A nominally online link that is able to pass traffic between its specified devices. That does not necessarily mean it is a primary path for any internet traffic (e.g. WDS backup links) |
| Inactive | A link which was active but is no longer able to pass traffic due to disassembly, abandonment, loss of LOS, etc. If a link drops offline for a few days, it does not need to be marked Inactive, but if it is offline for a month or more, or is known to have been taken down, it should be marked Inactive |
Device Status
| Value | Description |
| Planned | A future device that might be added to the mesh. Does not need to be actively scheduled, but should have some chance at feasibly being completed |
| Active | A nominally online device that is reachable on the mesh |
| Inactive | A device which was active but is no longer online due to disassembly, abandonment, power issue, etc. If a device drops offline for a few days, it does not need to be marked Inactive, but if it is offline for a month or more, or is known to have been taken down, it should be marked Inactive |
How to onboard API clients to MeshDB
These instructions are for creating API access for automated systems. For human users, see How to Onboard Users to MeshDB
Adding a new user for an application
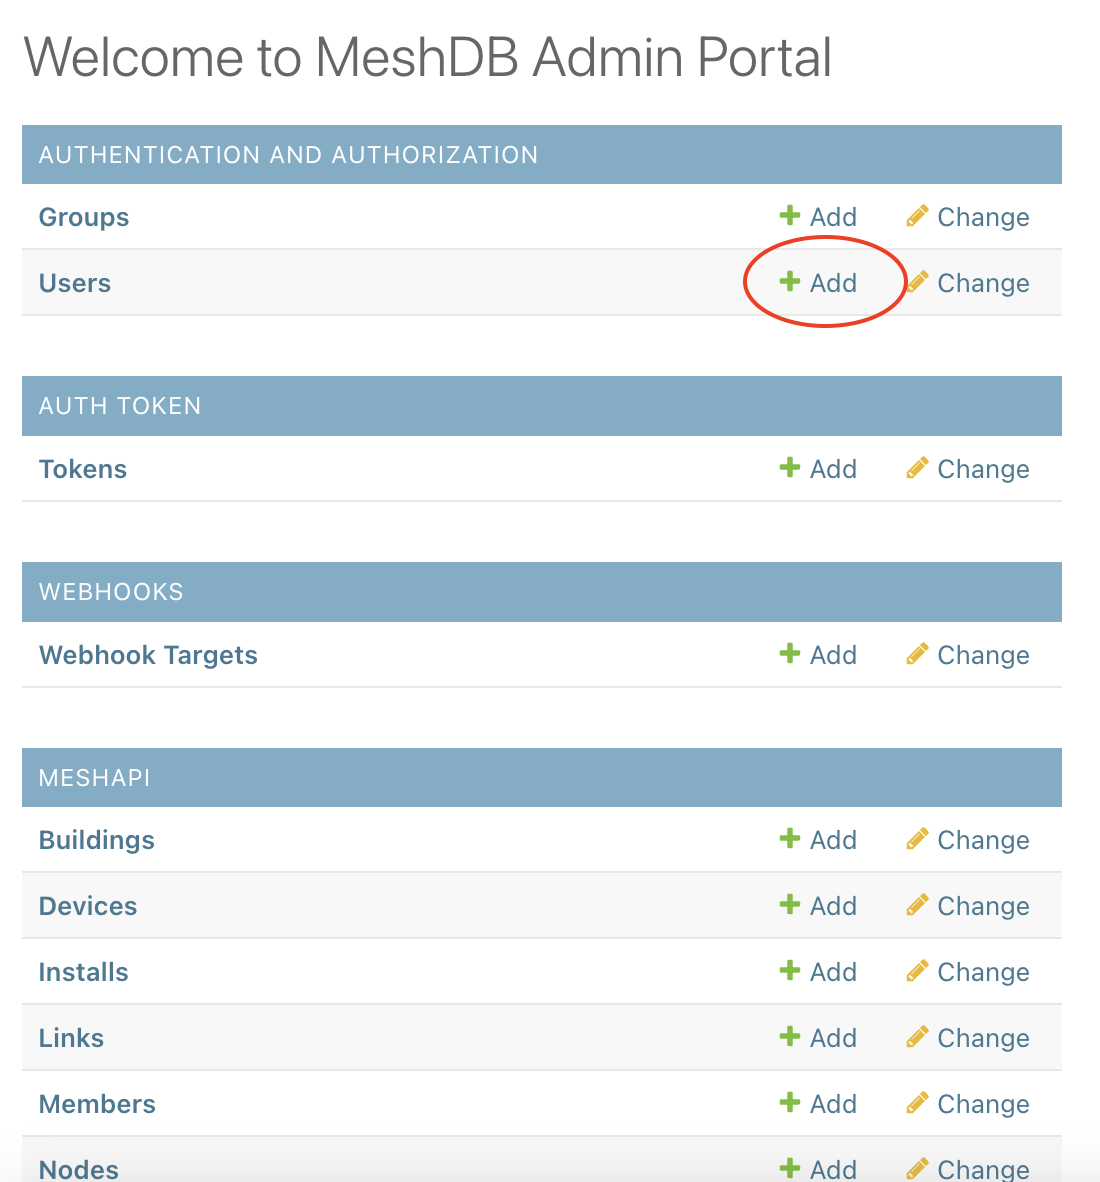
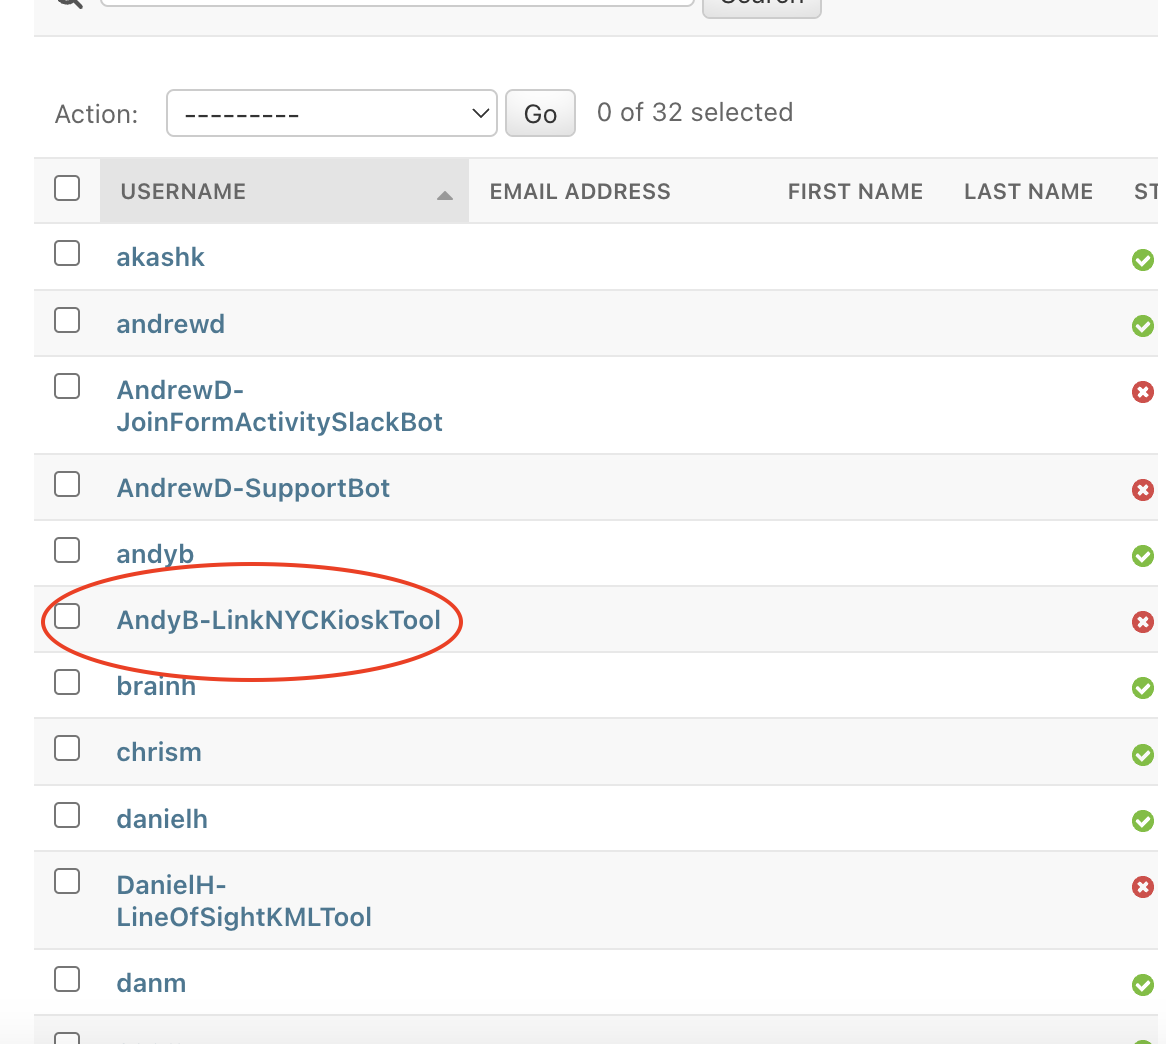
Make a new user specifically for the application, not just the author of the application. For example, if Andy is creating an application to measure member distance to link NYC kiosks, don't create a user called AndyB, create a user called AndyB-LinkNYCKioskTool. For the password, enter something secure, like a random password generated by your browser, but there is no need to save this password, we will use a token to authenticate this user.

Save the user, and then click on the username in the Users list to add the necessary permissions directly on the user object. Do not add the user to any groups. Do not grant the user Staff or Superuser permissions
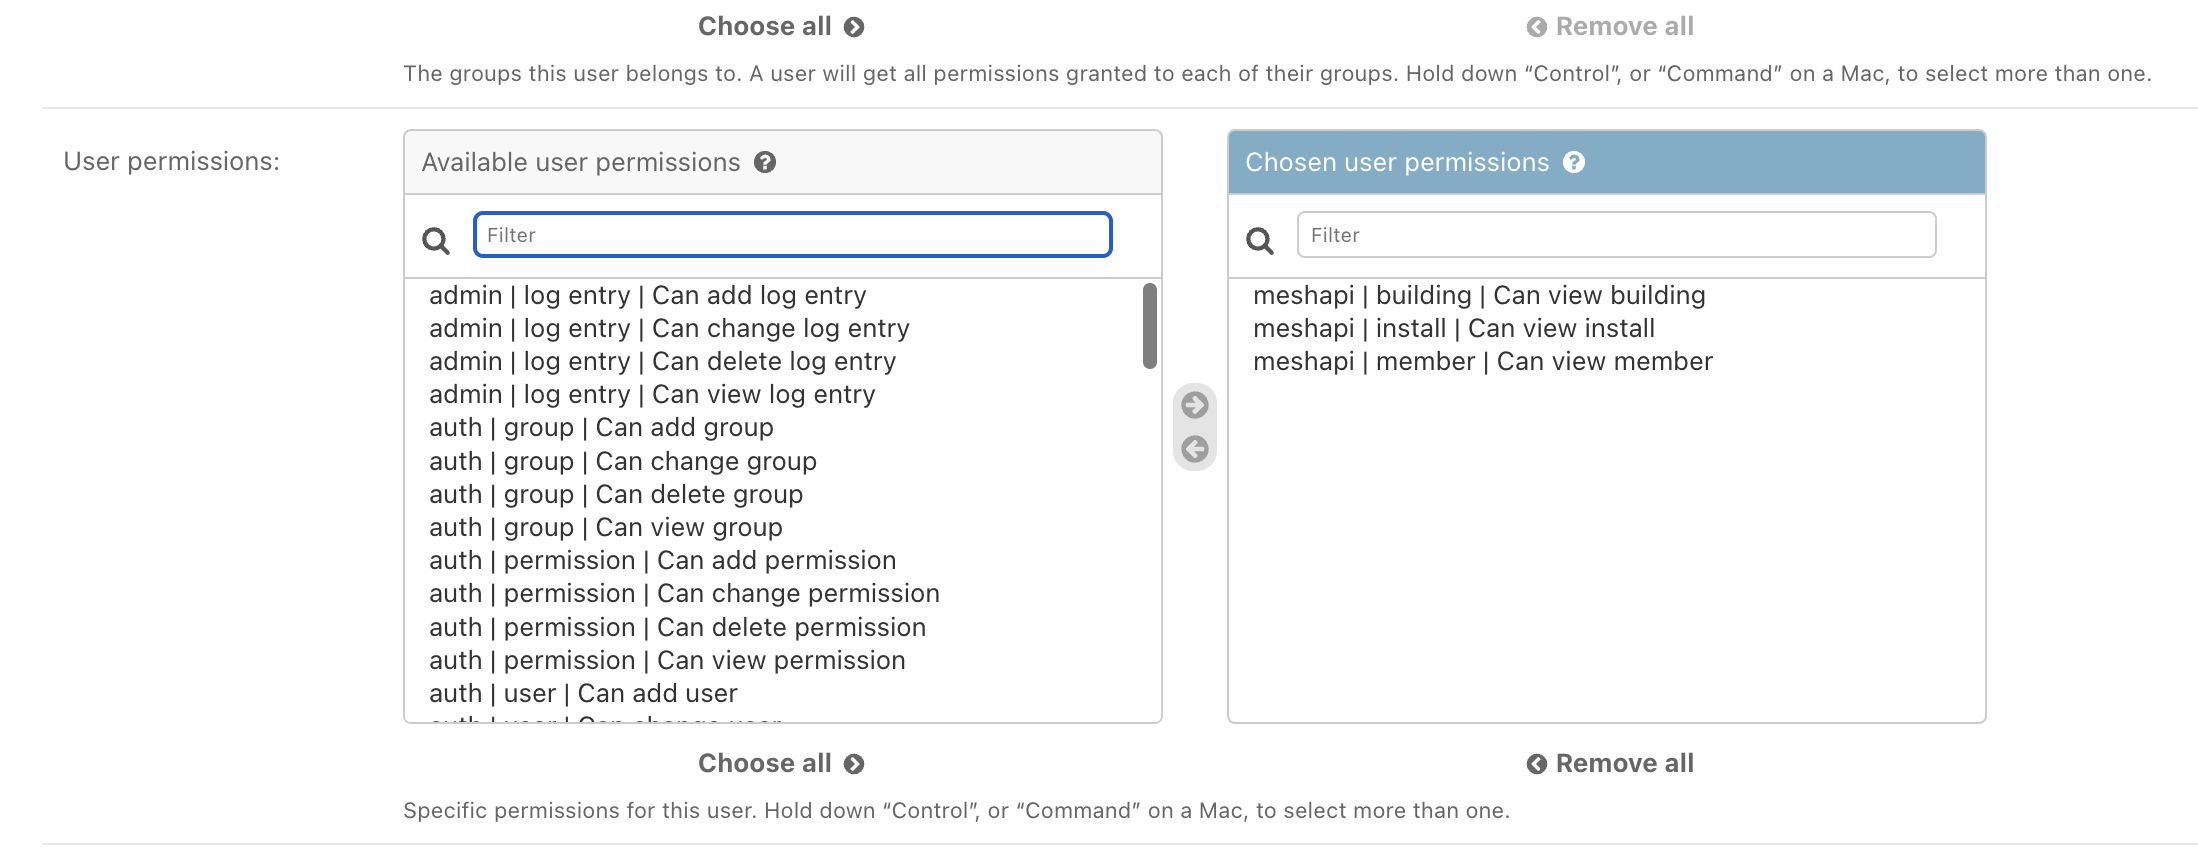
Use the arrows or double click to select permissions from the list of all possible permissions the application could be granted. Most applications do not need change/delete/add permissions. In this example, we grant Andy's tool "view" access to the Install, Building, and Member tables. Save the changes you've made to the user object.
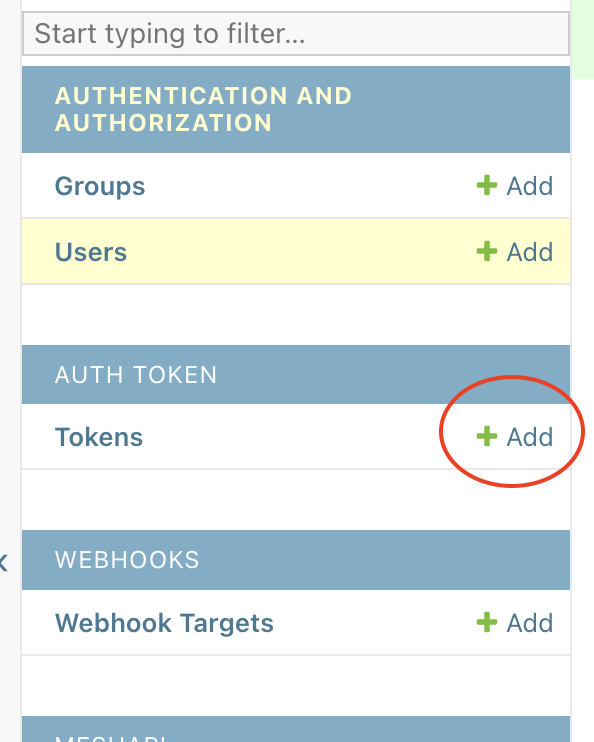
Adding an API token
Follow the instructions under Adding a new user for the application above. Then select "Add" next to Tokens. Select the user you just created in the dropdown provided
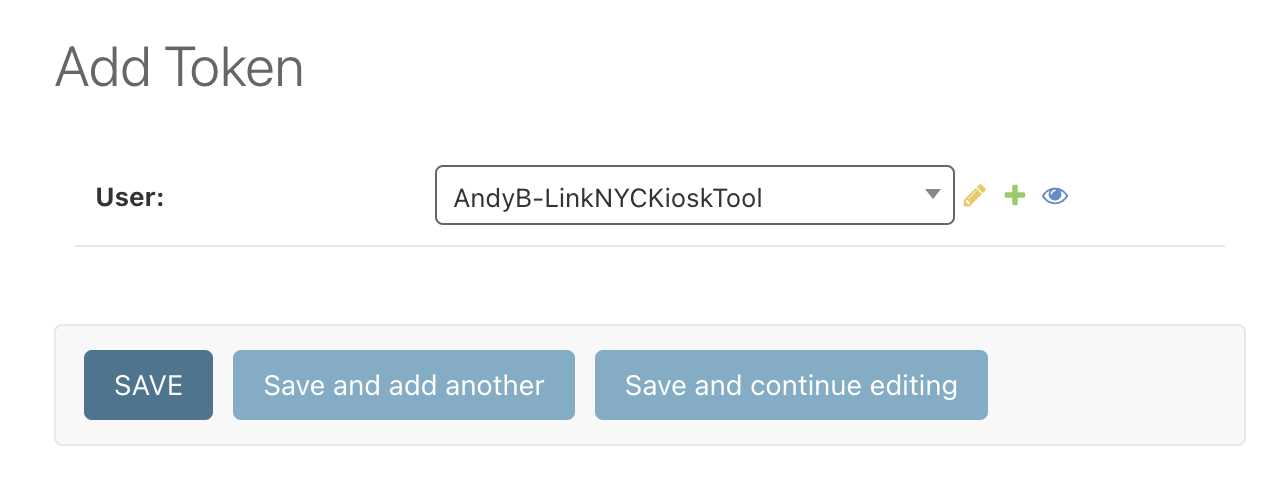
Save the new token, then send it to the author of the application. For more information on using this token to query the API, see the API docs here: https://db.mesh.nycmesh.net/api-docs/swagger/
Adding a new web hook recipient
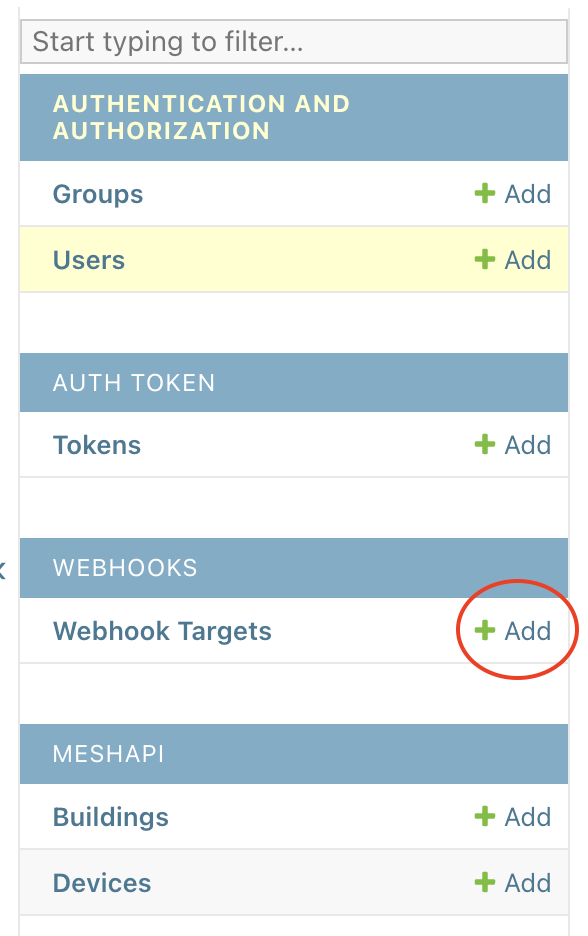
Follow the instructions under Adding a new user for the application above. You may use the same "User" object for both tokens and web hooks if they are for the same application.
Select the "Add" button next to Webhook Targets, then use the magnifying glass icon to select the user you created for this application. Enter the target URL for the notification delivery (will be provided by the application owner). This URL will receive an HTTP POST request every time the selected event is fired.
 .
. 
Select the appropriate event in the dropdown based on the event the application needs to receive, and save. If the application needs to receive more than one event type, add a separate webhook target for each event they need to receive.
How to Onboard Users to MeshDB
These instructions are for creating administrator console access for human users. For automated systems, see How to onboard applications to MeshDB
Adding a new user for admin console access

Every individual person should receive their own unique user object. User objects should not be shared among multiple volunteers. We have established an informal convention of using the volunteer's first name followed by their last initial. For example if the volunteer's name is John Doe, we would create their username as johnd. For the password, enter something secure, like a random password generated by your browser. Save this password and send it to the volunteer over slack (and encourage them to change it immediately using the link in the top right).
Click Save and continue editing to proceed to the full user editor
Here, set the volunteer's first and last name and email (if available). Then enable Staff status, which allows them to log in to the admin site.
Email address is not a required field. However, if you do not set an email address for the user, they will not be able to utilize the "Reset my Password" feature. So it is recommended that you set an email for all users
Finally, you need to add the new user to the appropriate group based on their needed permissions. The following table summarizes the difference in permissions between the various groups:
| Group | Permissions | Example User |
| Read Only | View-only permissions to all MeshDB core data such as Member Contact info, install details, buildings, etc No access to authentication information such as lists of MeshDB users or API tokens |
A junior installer |
| Installer | All permissions from Read Only, plus the ability to edit all MeshDB core data (buildings, install details, member contact info, etc.) but no permission to add or delete these objects No access to authentication information such as lists of MeshDB users or API tokens |
Install leaders |
| Admin | Full access to every table in the the core MeshDB database. Add, Edit, Delete permissions on these tables. Full view access to all tables, including authentication related information: Groups, Users, API Tokens. Ability to create and modify users. No access to modify the underlying structure of groups or add new ones. |
Mesh administrative staff |
| Superuser | Full access to do anything in the application. Bypasses all permissions checks, for safety reasons, this should only be applied to devs working on the maintenance of MeshDB itself The main thing this unlocks is the ability to modify the structure of the group permissions themselves, which should not be done lightly |
MeshDB Core Devs |
Do not grant permissions directly on the user object. Add the user to the appropriate group instead. Since the permissions are cumulative, a user should only need to be in a single group. To reduce confusion, this is strongly recommended.
Add the user to the appropriate group and save
SQL Explorer (formerly PGAdmin)
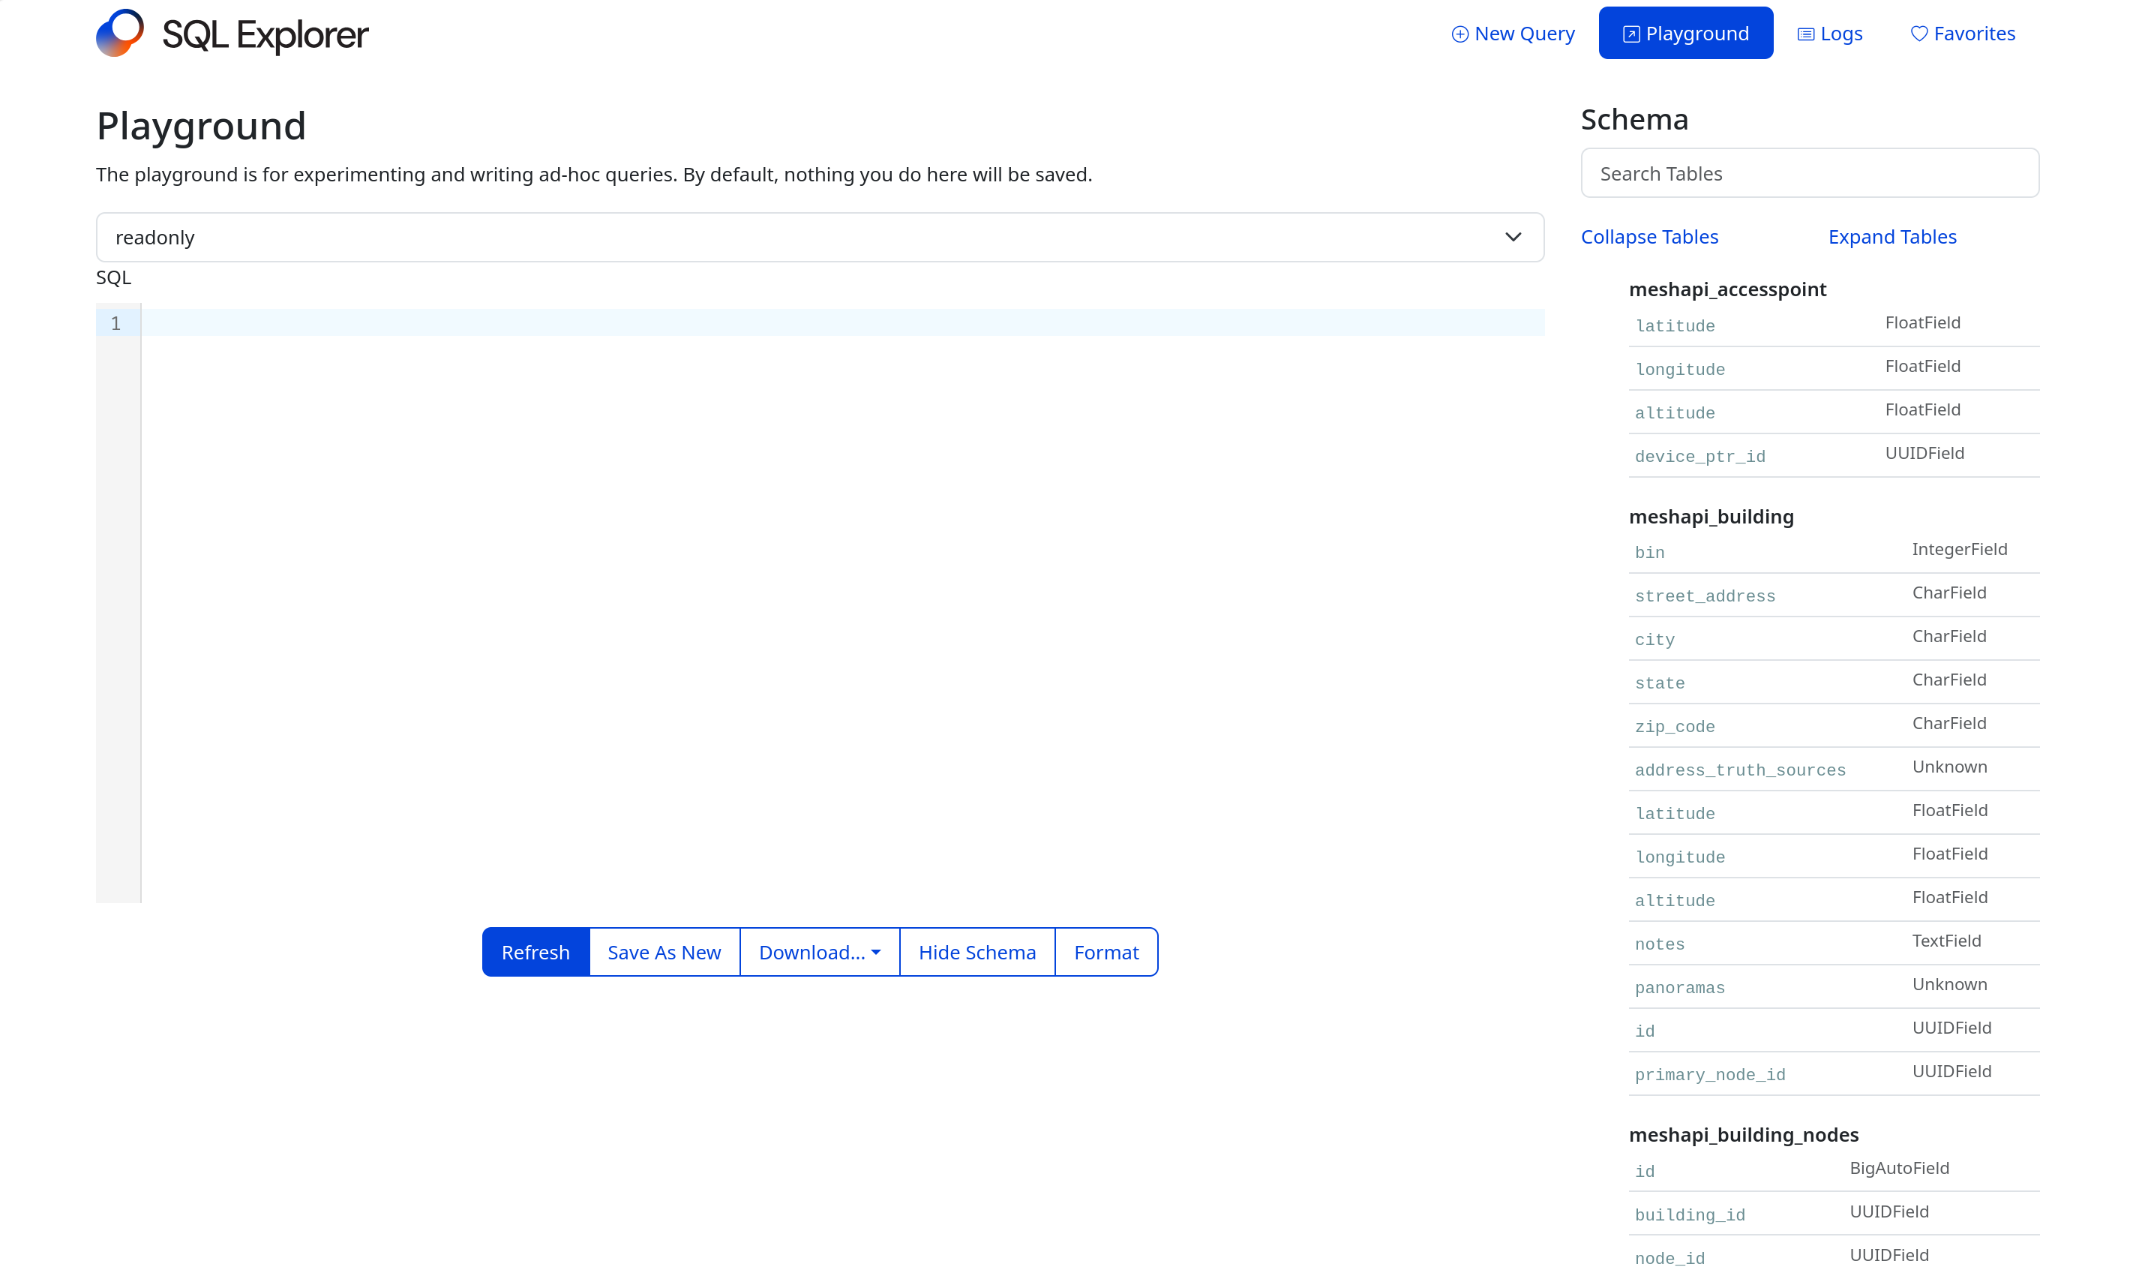
For more in depth access to MeshDB's datebase, you can use the SQL Explorer tool to perform complex queries and operations on the the MeshDB dataset. The tool is read-only, however queries can be stored for later use by yourself or others.
Try it out at https://db.nycmesh.net/explorer/play/.
You can use it by logging in with your MeshDB account! If you don't have access to the tool or need a Mesh DB account, reach out in #meshdb on slack.
How to bulk create installs for large buildings
These instructions detail how to provision many Install requests at once. Usually this is done at large buildings where the mesh serves many apartments. Often we install the equipment all at once during a renovation or construction without an explicit request from the resident of the apartment. In this scenario we need to create install numbers in our systems without asking each resident to submit the join form.
Create/Locate the Supporting Objects
Since MeshDB uses a relational model to store data, multiple objects need to be created to represent the equivalent of a single row in the "New Node Form" spreadsheet. Before we can create Install objects, we must first create Member and Building objects, and assign a network number. For more information about the various tables included in MeshDB, see MeshDB Schema Design.
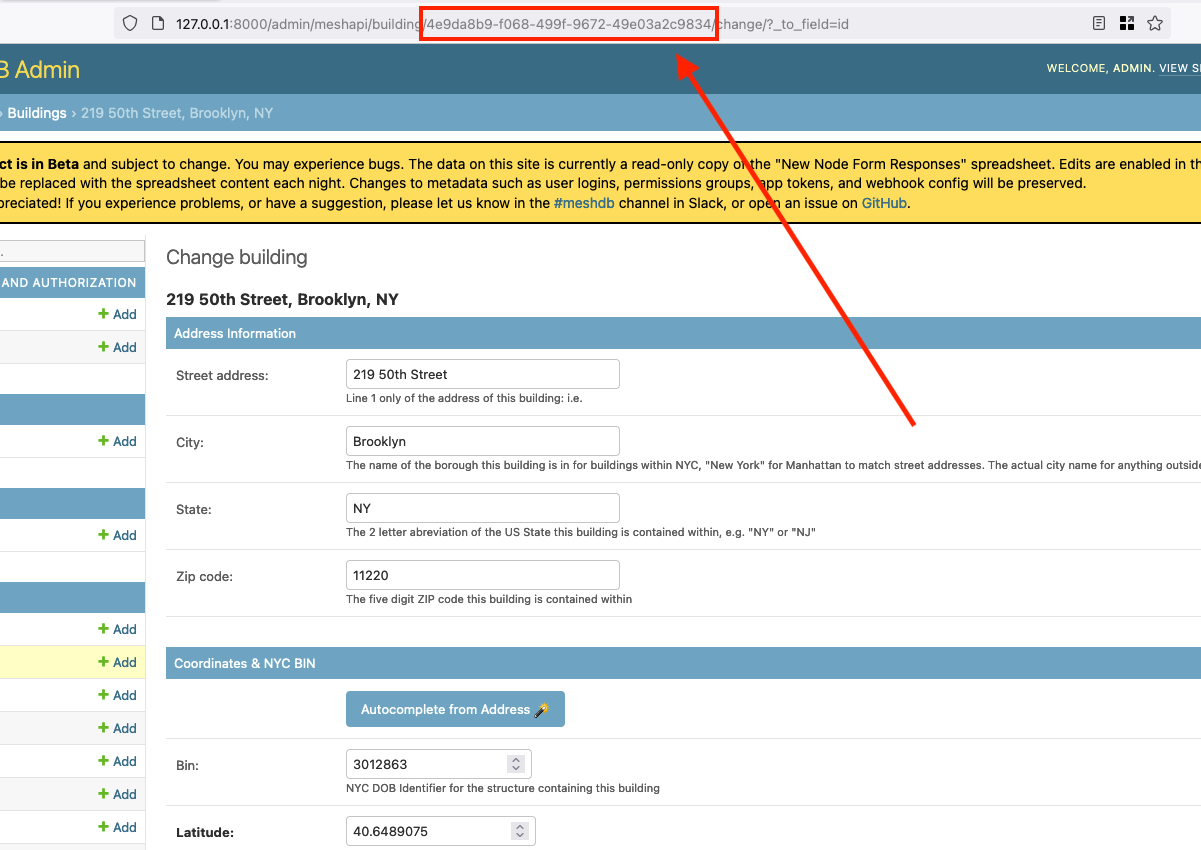
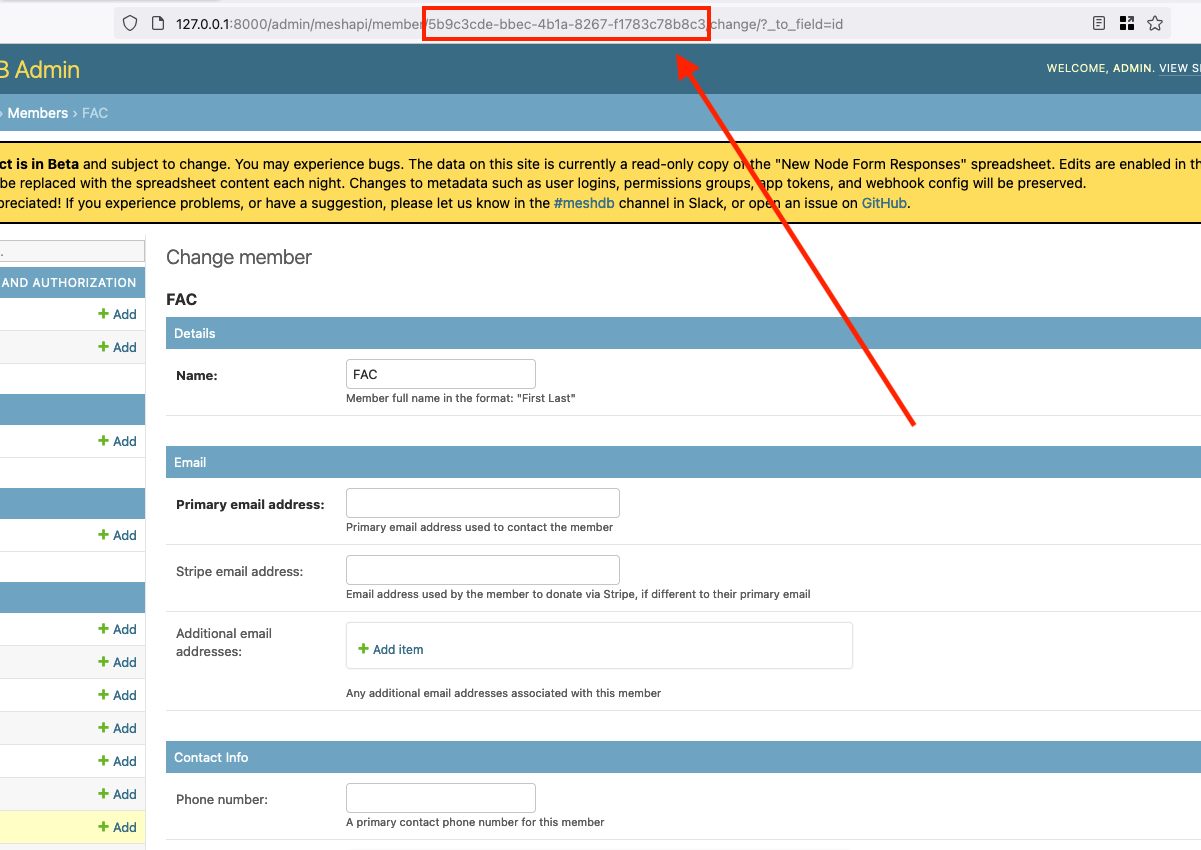
The easiest way to do this is to submit the join form once on behalf of the building (if not already done previously). Once created, open this first install object in the MeshDB admin UI:
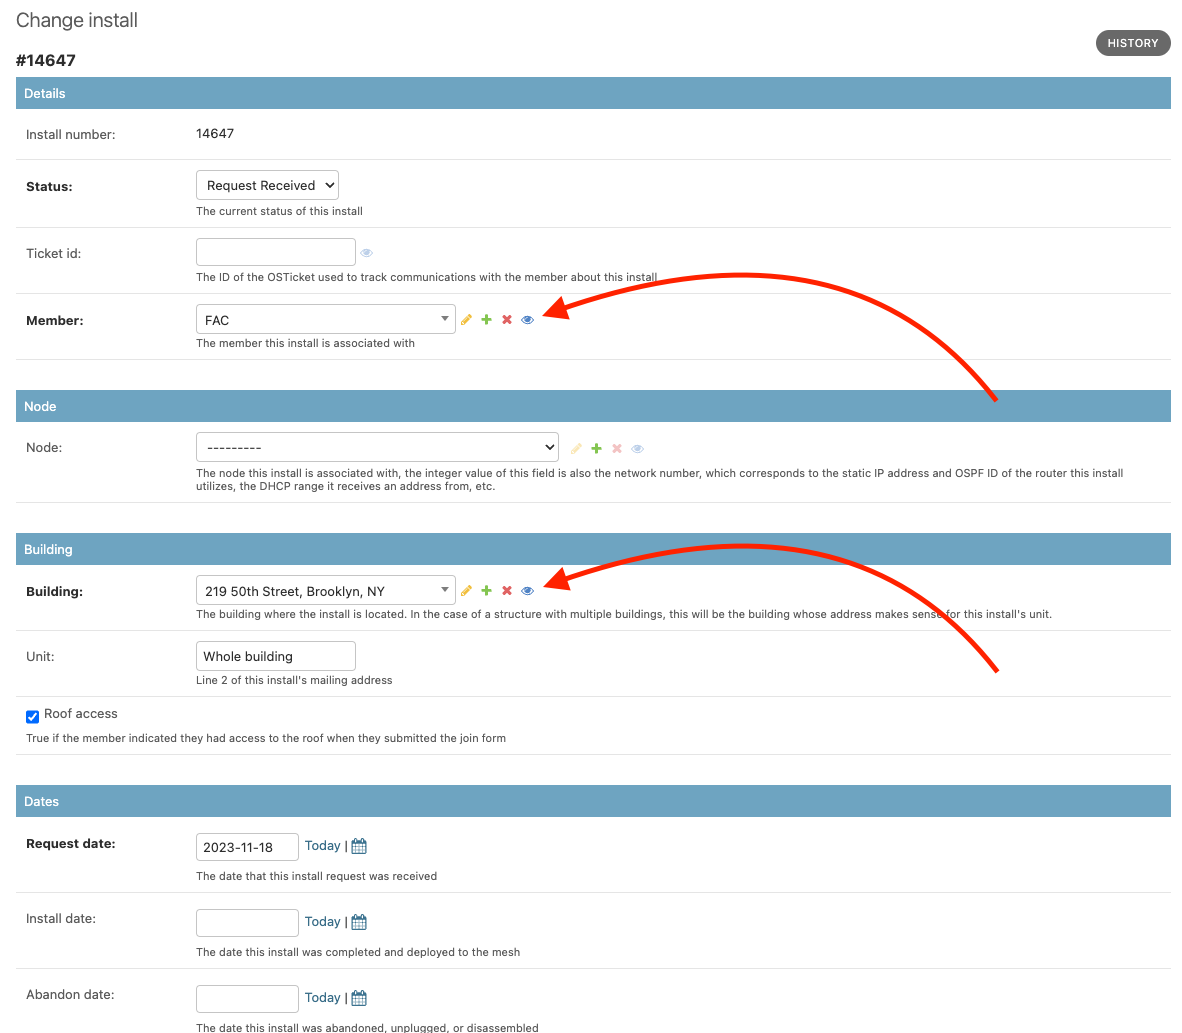
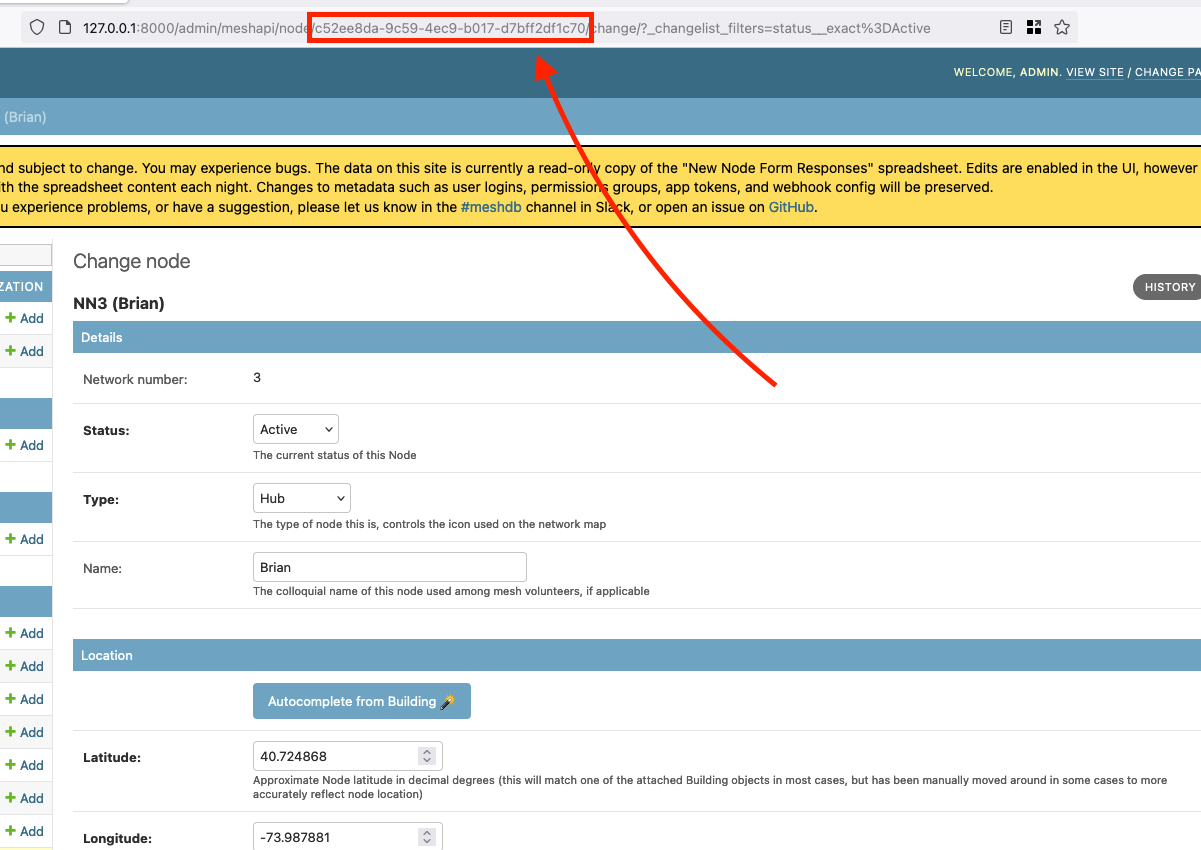
Use the eye icon next to the building and member entries to open the linked objects. On each object, note the object ID from the URL. For example, in the screenshots below, the meshdb member ID is 5b9c3cde-bbec-4b1a-8267-f1783c78b8c3, and the meshdb building ID is 4e9da8b9-f068-499f-9672-49e03a2c9834
At this point, you should also create a Node for this location using the NN assignment tool or vanity NN process. Use the "first" install number we created above to assign the NN. Then use the network number to locate the node object, and copy the node ID from the URL similar to the building and member IDs:
Build the import CSV
In order to create the install requests in bulk, we need to place the necessary information in a tabular format. Several formats are supported, but for these instructions we will use CSV as it is the simplest to work with using standard spreadsheet applications such as Excel or Google Sheets. To start, open the following CSV template in your favorite spreadsheet application (you will need to paste this into a text editor and save it as a .csv file):
Edit the following columns based on the information collected above:
node- set all rows to the node ID we identified abovestatus- likelyPendingfor all rows, though if some equipment has already been installed,ActiveorInactivemay be more appropriate. See MeshDB Status Values for more information about each value and when it is most appropriaterequest_date- set all rows to the current date in the formatMM/DD/YYYYinstall_date- leave blank or set to the date of the equipment installation as appropriateabandon_date- leave blankbuilding- set all rows the MeshDB numerical ID of the building as identified aboveunit- enter the unit number for each install request as provided/defined by the building ownerroof_access- enter1(true) or0(false) to indicate if access to the roof is available at this sitemember- set all rows the MeshDB numerical ID of the member object created for the "original install" as identified above- This is not the only option, it is possible to create different member objects for each install row if contact information is available, see the section titled "Bulk Add Members" below for more info
referral- optional, a but good place to indicate this install was created for a large buildingnotes- optional, but a good place to indicate the name of the building/node that these installs belong todiy- enter0(false) for all rows to indicate that these installs are conducted by volunteers, not DIYers
node,status,request_date,install_date,abandon_date,building,unit,roof_access,member,referral,notes,diy
,Pending,07/19/2024,,,,2A,1,,Large Buidling Install,Building Name,0
,Pending,07/19/2024,,,,2B,1,,Large Buidling Install,Building Name,0
,Pending,07/19/2024,,,,2C,1,,Large Buidling Install,Building Name,0
,Pending,07/19/2024,,,,3A,1,,Large Buidling Install,Building Name,0
,Pending,07/19/2024,,,,3B,1,,Large Buidling Install,Building Name,0
,Pending,07/19/2024,,,,3C,1,,Large Buidling Install,Building Name,0
,Pending,07/19/2024,,,,4A,1,,Large Buidling Install,Building Name,0
,Pending,07/19/2024,,,,4B,1,,Large Buidling Install,Building Name,0
,Pending,07/19/2024,,,,4C,1,,Large Buidling Install,Building Name,0
,Pending,07/19/2024,,,,5A,1,,Large Buidling Install,Building Name,0
,Pending,07/19/2024,,,,5B,1,,Large Buidling Install,Building Name,0
,Pending,07/19/2024,,,,5C,1,,Large Buidling Install,Building Name,0
,Pending,07/19/2024,,,,6A,1,,Large Buidling Install,Building Name,0
,Pending,07/19/2024,,,,6B,1,,Large Buidling Install,Building Name,0The following columns can be optionally added to the csv, but should not be unless there is a good reason, and you know what you're doing:
id- under normal circumstances this should not be specified manually, since these are automatically assigned by meshdb when the installs are importedinstall_number- under normal circumstances this should not be specified manually, since these are automatically assigned by meshdb when the installs are importedticket_id- meshdb will automatically create OSTicket entries for each install request as needed. Do not manually create these
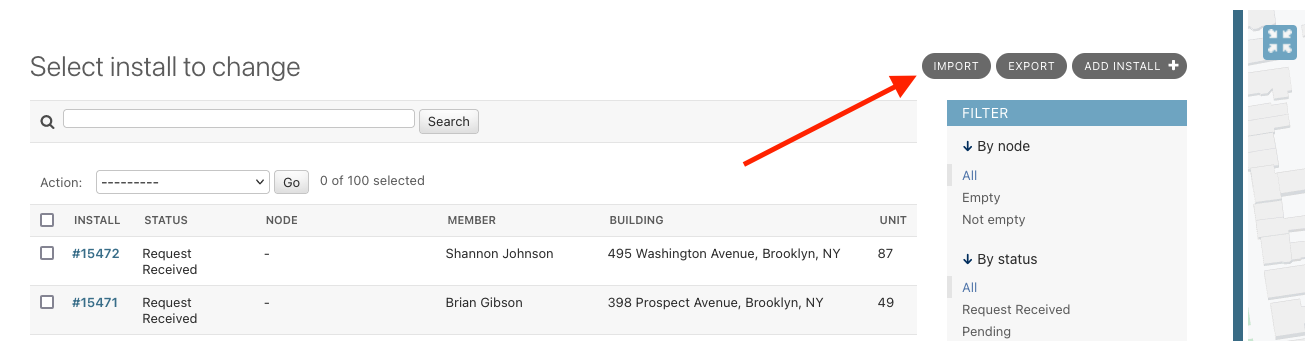
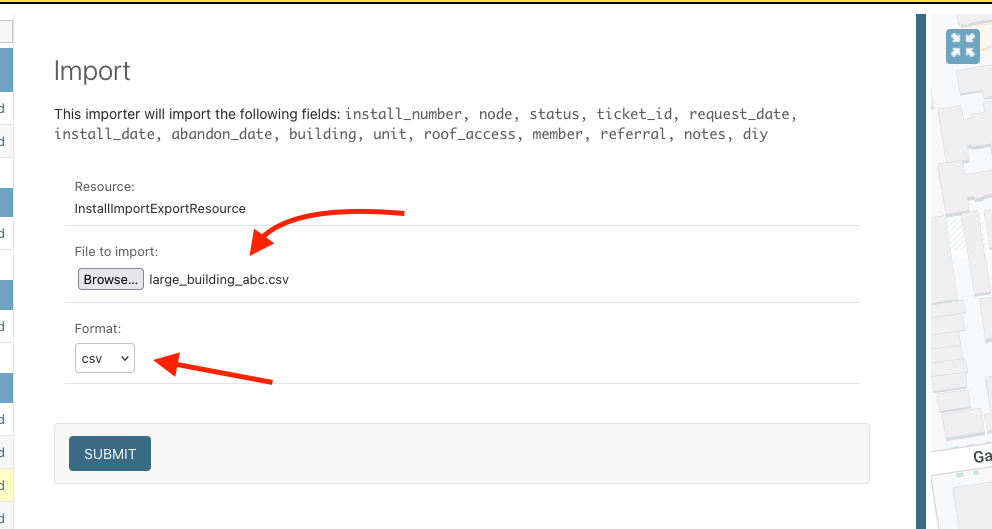
Import your CSV into MeshDB
Select your CSV file, and select CSV as the format in the dropdown:
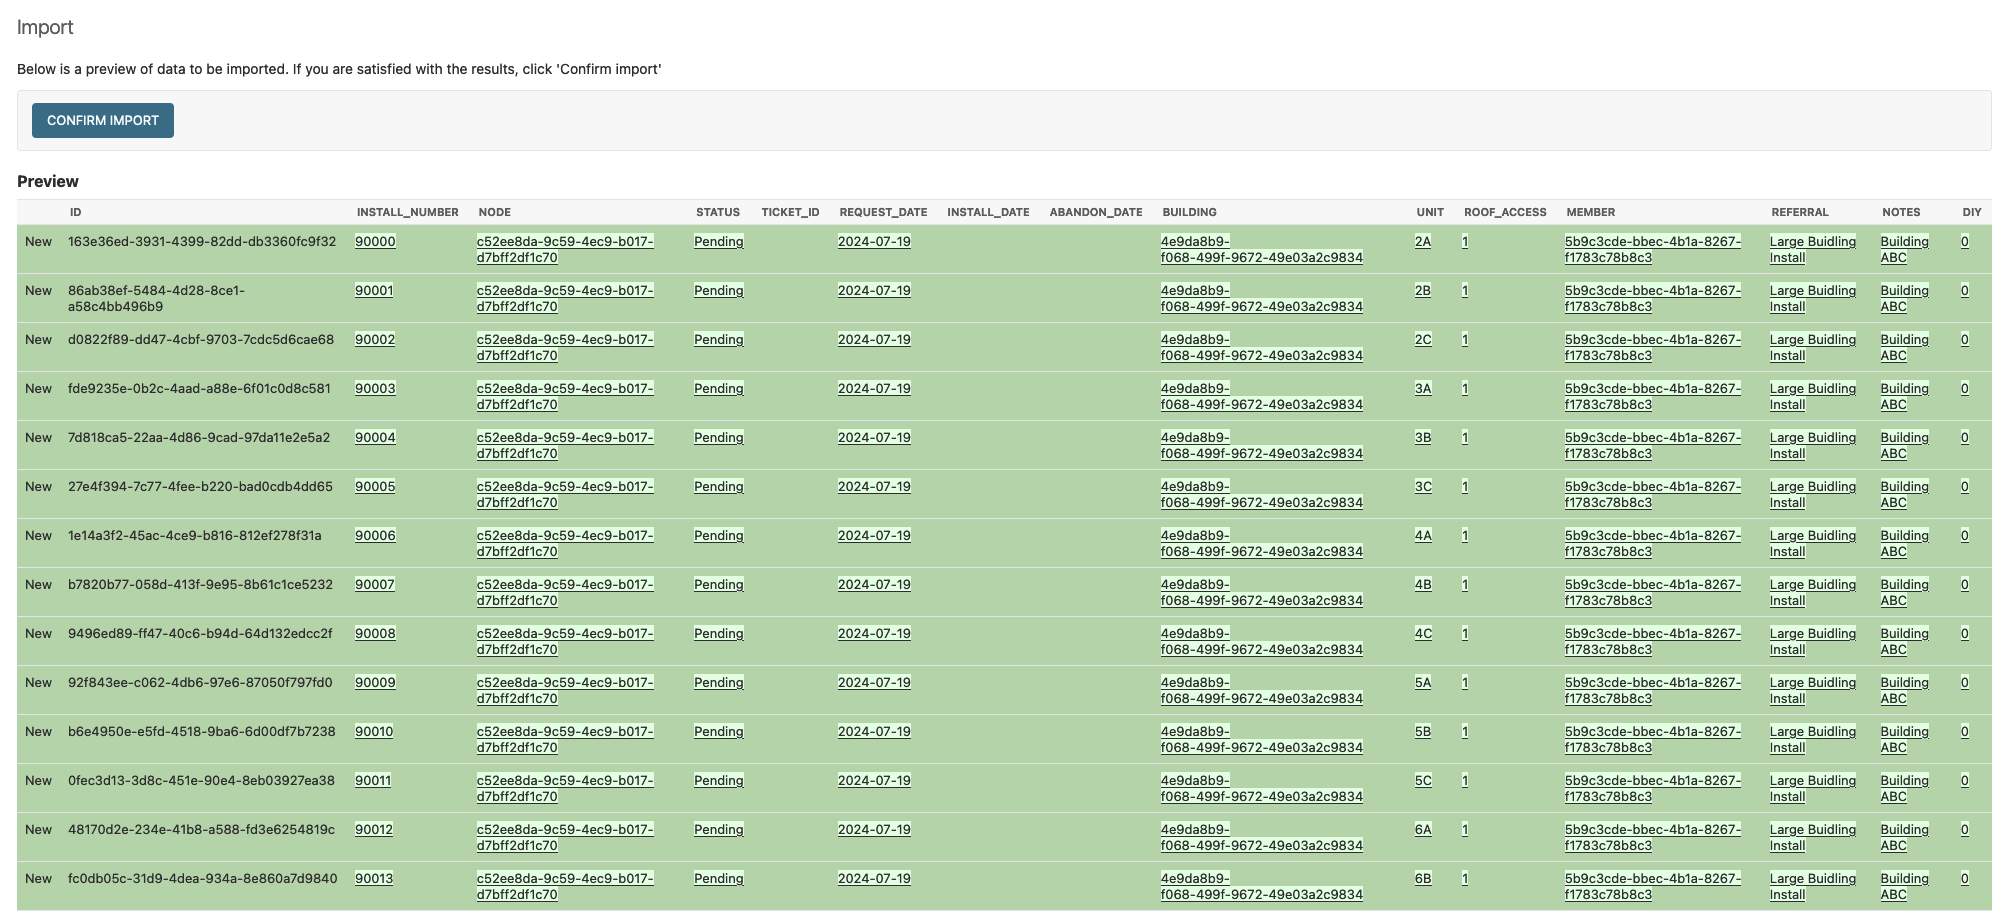
Review the information available on the confirmation screen for correctness, note the generated install numbers if desired and select "confirm import" to create the new installs in the database:
Check to make sure the correct number of installs was created, and observe the newly created install rows in the "all installs" view:
Bulk Add Members
The instructions above assume that contact information is not available for the members that will reside in the created install objects. However, if this information is available, and you'd like to create install objects with the correct contact information associated with each, first create a CSV for the member objects using the following template (you will need to paste this into a text editor and save it as a .csv file):
name,primary_email_address,stripe_email_address,additional_email_addresses,phone_number,additional_phone_numbers,slack_handle,notes
Tami Gibson,tamigibson@gmail.com,,,+1 555 555 5555,,,
Jean Williams,jeanwilliams@gmail.com,,,+1 555 555 5555,,,
Shari Martinez,sharimartinez@gmail.com,,,+1 555 555 5555,,,
Melinda Martin,melindamartin@gmail.com,,,+1 555 555 5555,,, Edit the following columns based on the information available for each member:
name- the member's first and last nameprimary_email_address- the member's email addressstripe_email_address- likely this leave blank (used to indicate if the member has signed up in stripe with a different email)additional_email_addresses- likely leave blank (used to indicate if the member has other emails than their stripe and primary addresses). If provided, must be a comma separated list of email addressesphone_number- the member's phone number, in the format+1 555 555 5555additional_phone_numbers- likely leave blank (used to list additional phone numbers for the member). If provided, must be a comma separated list of phone numbers in the above formatslack_handle- likely leave blank, but can be set to the member's slack handle if availablenotes- optionally provide any notes about this member
The following columns can be optionally added to the csv, but should not be unless there is a good reason, and you know what you're doing:
id- under normal circumstances this should not be specified manually, since these are automatically assigned by meshdb when the members are imported
Import this CSV on the members screen, following the same instructions provided above for installs. Just take note of the member IDs provided on the import confirmation screen, and use these IDs in the member column in the installs CSV
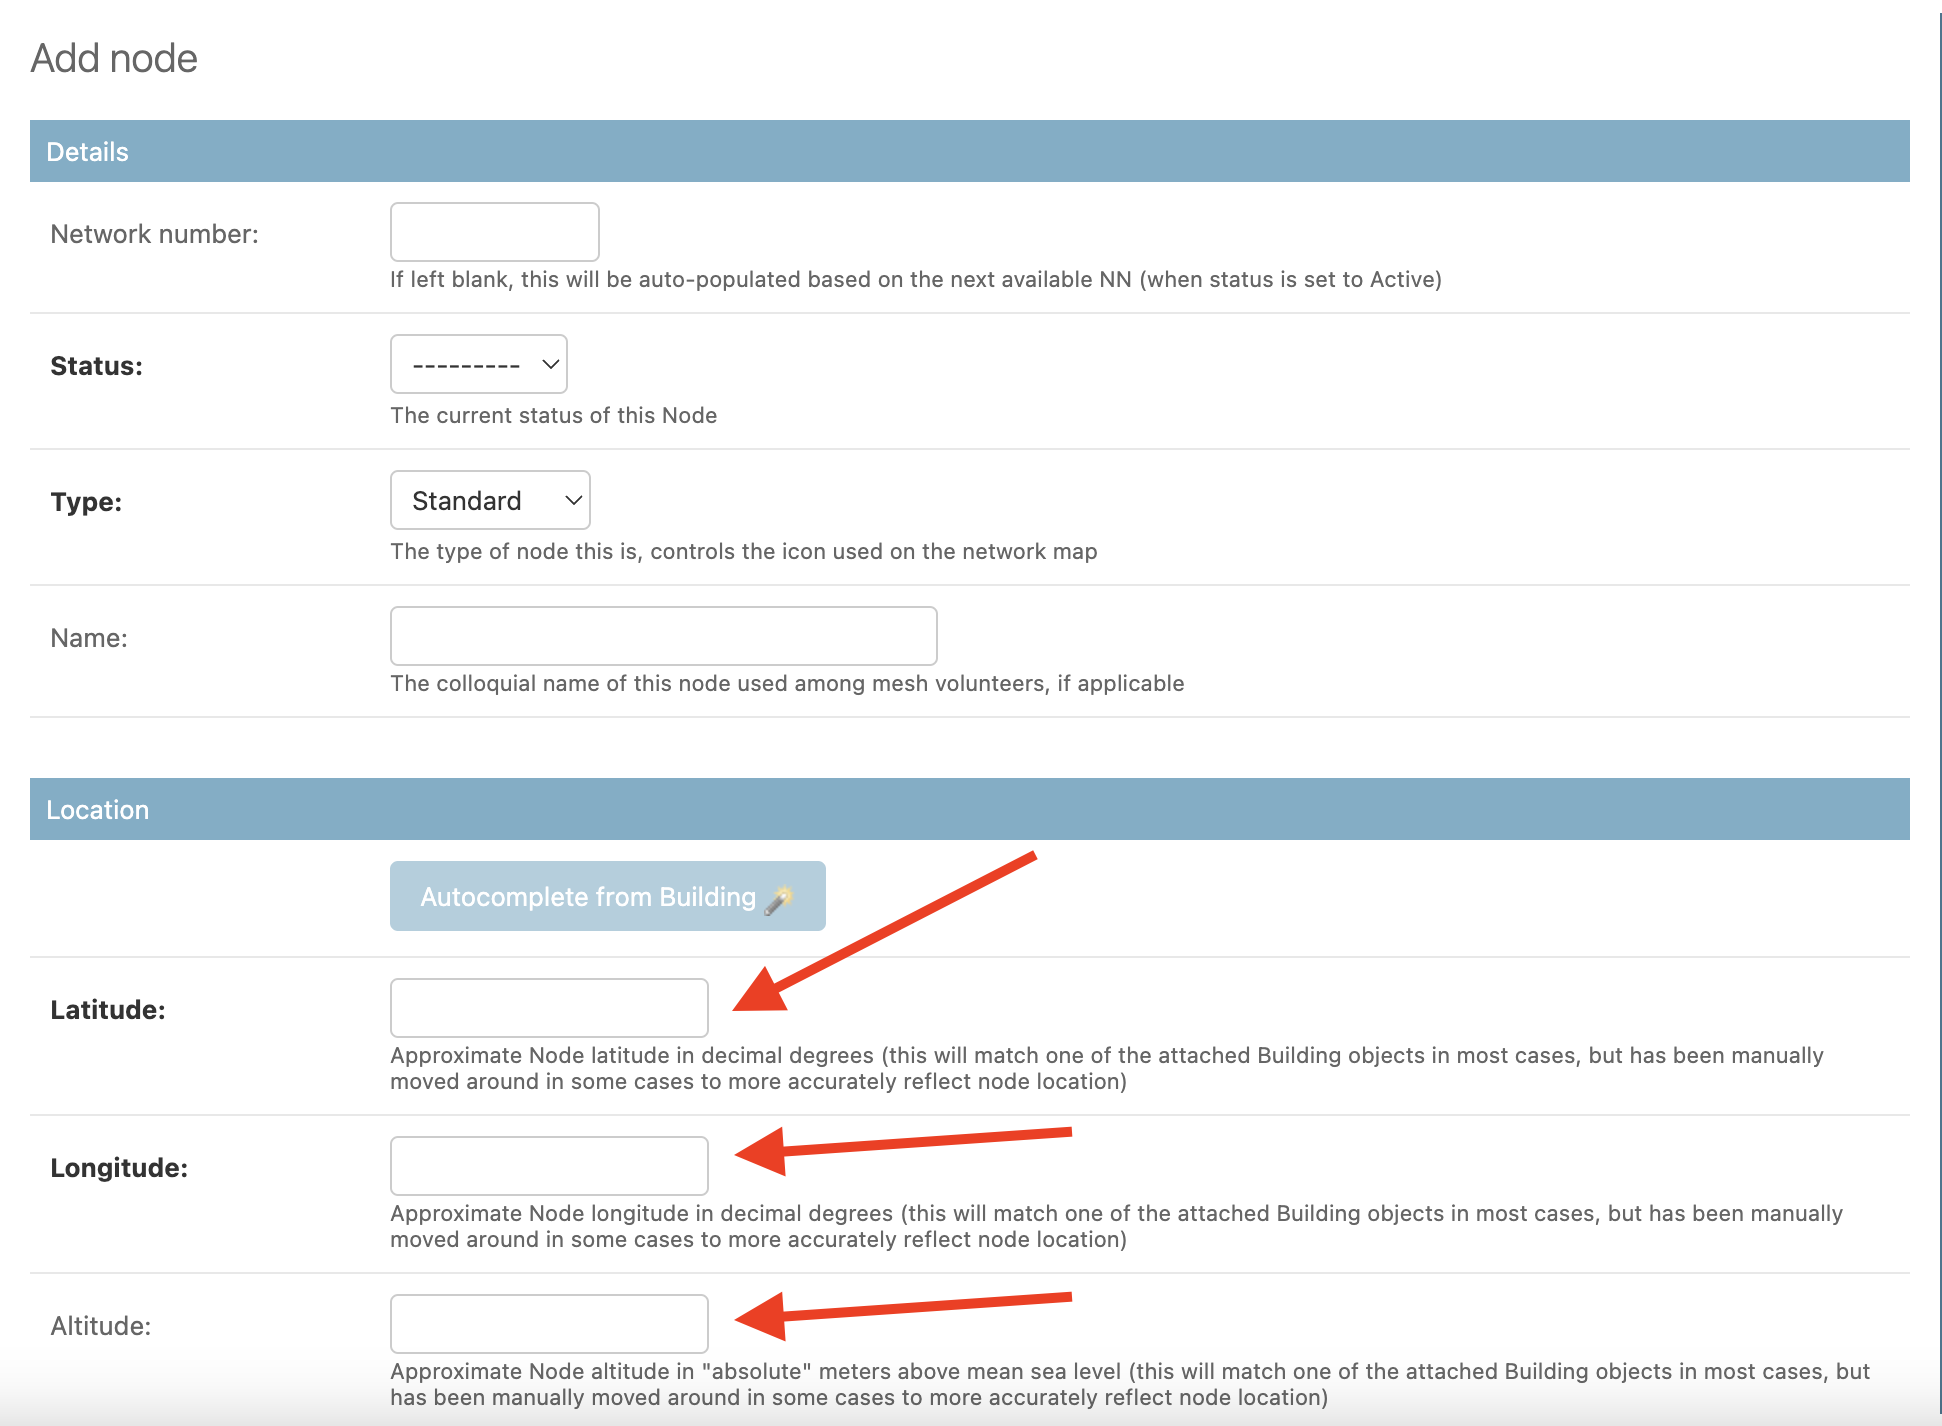
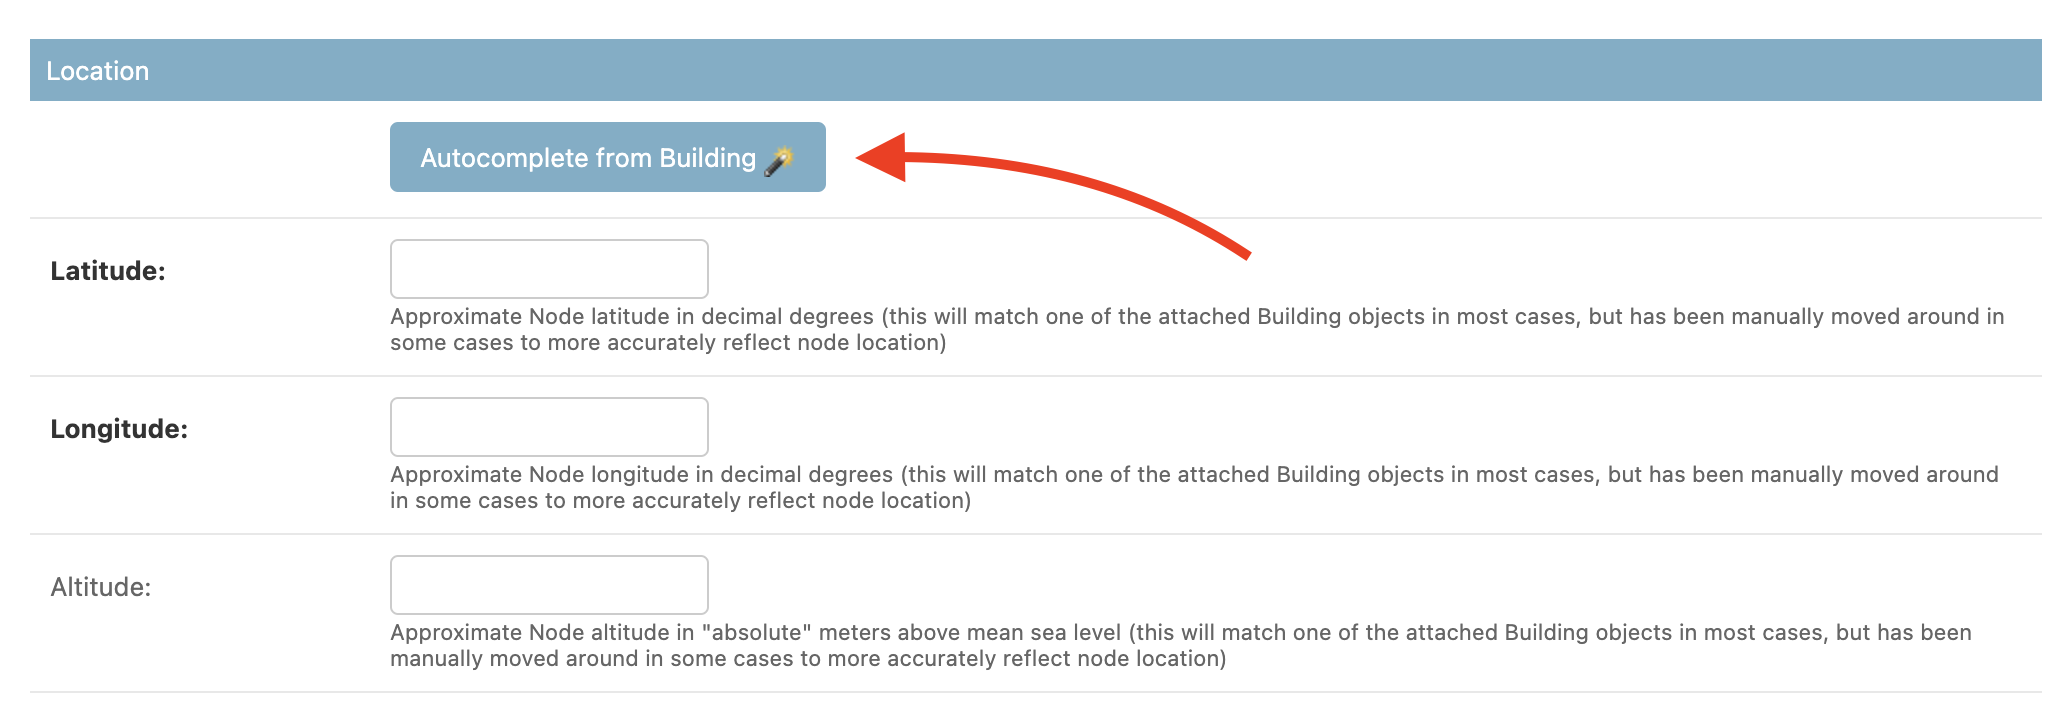
How to avoid manually entering latitude/longitude/altitude when constructing Node objects
When constructing or editing Node objects, users are presented with the following fields:
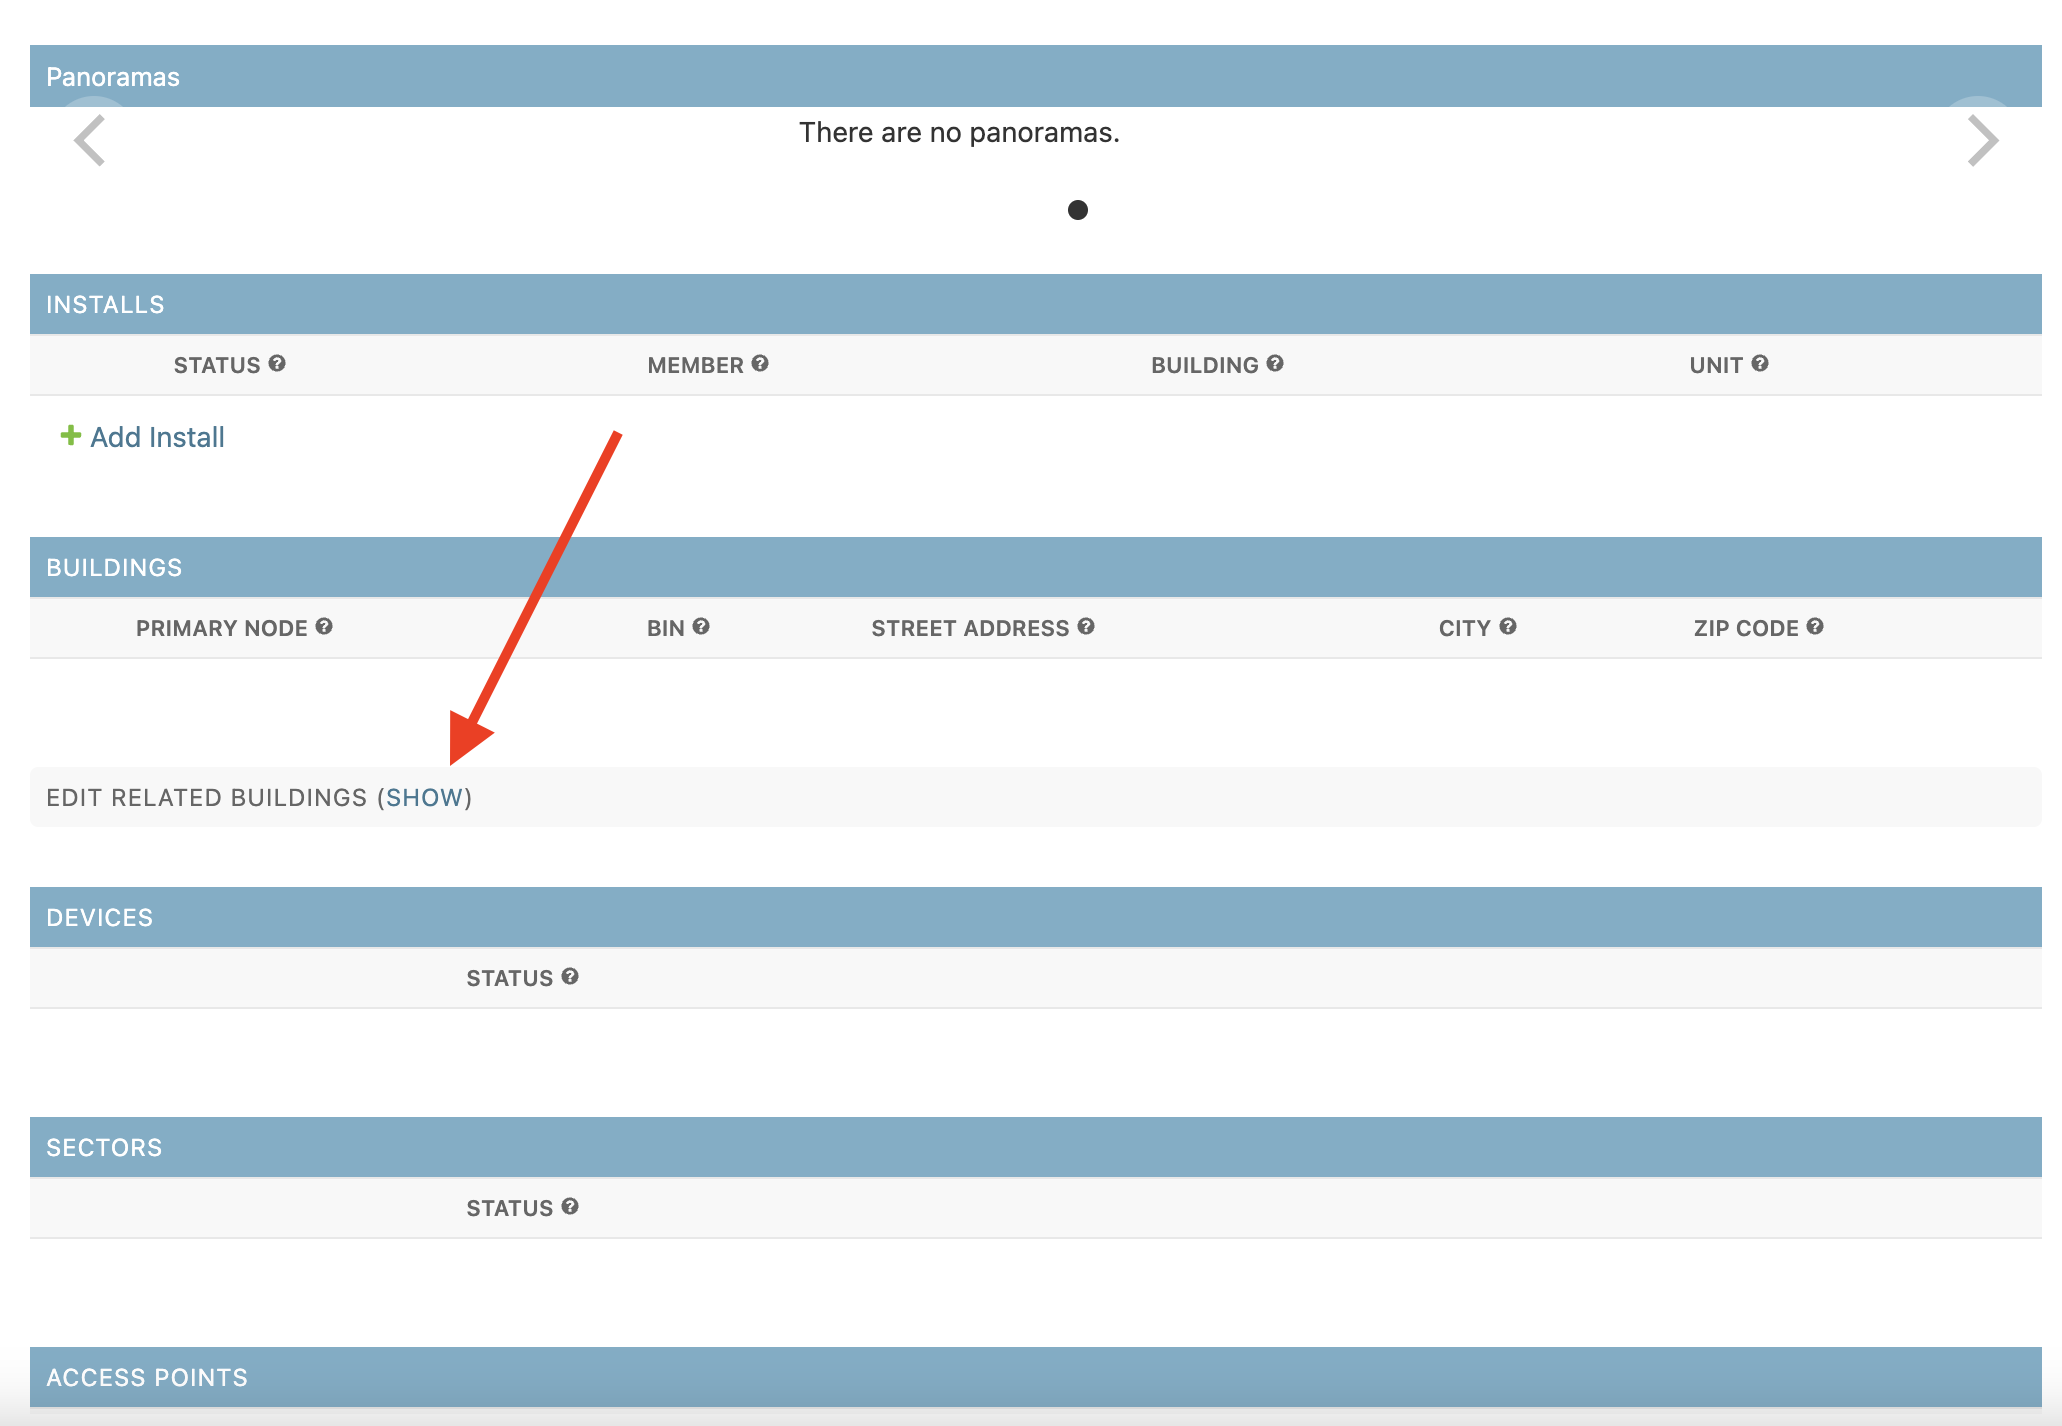
Since manually locating these coordinates is tedious, MeshDB is able to automatically populate these fields from the Building object. To use this feature, simply scroll down to the "Buildings" heading below, and click "Show" next to "Edit Related Buildings":
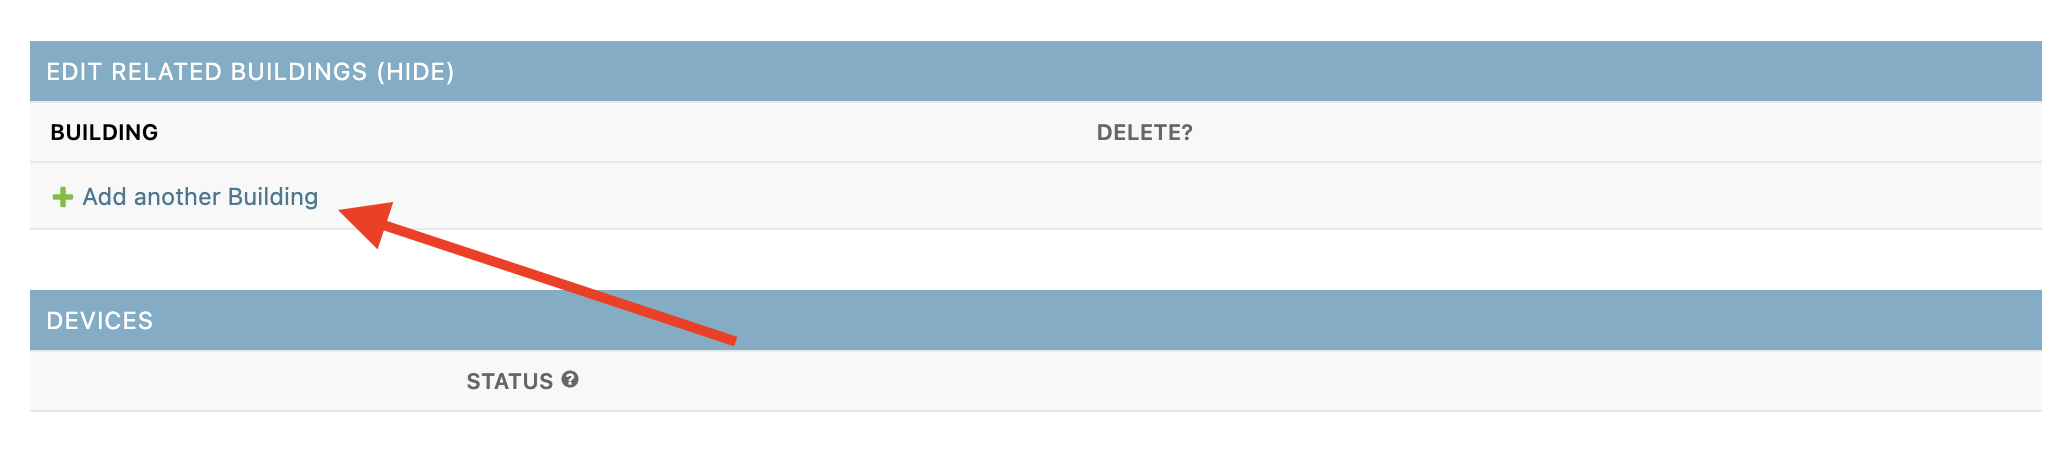
Select "Add another Building"
In the building selection dropdown, enter the address of the building you are trying to assign this node to:
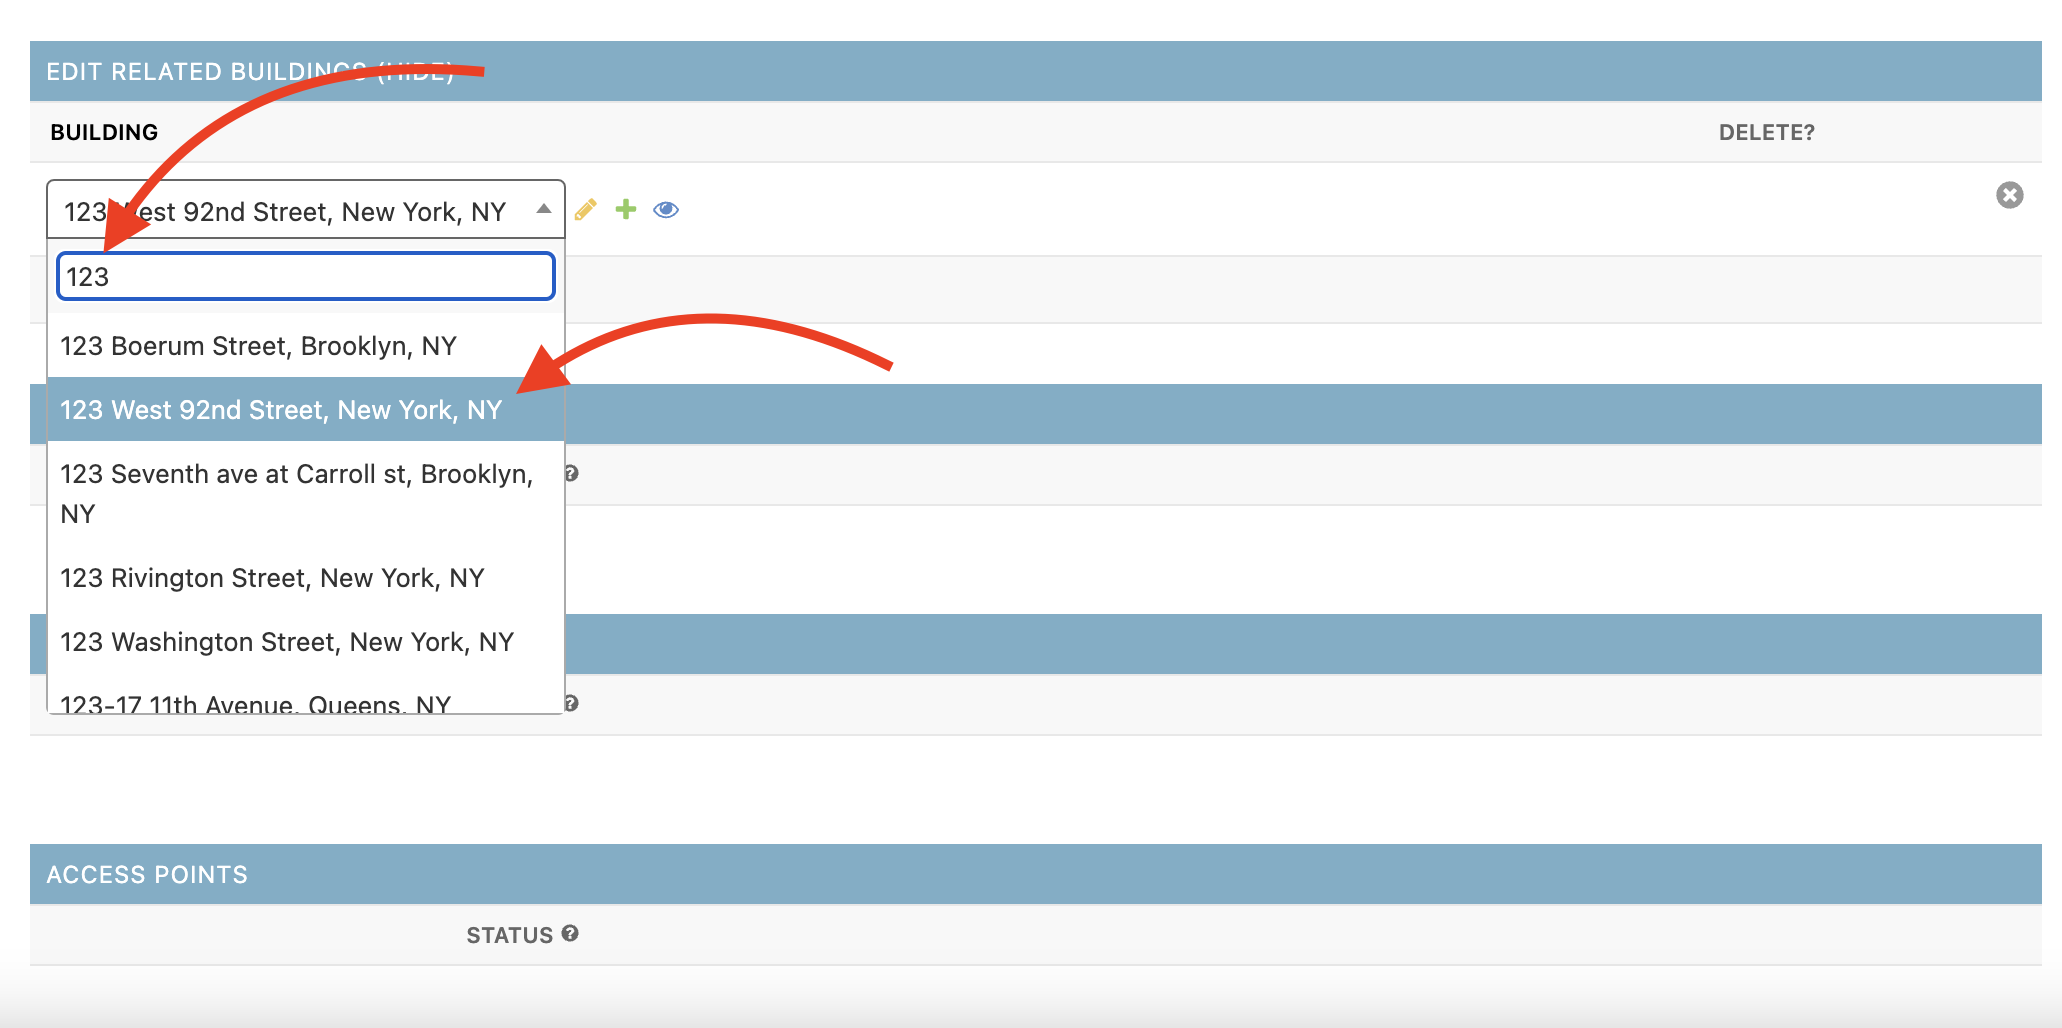
Once a building is selected, the "Autocomplete from Building" button will become enabled. Click it to automatically populate the coordinates based on the information available for this building:
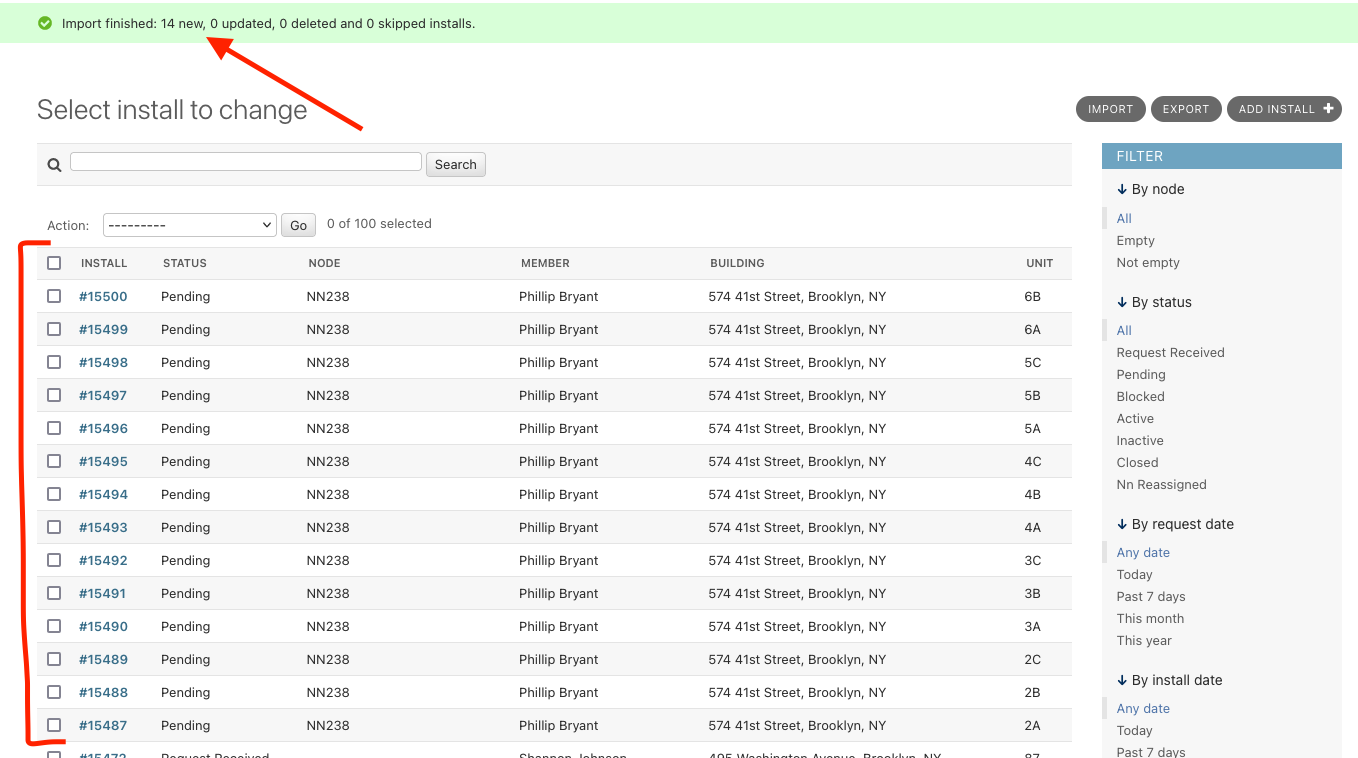
How to assign a "vanity" network number
These instructions are only needed when precise control of the exact NN is required. Most installs should just use the standard network number assignment form
Network numbers uniquely identify devices on the NYC Mesh network. They are used to compute IP addresses and in device names to locate and organize things. In some cases, mesh volunteers prefer a specific NN be allocated to a given install number, to allocate sequential numbers for a series of nodes, to match the street address, or some other significant number for the building.
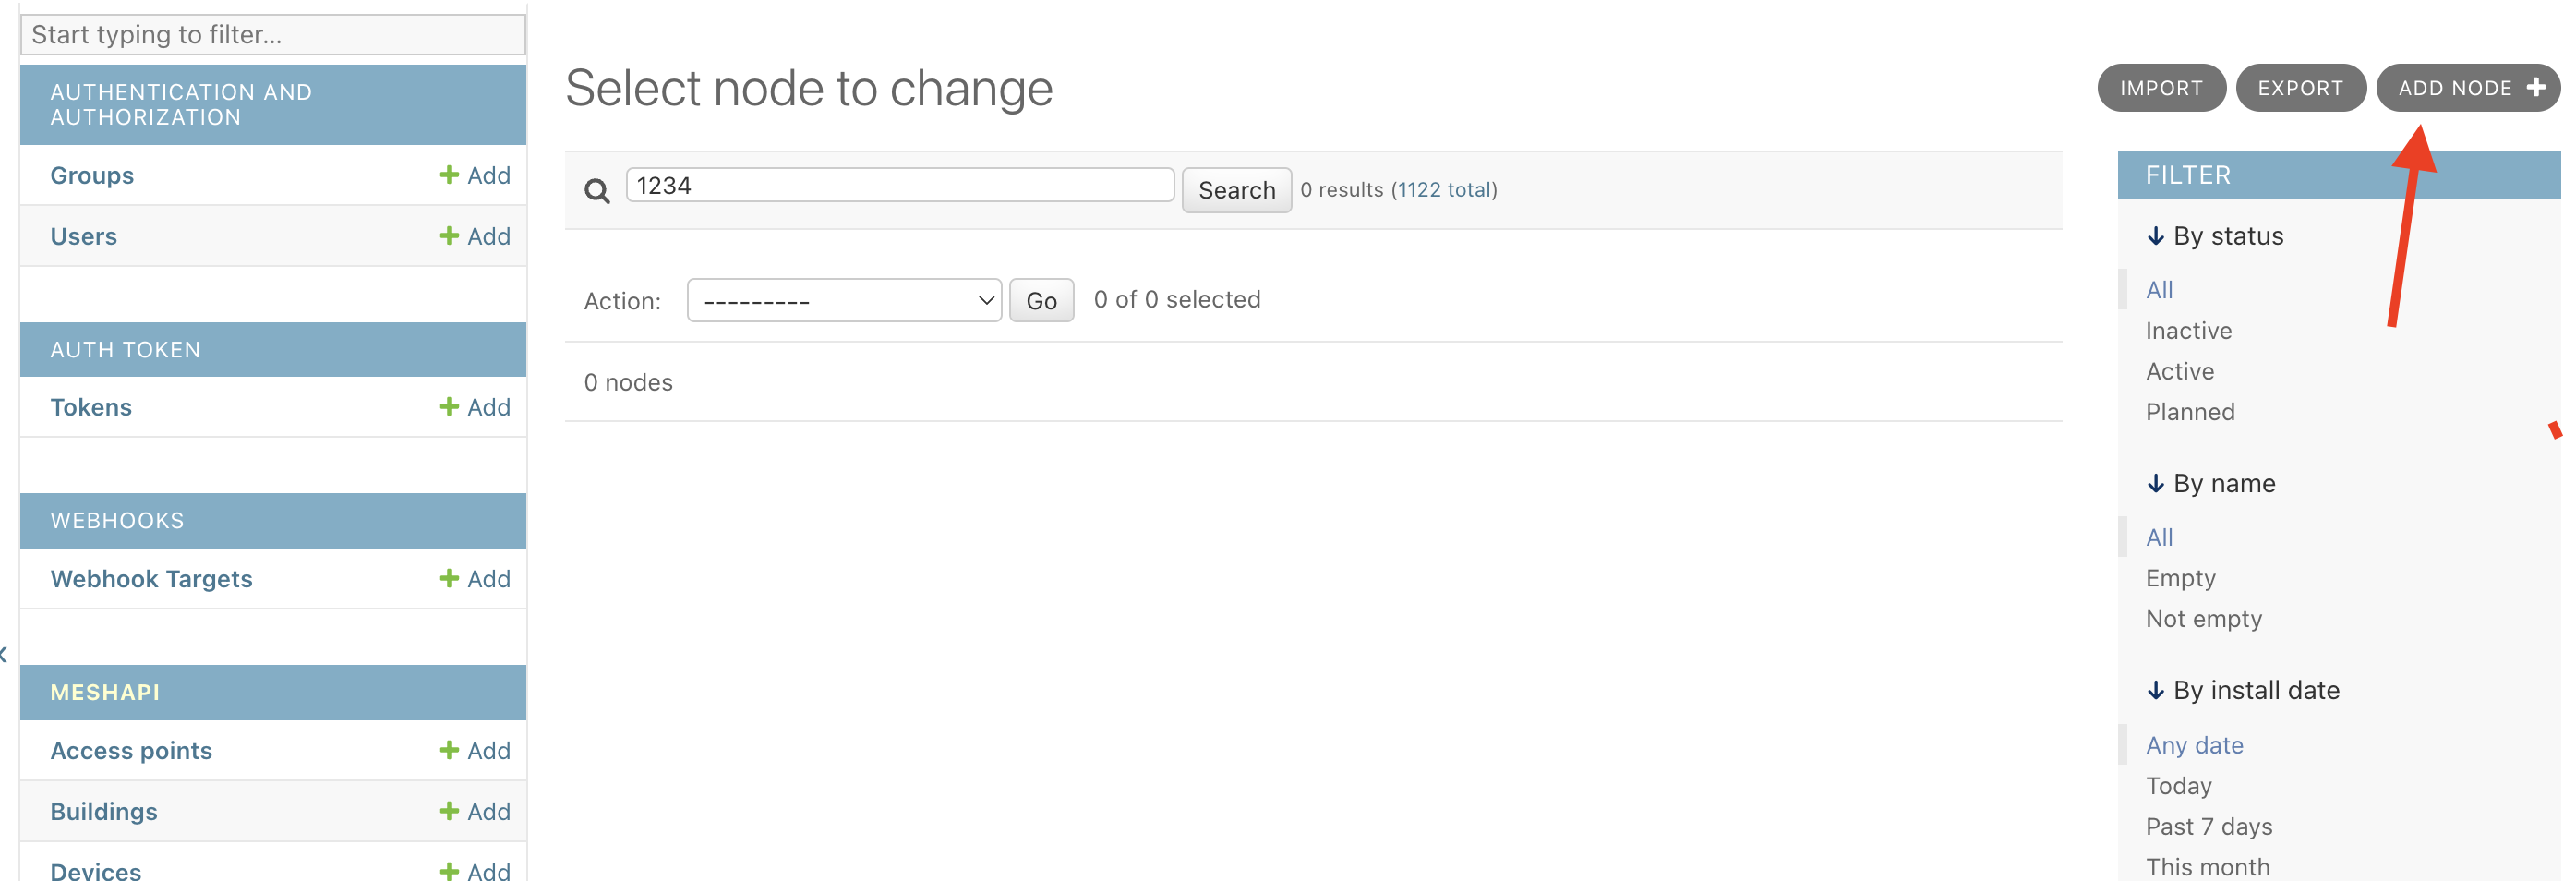
To allocate a specific network number for a given install, first validate that the desired network number is unused. Navigate to the Install search page and enter the network number you'd like to use:
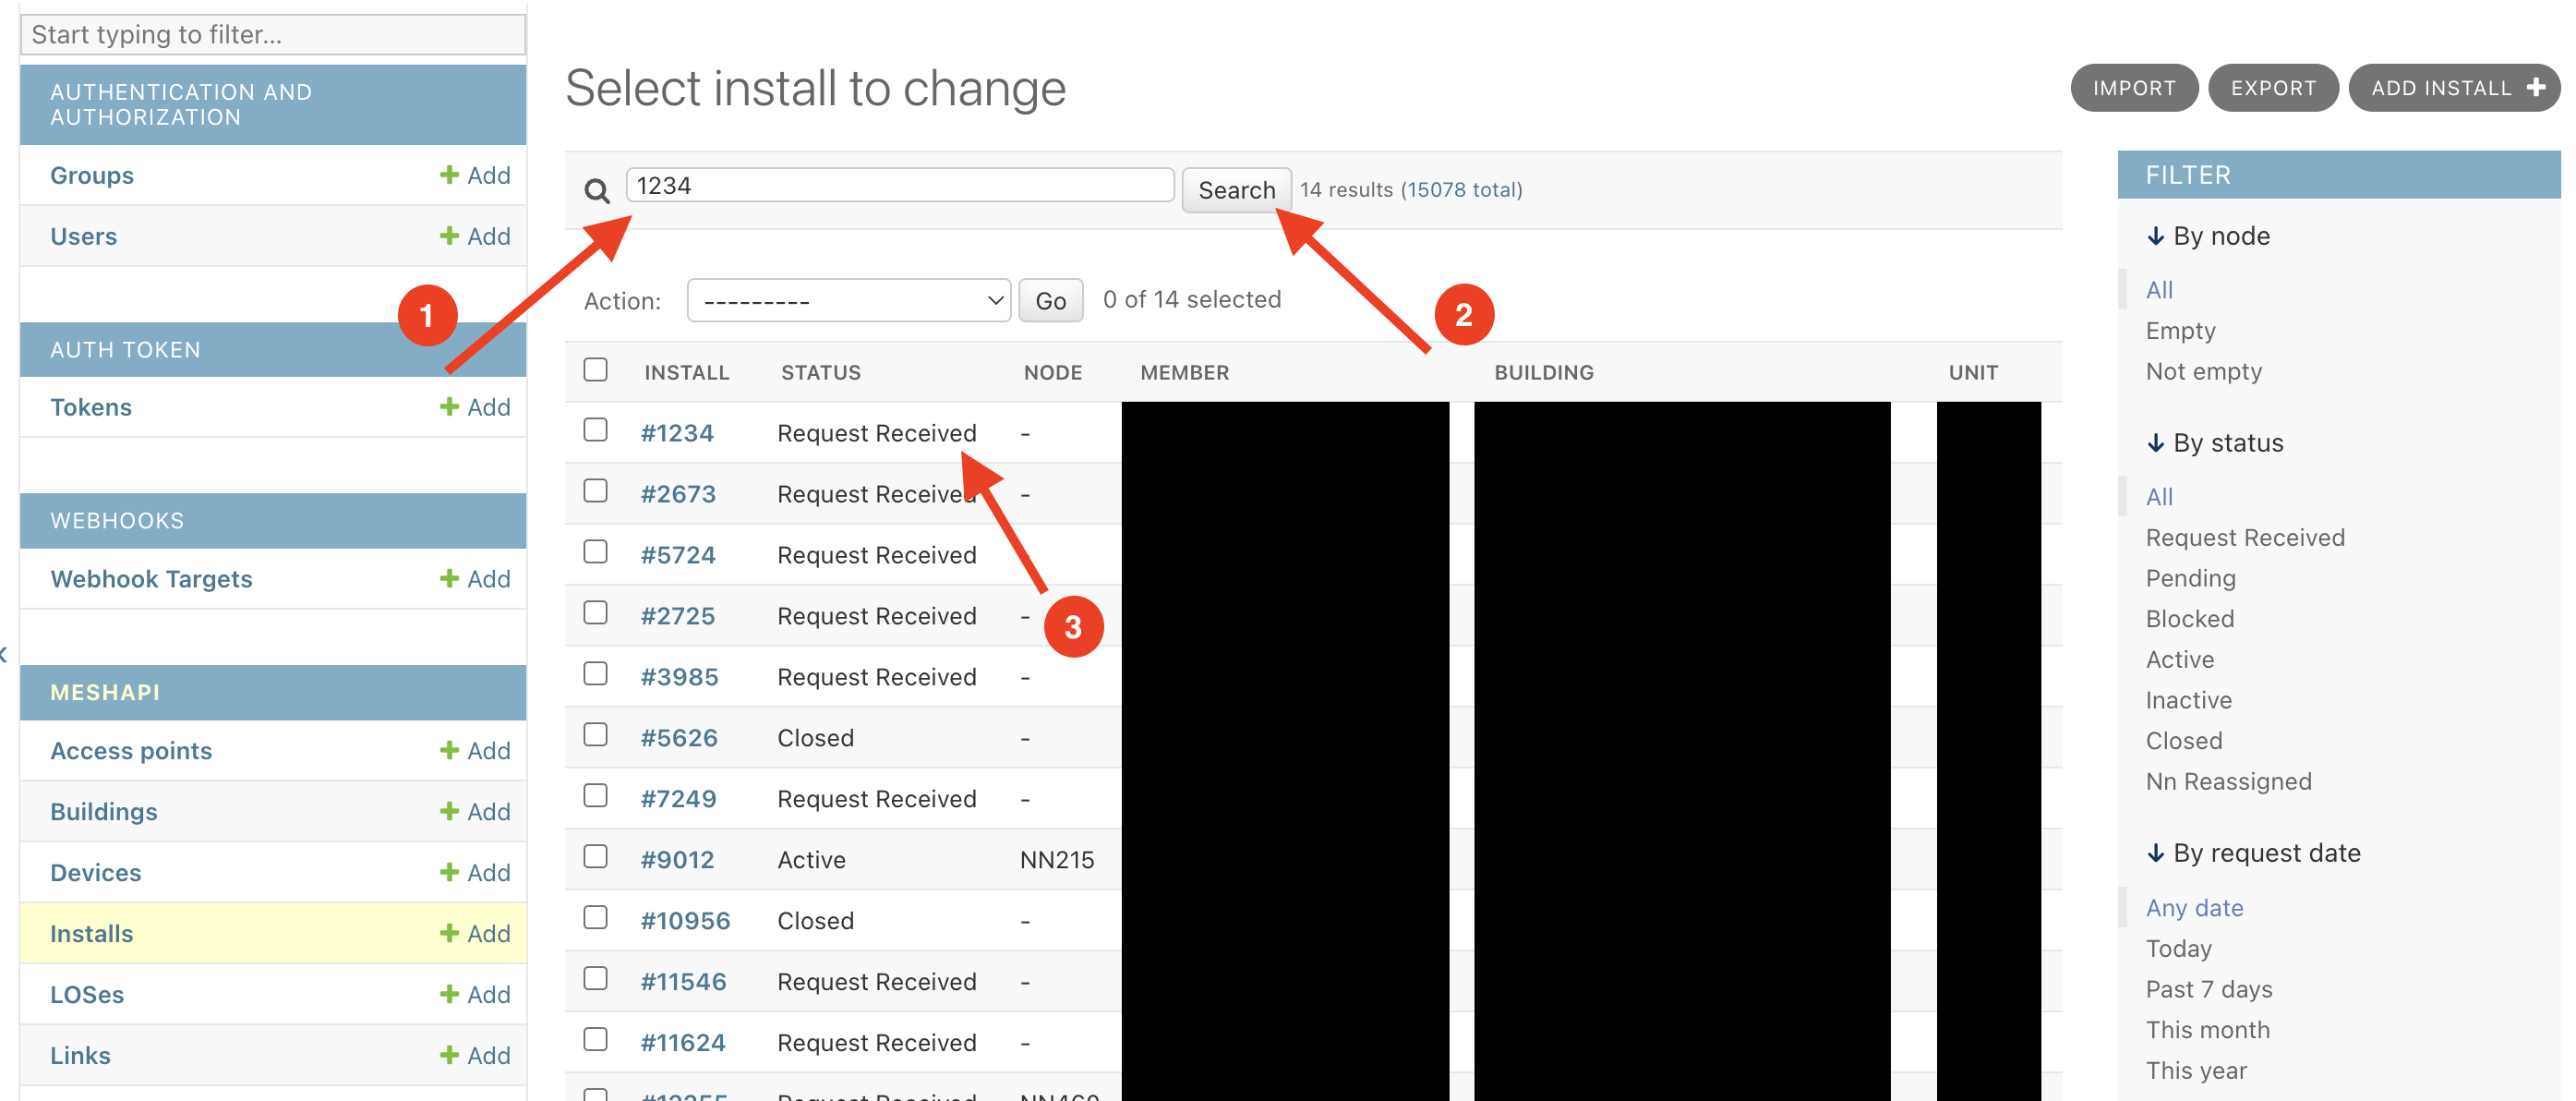
Click "Search" and then find the row where the install number corresponds to the desired network number. Check the status of this row. To recycle the install # as a vanity NN, the status must not be Active. In this case, the Install shows as Request Received, so we are good to proceed.
Next, check for any pre-existing nodes with the desired network number. Open the Node search page and enter the desired network number:
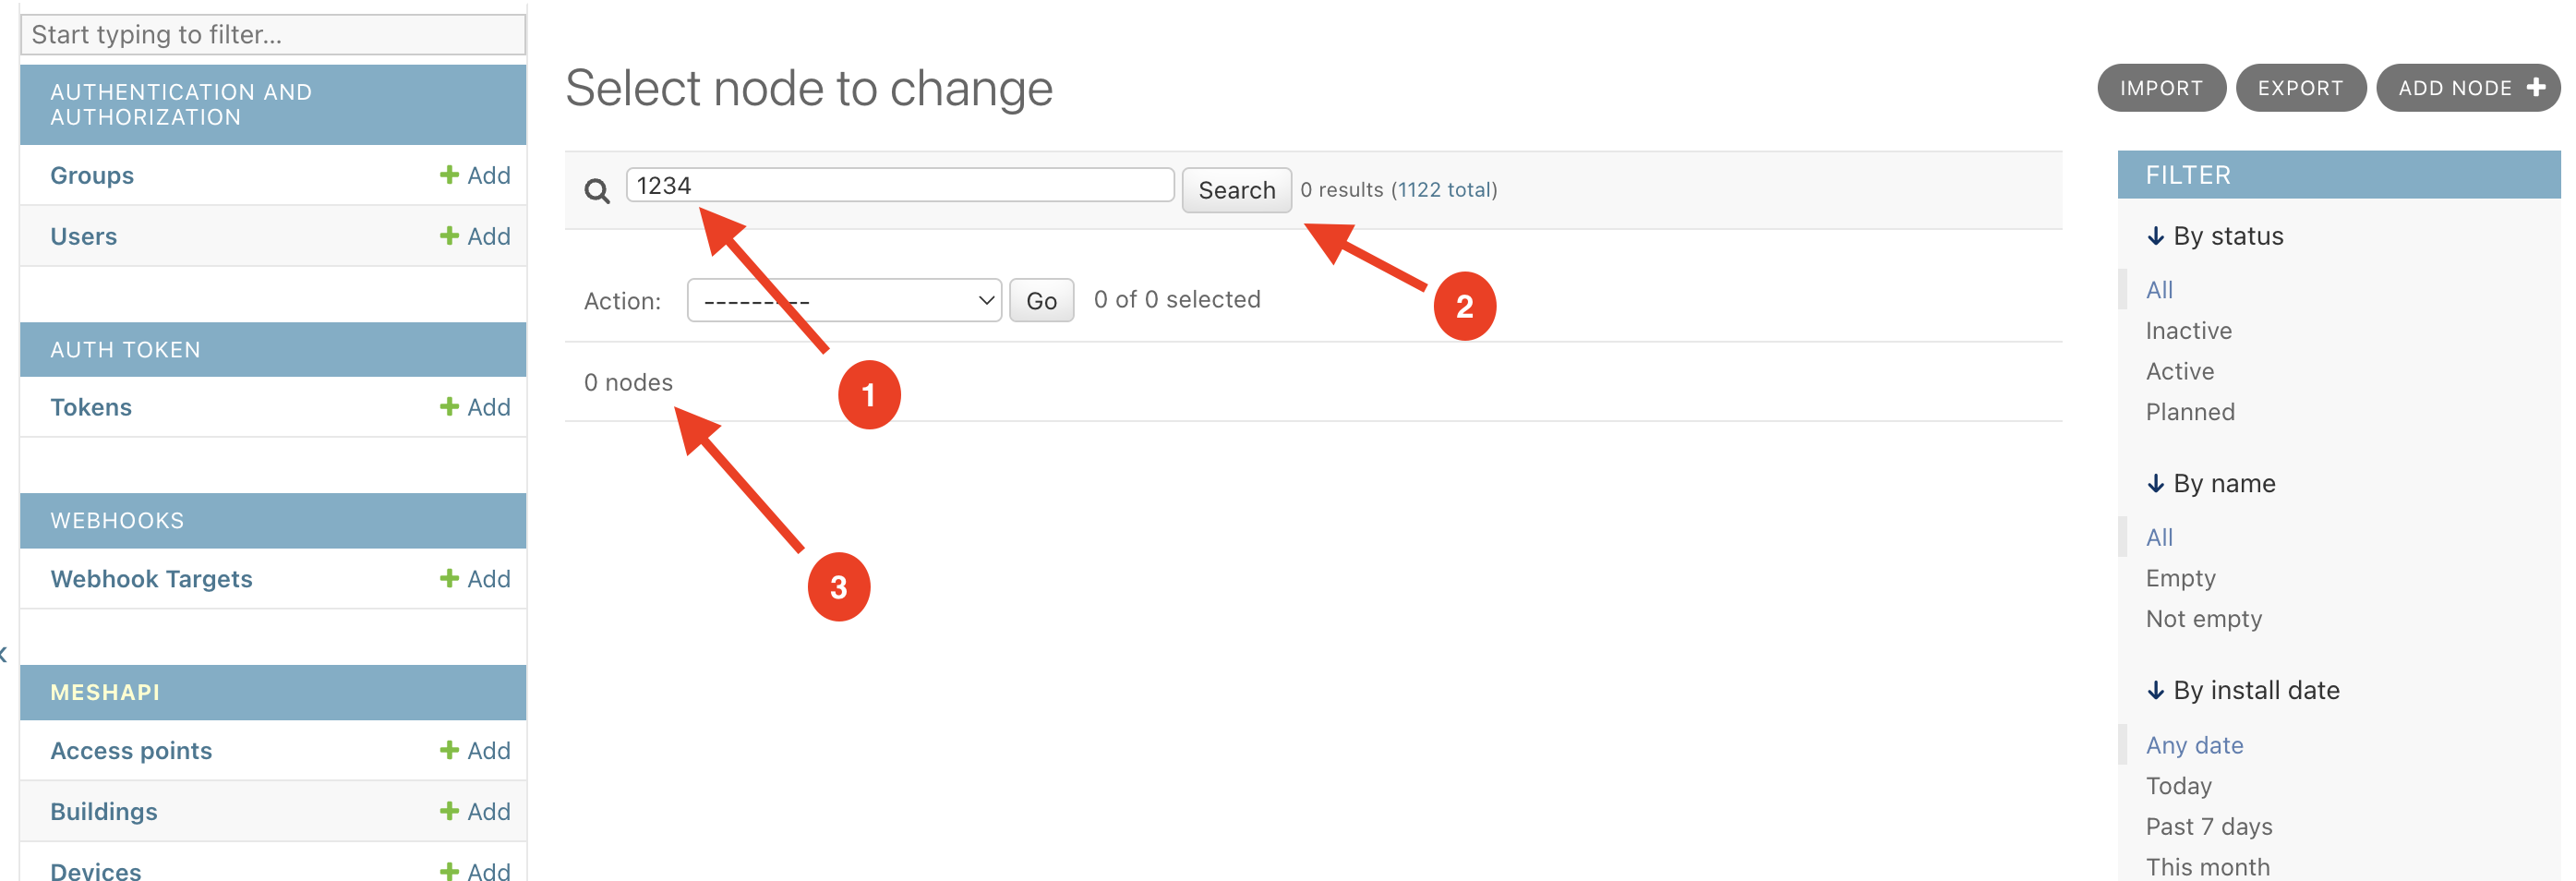
Click "Search" and then confirm that there are no nodes matching this network number
The two above checks are considered best practice to locate a valid network number. However, they are not strictly necessary. MeshDB will perform these checks on your behalf to ensure NN allocation safety as needed in the next step.
Finally, select Add Node to enter the node creation form
Enter the desired NN in the Node Creation form:
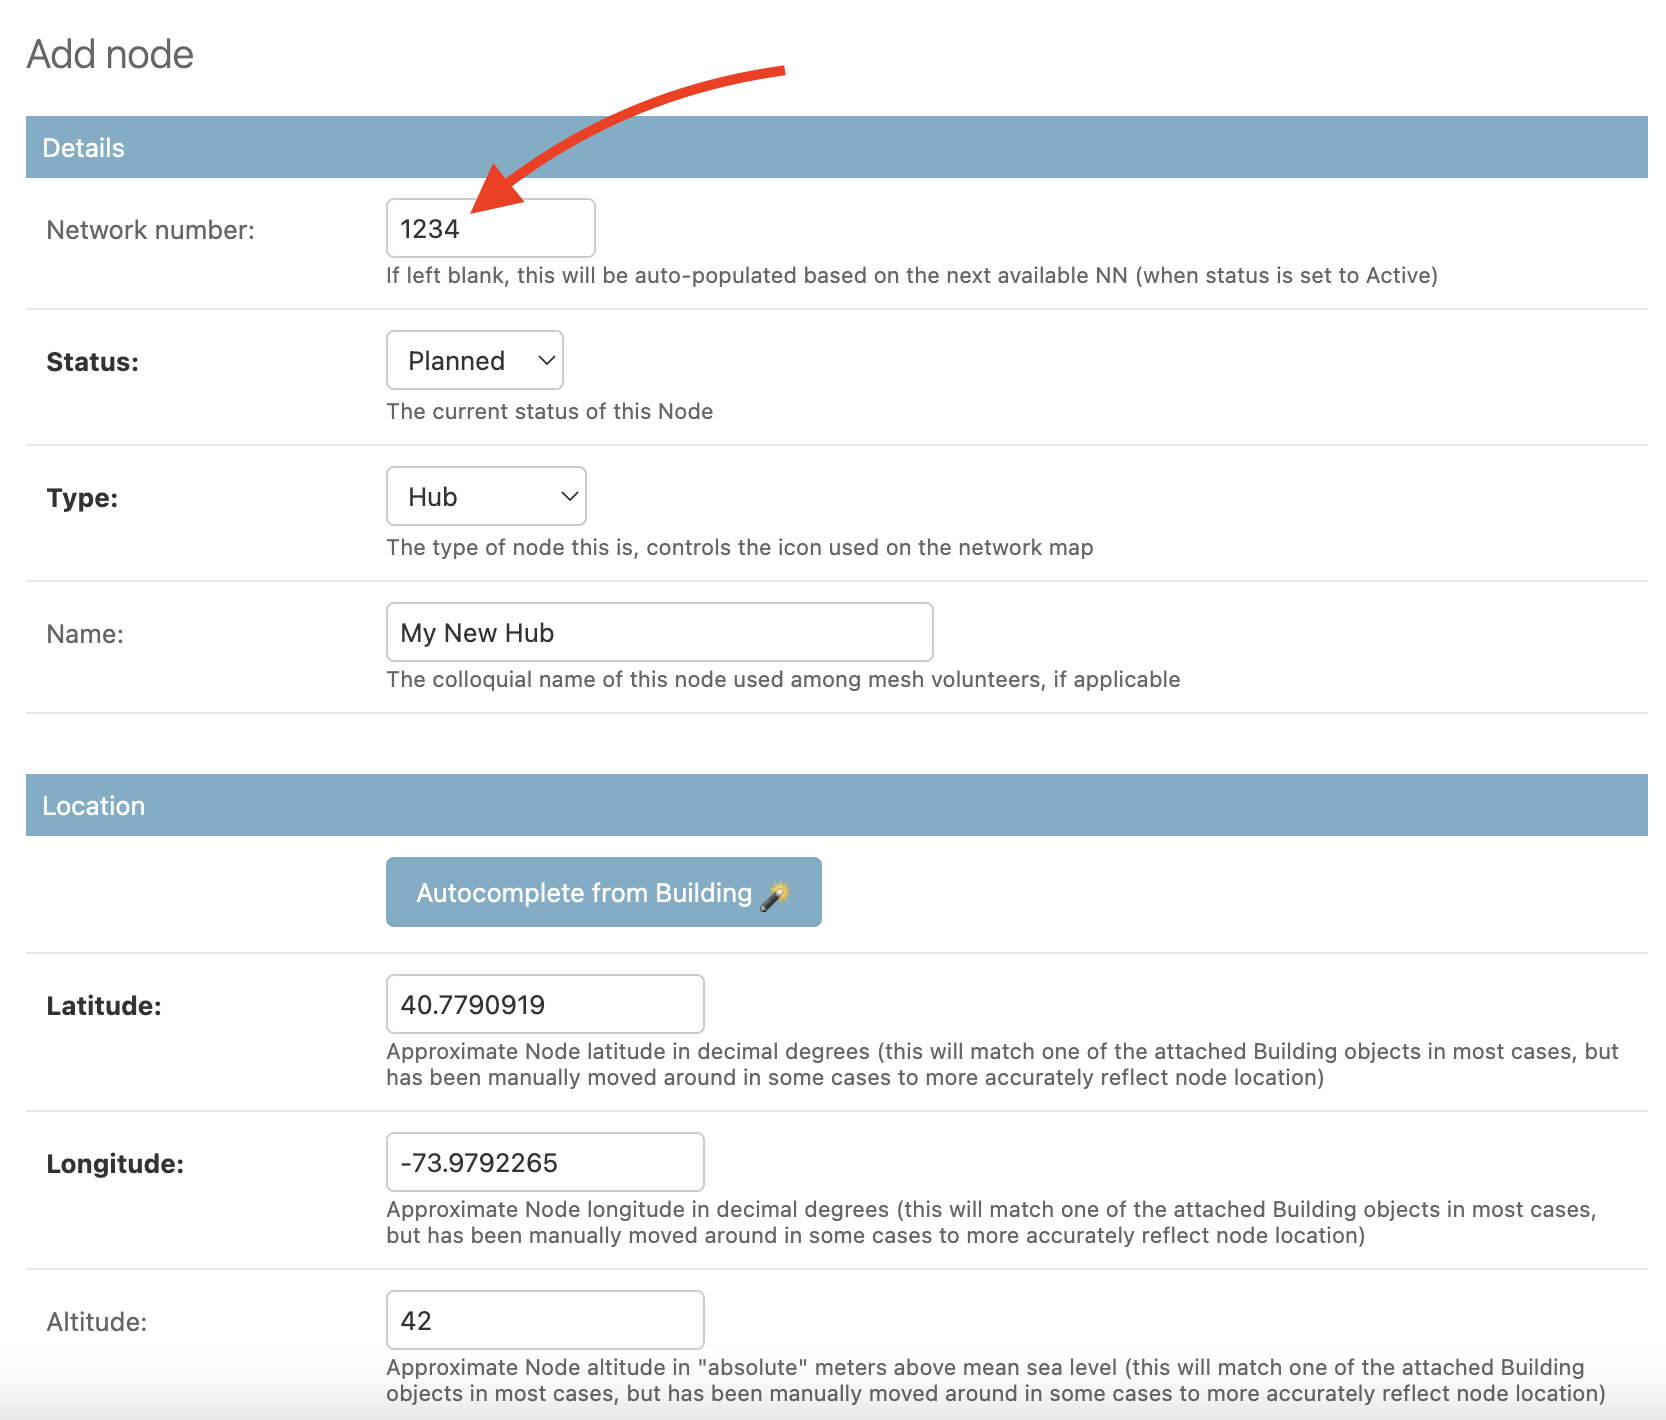
Fill out the remainder of the node creation form based on the details of your node. In this case, we are assigning a network number to a Planned Hub, so we select Planned for the status and Hub for the type.
Pro tip: to avoid having to manually enter the latitude, longitude and altitude information, you can automatically populate this information from the Building object. See How to avoid manually entering latitude/longitude/altitude when constructing Node objects for more information
We complete the rest of the fields as appropriate, and click "Save" at the bottom of the form:
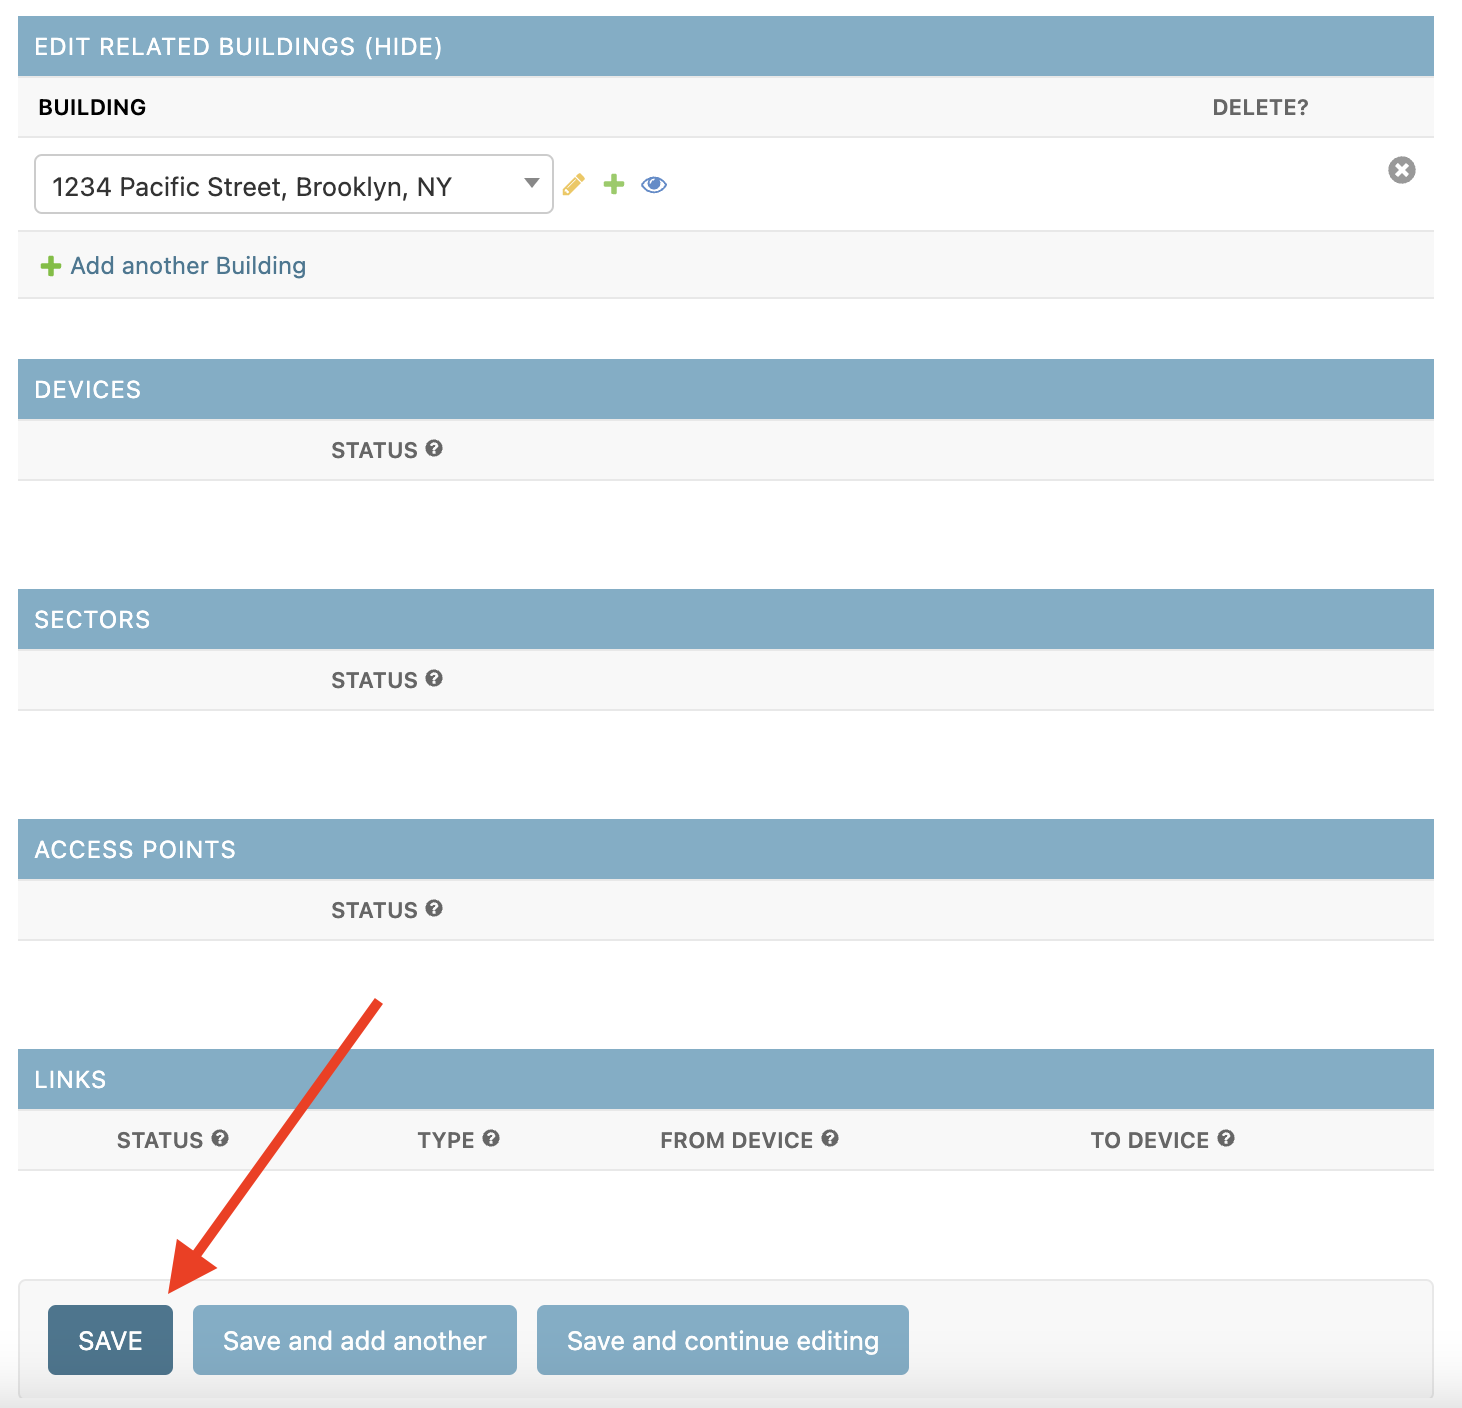

On the install details page, select the node we just created:
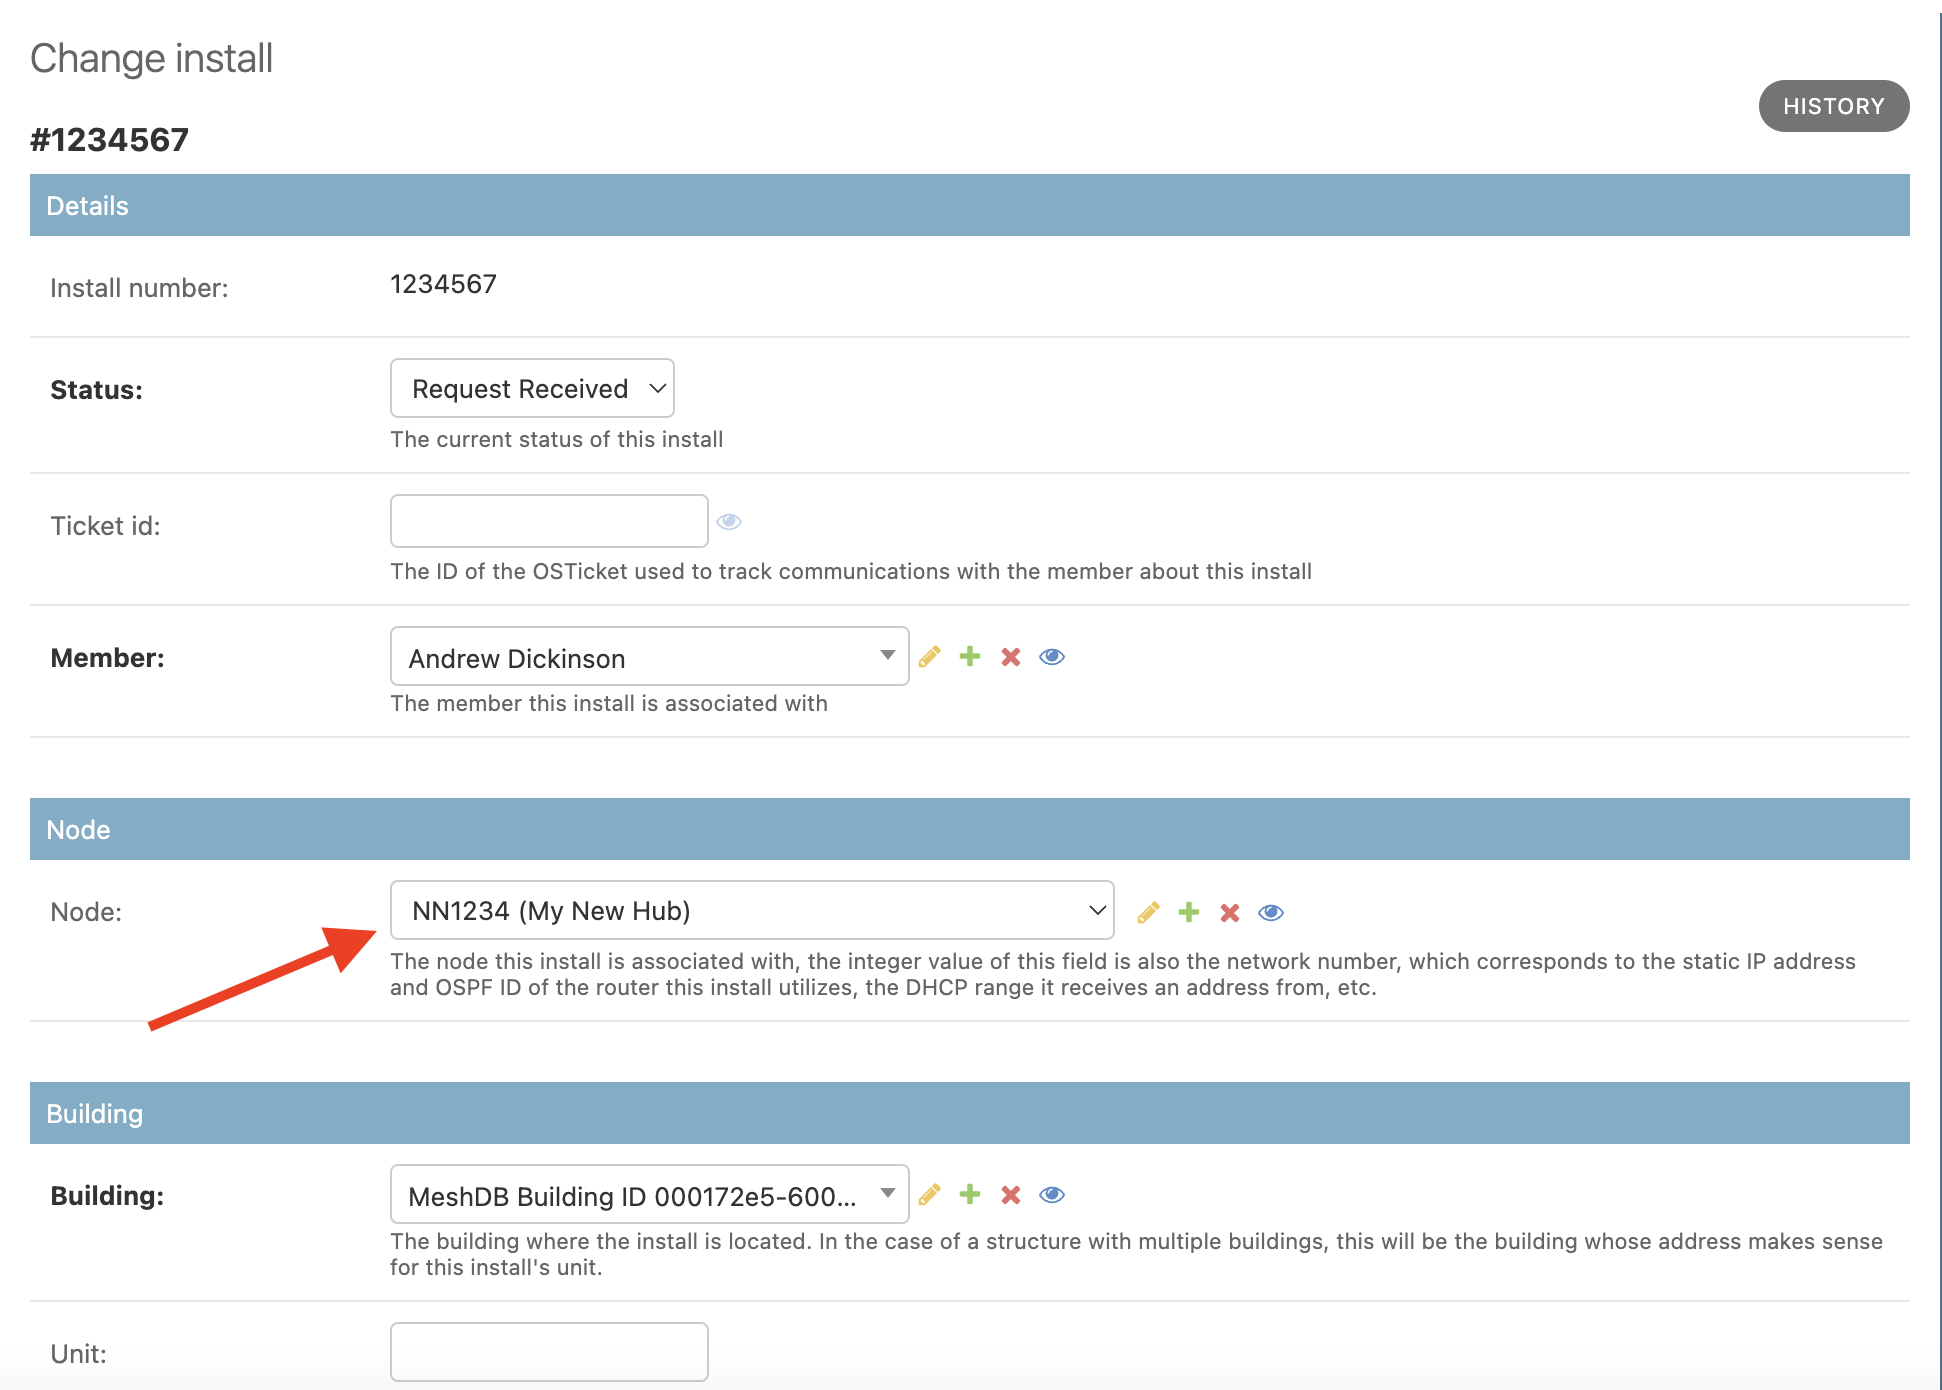
Finally, scroll to the bottom and click "Save"
How to add potential Hubs and Links to the map
To add potential hubs and links to the map using MeshDB, you must create the appropriate database objects. The right way to do this depends on the current state of the data in the database, and the desired outcome. This page summarizes how to do various common tasks:
How to add a big dot for a potential hub or supernode
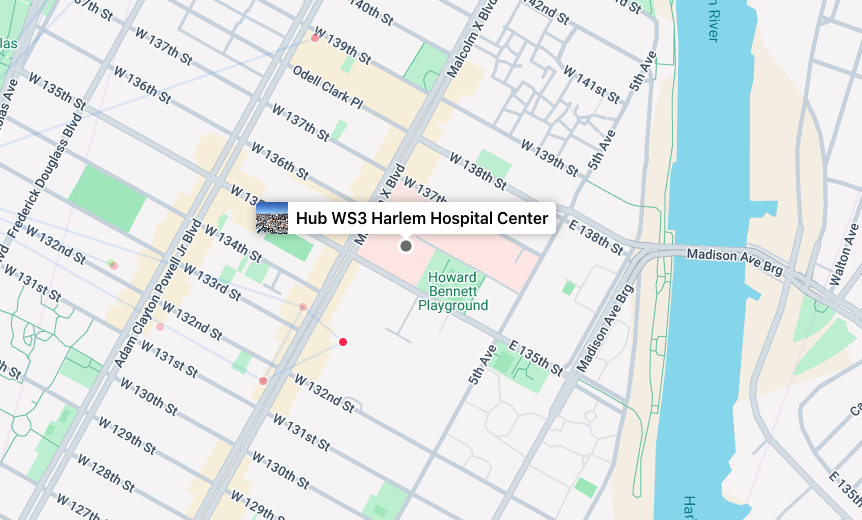
Submit the join form for the location in question, if not already done. Then open the "Add Node" form in the admin panel:
Fill out the information in the form, selecting "Planned" for the status and "Hub" for the type. You do not need to enter a network number if not desired. However if you do not enter a network number at this point, you will not be able to assign a vanity number in the future without re-creating the Node object (automatic NN assignment can still be performed)
Setting the status to "Active" will automatically assign a network number for any Node that doesn't already have one, don't do this until the network number is needed for equipment config, etc.

Fill out the remainder of the node creation form based on the details of your node.
Pro tip: to avoid having to manually enter the latitude, longitude and altitude information, you can automatically populate this information from the Building object. See How to avoid manually entering latitude/longitude/altitude when constructing Node objects for more information
Complete the rest of the fields as appropriate, and click "Save" at the bottom of the form:
On the install details page, select the node we just created:
Finally, scroll to the bottom and click "Save". Your new dot should be present on the map (after a brief waiting period to allow the map to refresh)
How to add a grey line representing a potential link...
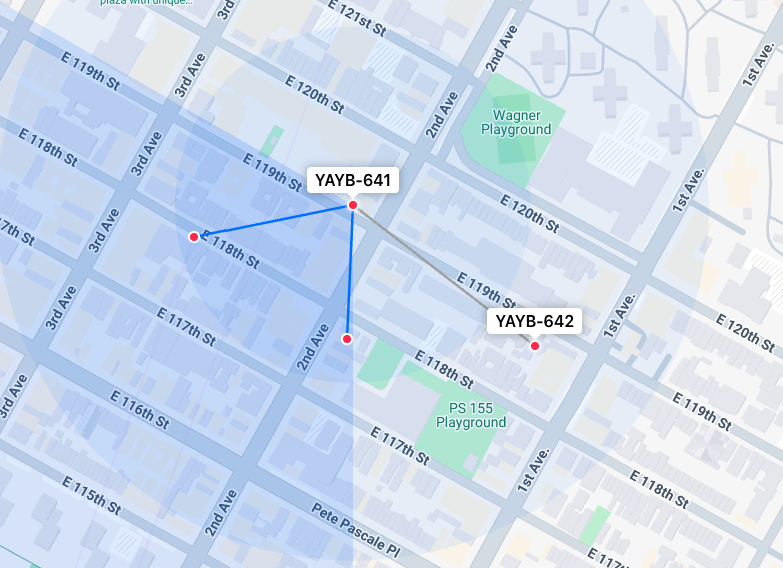
...when the two endpoints of the link are active and the devices to be used are known
When grey new line is to be drawn between active nodes, and the devices at both ends are known, you can use a standard "Link" object, but set the status to "Potential". For example if an SXT is going to be added to an existing node to enable a connection to an existing omni at another node. Perhaps currently the line of sight or antenna gain prevented such a connection between the omnis directly, so there is no existing active link object, despite active nodes at both ends of the potential link.
Use the Device add form to add a device for each side of the link (as needed). Set the status to "Potential" for any devices that do not yet exist in the real world:
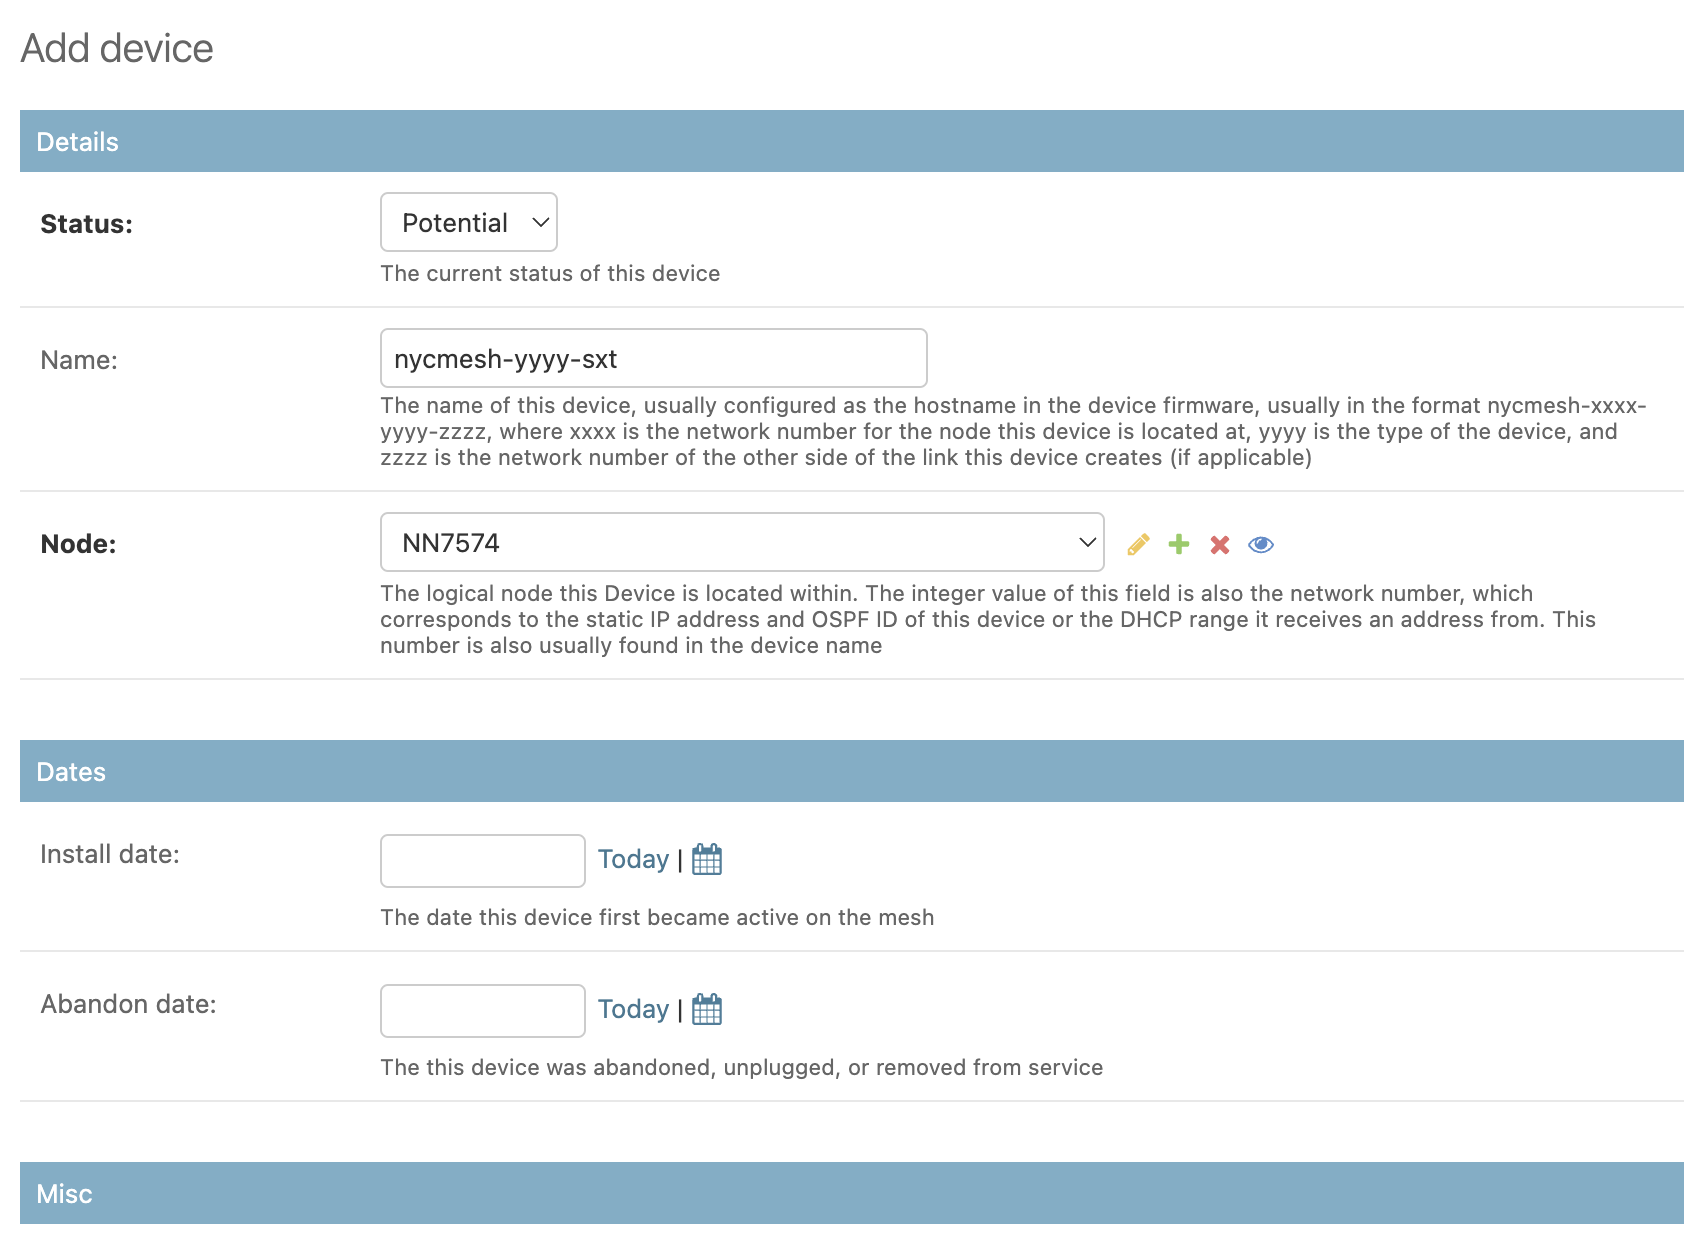
Save each of these devices, then use the Link add form to create the new potential link:
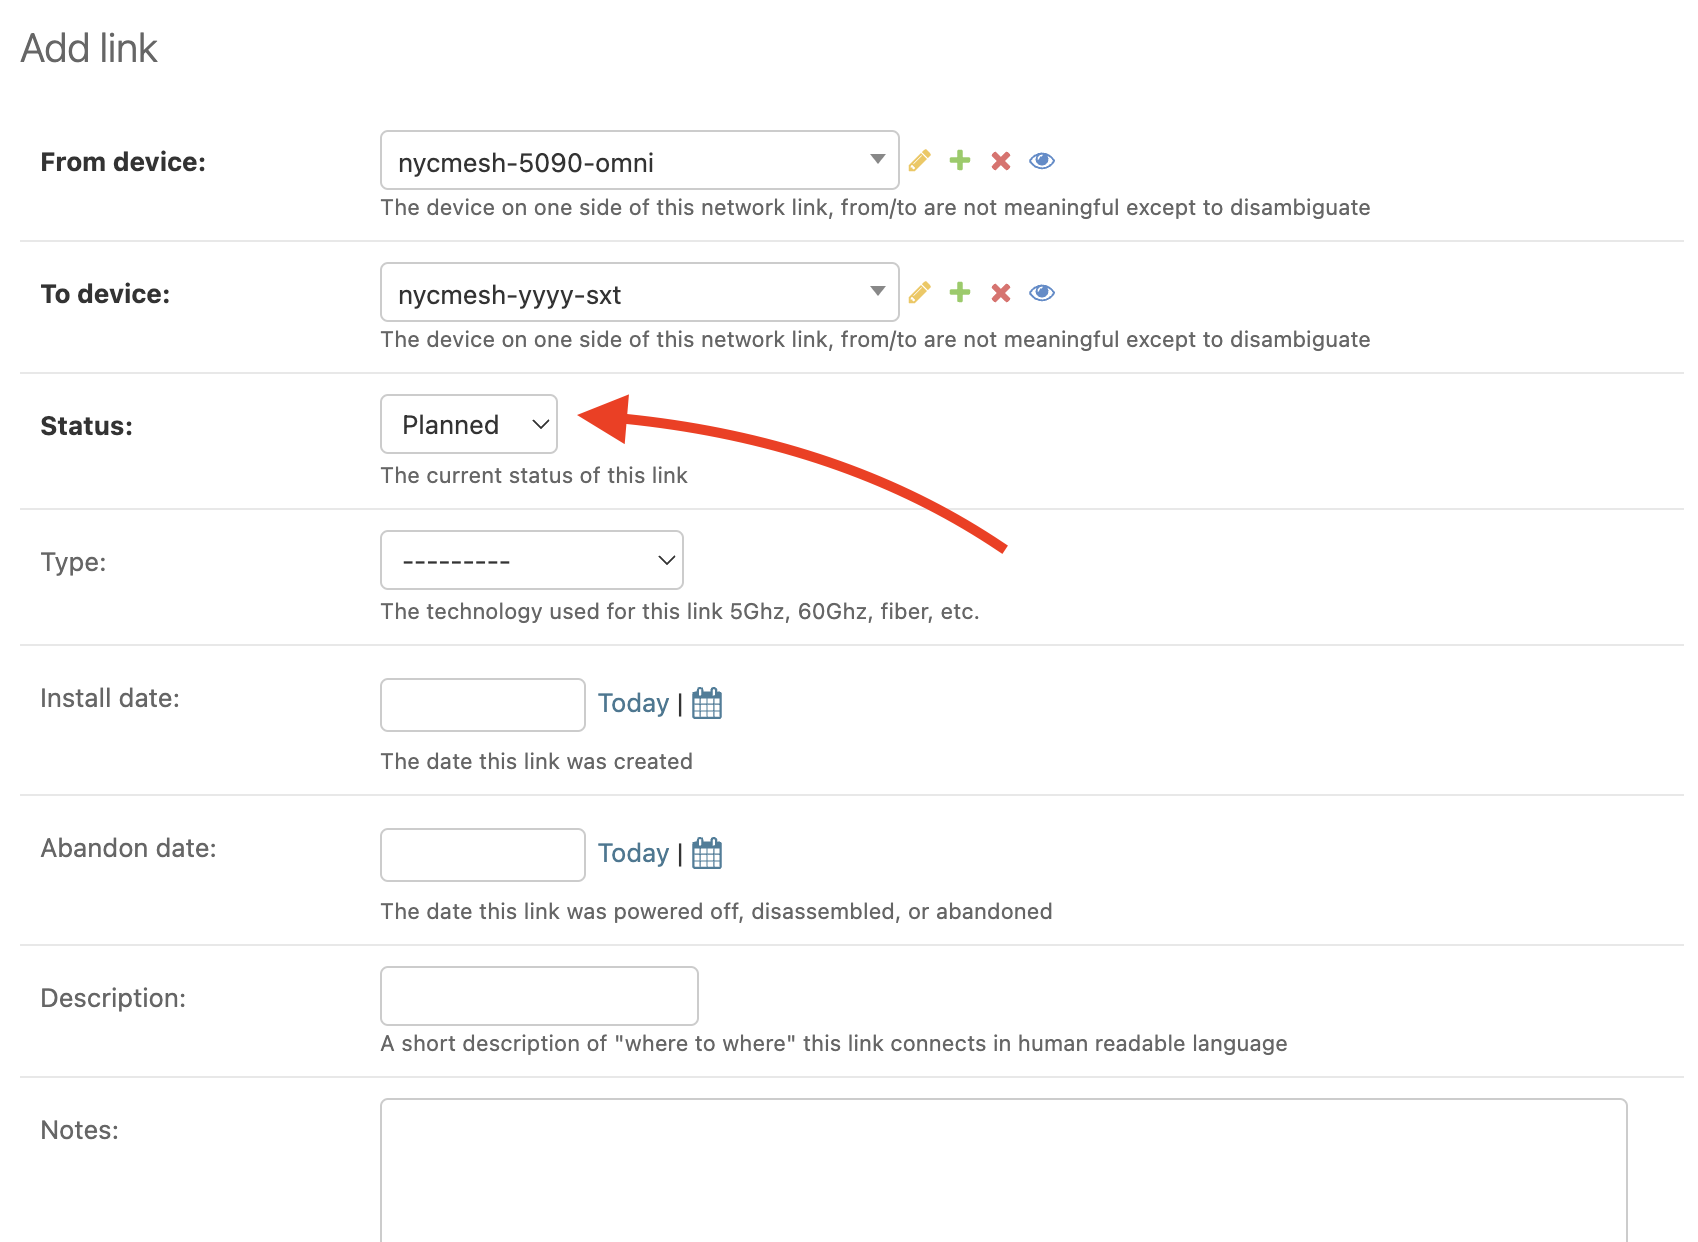
Select "Planned" for the status, so that this link doesn't show as a blue active link on the map.
Save the new link object. Your new line should be present on the map (after a brief waiting period to allow the map to refresh)
...when there are not node objects yet, or the devices are not known
If either end of the link does not have a node object (very likely for potential installs), there is a simpler approach to adding a potential link. We can add this link as a "Line of Sight" (LOS) instead of making it a full fledged link. To do this, open the LOS add form:
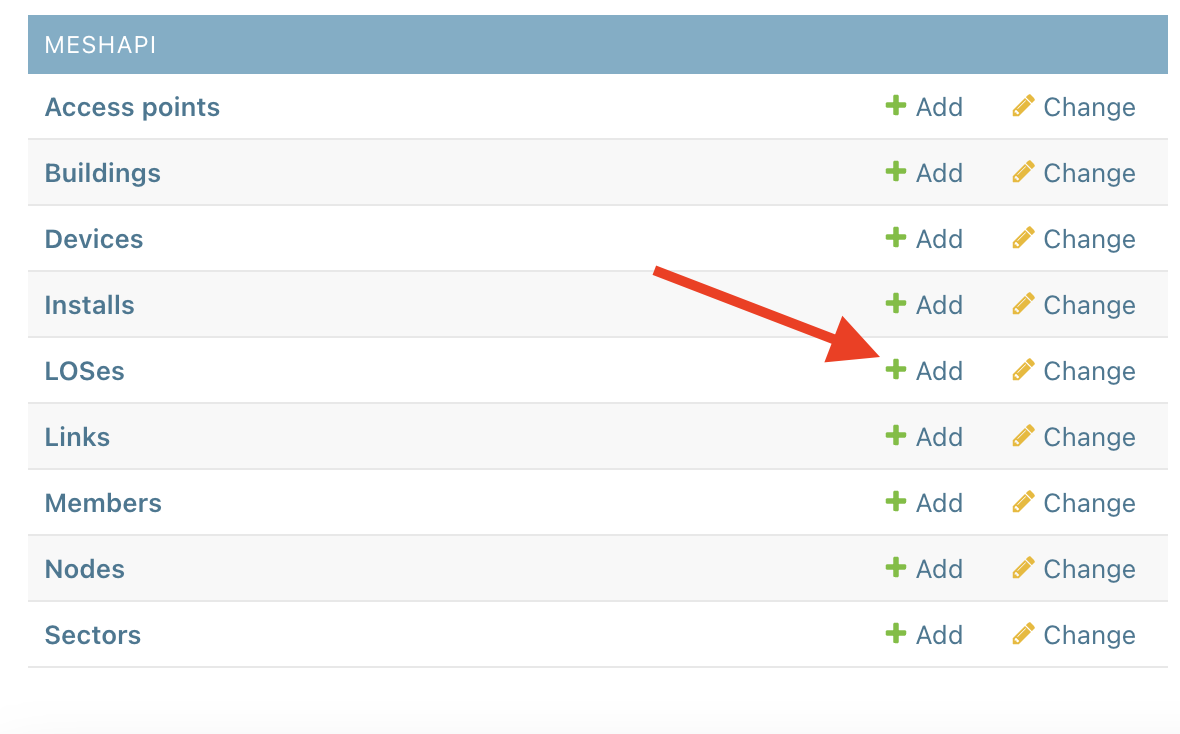
Select the two buildings you would like to draw a line between, by searching using their addresses. Select "Human Annotated" as the source (since you are manually entering the LOS entry).
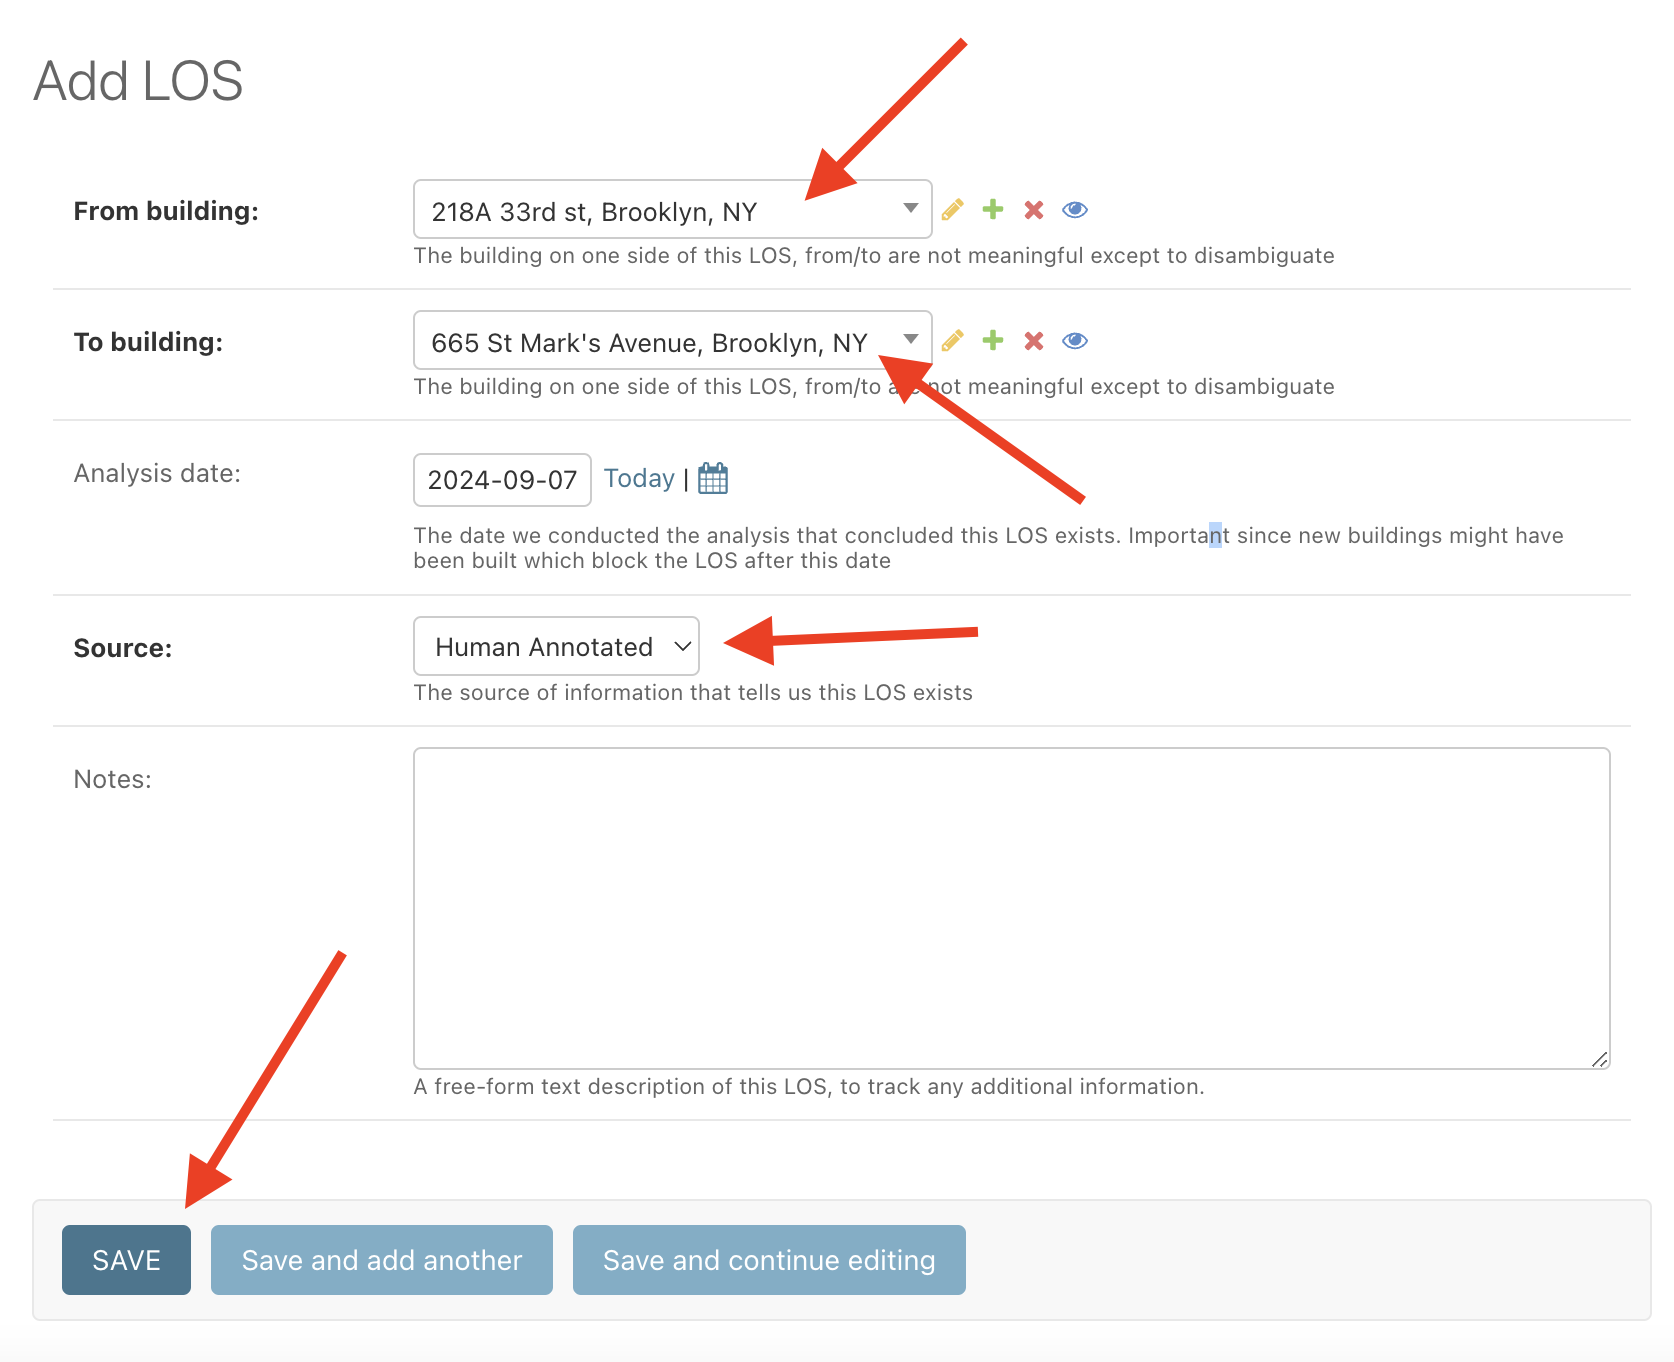
Finally, click "Save". Your new line should be present on the map (after a brief waiting period to allow the map to refresh)
How to update MeshDB when an install is completed
When an install is completed, there are a few items to confirm are correct in MeshDB so that we have accurate information and an up-to-date map:
- Confirm that a network number has been assigned to the install (this is probably already done by the installer, either via the NN assignment form or the vanity NN process in most cases). Do this by searching for the network number in the Nodes search page, and then selecting the correct Node. On the node details page, check that the install that was just completed is listed under "Installs". If it is not listed, correct it on the Install detail page.
- Check that the Node details are correct. Validate that the node status is set to "Active", and that the Node's building list includes the building the install is contained in
- Click the link to the install details page and mark the install status as "Active"
- Update the Install Date field on the install (and Node if not pre-existing) to today's date
- Set the Is DIY? field based on if this install was conducted by a volunteer or directly by the member themselves
- To add a link to the map, create the appropriate device objects if needed using the device add form. However, these devices are also automatically imported from UISP, so check if the devices already exist by searching for them by name before creating duplicates. Next, add a link between the devices using the link add form if needed. Again, links are automatically imported from UISP, so take care not to duplicate existing link objects
How to update MeshDB to indicate the loss of an install
When an install leaves the mesh, MeshDB needs to be kept up-to-date to ensure we have accurate member count and contact information.
If an install has just dropped offline for a few hours, no action is needed. MeshDB does not attempt to track the status of the mesh that finely. See node explorer for up-to-the minute information. However, if an install has been offline for a month or more, it should really be marked as "Inactive"
See MeshDB Status Values for more information about the meaning of each status option.
Marking objects as "Inactive"
To update MeshDB for an install that has dropped offline for a few weeks but has the potential to return at a later date, do the following.
- Set the status of the Install object to Inactive
- Set the status of the Node object to Inactive
- Set the status of any devices on the Node to Inactive
- Set the status of any links connected to those devices as Inactive
Marking objects as "Closed"
If an install has been confirmed to be abandoned or taken down by talking with the member, or an on-site visit from a volunteer, and is not expected to return, then it should be marked as "Closed"
- Set the status of the Install object to Closed
- Set the status of the Node object to Inactive
- Set the status of any devices on the Node to Inactive
- Set the status of any links connected to those devices as Inactive
Multi-install nodes
If the install that as gone offline is a part of a node with additional installs, and those other installs are still online, then only the offline install needs to be marked Inactive or Closed. Nothing else needs to be changed
New Application Integration Guide
So you want to build an application which interacts with MeshDB data. Great!
First, familiarize yourself with the data schema that we use at a high level. You likely don't need to get into the intricacies of the various edge cases, but read the first section where we describe the high level relationship between the various tables. You probably also want to gain at least read-only access to the admin console so that you can see examples of the schema implemented for real data. Have a friendly admin follow this guide to give you access (or ask in #meshdb on slack).
Next, review our API docs to get a sense of the endpoints available and the format of the data your application can expect to receive. In order to get credentials, Have a friendly admin follow this guide to create the credentials (or ask in #meshdb on slack)
Environments
We run several instances of MeshDB. This is so that we can do development and testing, gate our changes, and ensure the quality of the code and configurations we ship.
Find our infrastructure at https://github.com/nycmeshnet/k8s-infra
Production (prod1)
Our main instance.
Preproduction (gamma)
Planned instance. Does not currently exist.
Used to run tests against before changes go out. Designed to be as close to prod as possible.
Development (dev3)
https://devdb.mesh.nycmesh.net
Development instance. Probably broken a lot, used to test infrastructure changes and develop new features. Does not represent prod 1:1.
Maintenance Mode
MeshDB has a maintenance mode. It prevents all access to the site, UI, and API while active.
To enable it, run `manage.py enable_flag MAINTENANCE_MODE` or POST to the `/maintenance/enable/` route
To disable it, run `manage.py disable_flag MAINTENANCE_MODE` or POST to the `/maintenance/disable/` route
There is also a view in the Admin UI that can enable it, though it will not work for disabling.
Observability
We use Datadog to monitor MeshDB.
Dashboard
https://p.us5.datadoghq.com/sb/4614e554-06a1-11ef-b43a-da7ad0900005-ba514715f9683f103794ee705df1db95
APM & Tracing
Presently, MeshDB is instrumented at the deployment level with Single Step APM. Meshforms is instrumented from the datadogagent itself using the enabledNamespaces feature.
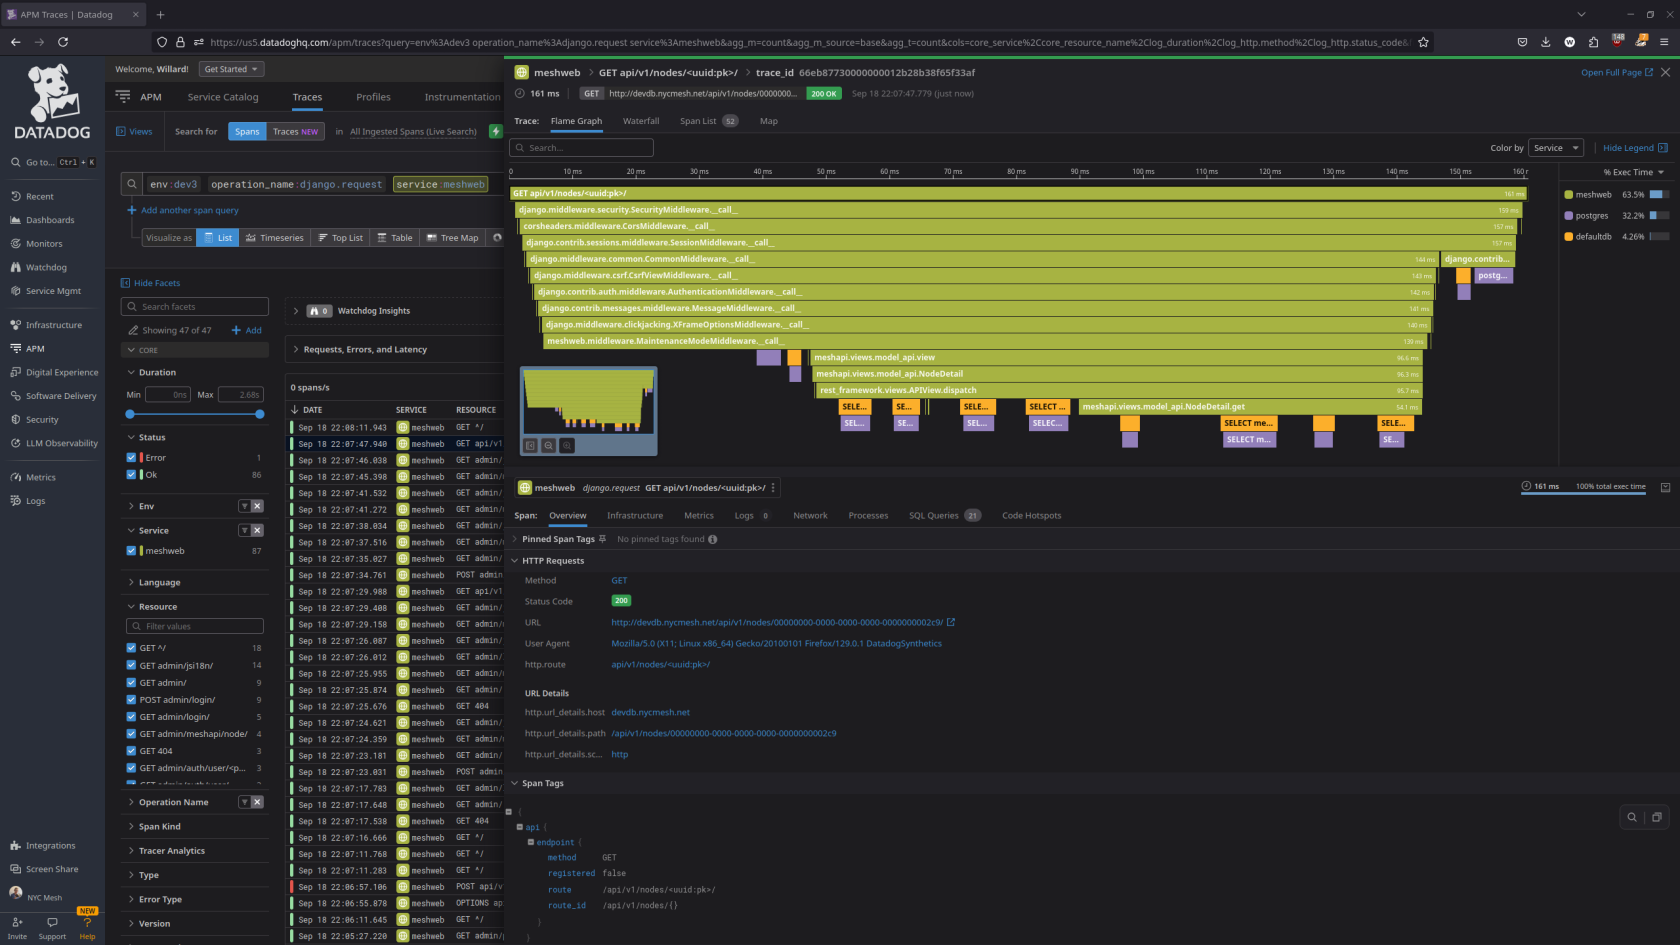
Admin Panel
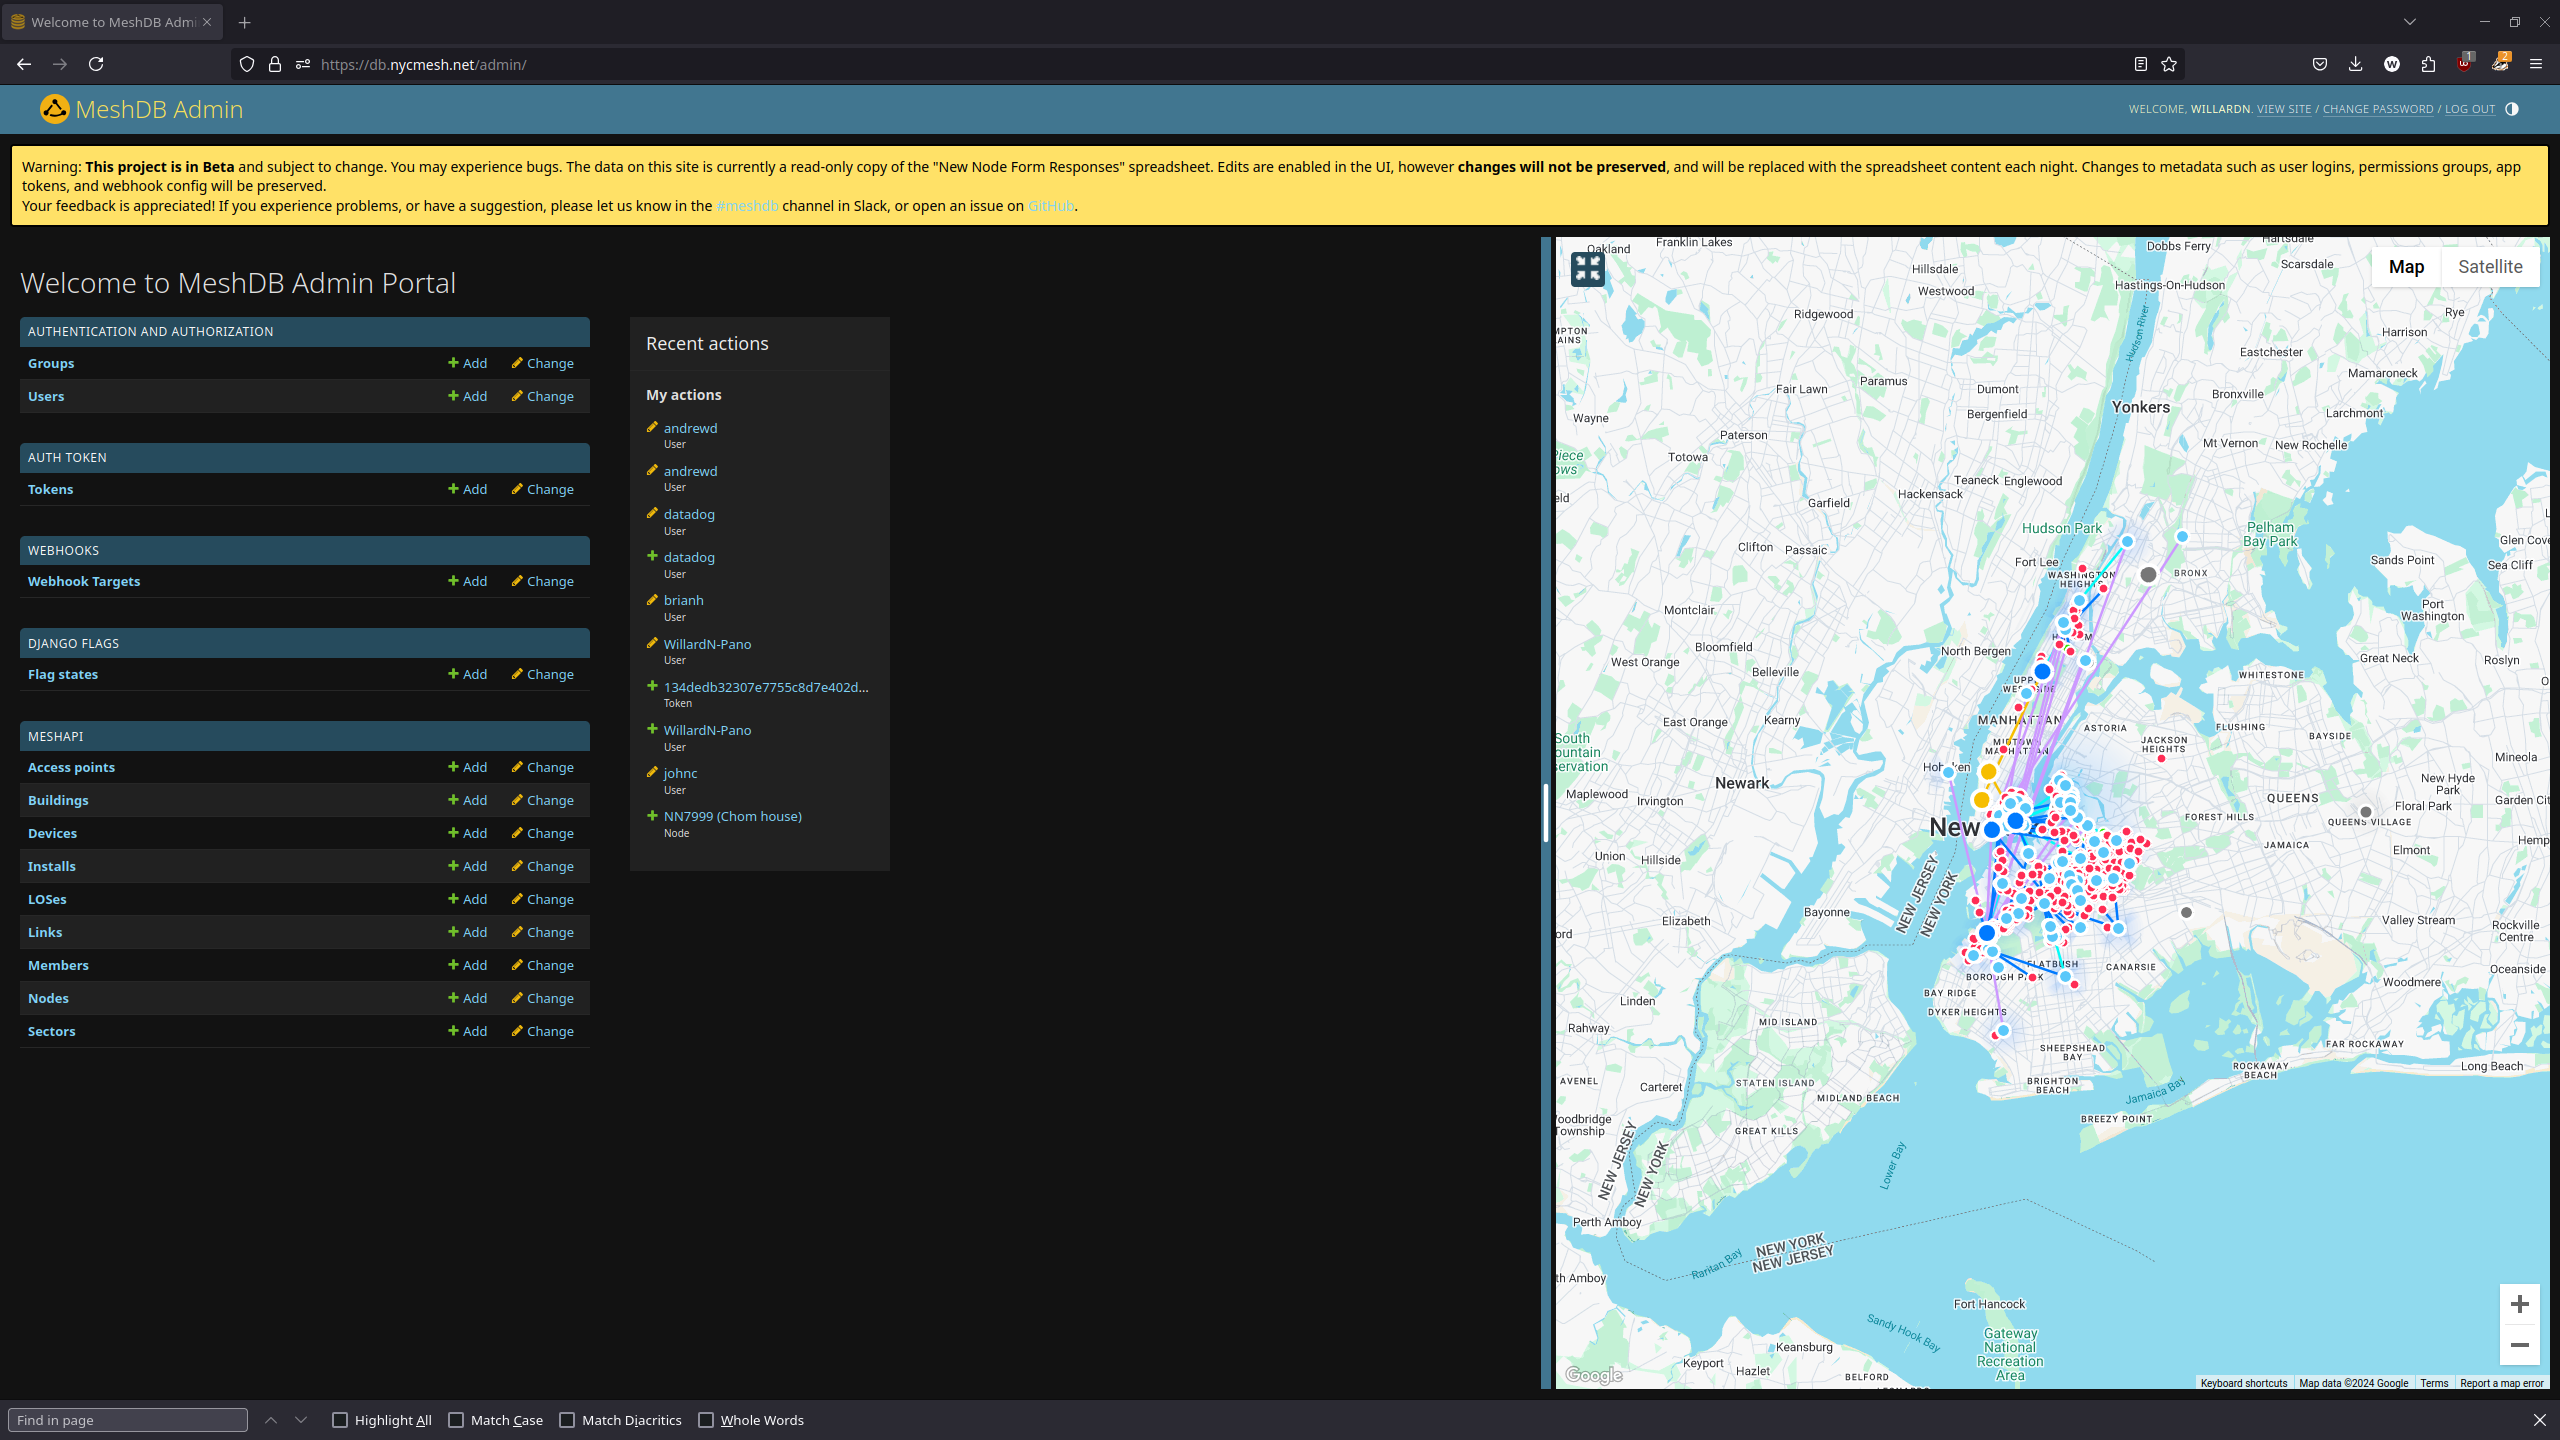
MeshDB Domains
| Environment | Service | Link |
| Production |
MeshDB | https://db.nycmesh.net |
| Mesh Forms | https://forms.nycmesh.net | |
| LOS Tool | https://los.nycmesh.net | |
| LOS Backend | https://los-backend.db.nycmesh.net | |
| Admin Map | https://adminmap.db.nycmesh.net | |
| Map | https://map.db.nycmesh.net | |
| Development |
MeshDB | https://devdb.nycmesh.net |
| Mesh Forms | https://forms.devdb.nycmesh.net | |
| LOS Tool | https://los.devdb.nycmesh.net | |
| LOS Backend | https://los-backend.devdb.nycmesh.net | |
| Admin Map | https://adminmap.devdb.nycmesh.net | |
| Map | https://map.devdb.nycmesh.net |
Feature Flags
We use a library to control whether certain features are enabled.
To enable a feature, go to Flag States, create a new state, or edit the existing one, and fill it out like so.
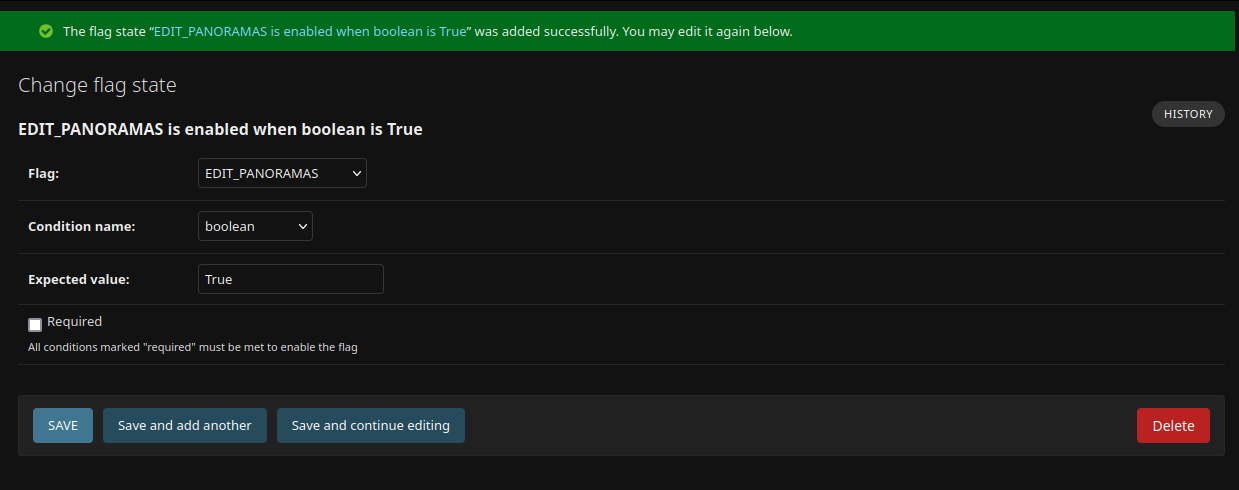
The feature will then be enabled.
Panoramas
The way that panoramas currently work in MeshDB sucks. They are uploaded to a github repo (https://github.com/nycmeshnet/node-db/tree/master/data/panoramas) manually. Once every now and then, MeshDB runs a celery job to query this GitHub and mutate the contents of this huge directory into _netlify_ URLs to actually serve. How do images get from GitHub to Netlify? I dunno, Magic, I guess.
Proposed solution
Instead of doing All That Nonsense, we should take better advantage of our Dropbox storage and store panoramas in there durably. Upload panoramas (and install photos!) form Meshforms. Then, we can actually serve them from a MinIO instance. The MinIO instance could be ker-ploded and rebuilt from Dropbox, which is cloud-based, HA, and durable.
Add a portal to Meshforms that allows people to upload panoramas and install photos
https://www.dropbox.com/developers/reference/webhooks
MeshDB receives webhooks from Dropbox, syncing panoramas to MinIO, then updates the Building models to point at their location on MinIO.
We get real-time panorama updates :)
(This could also be done with a separate microservice if we want to keep the functionality out of meshdb, but I would want to get the client lib working)
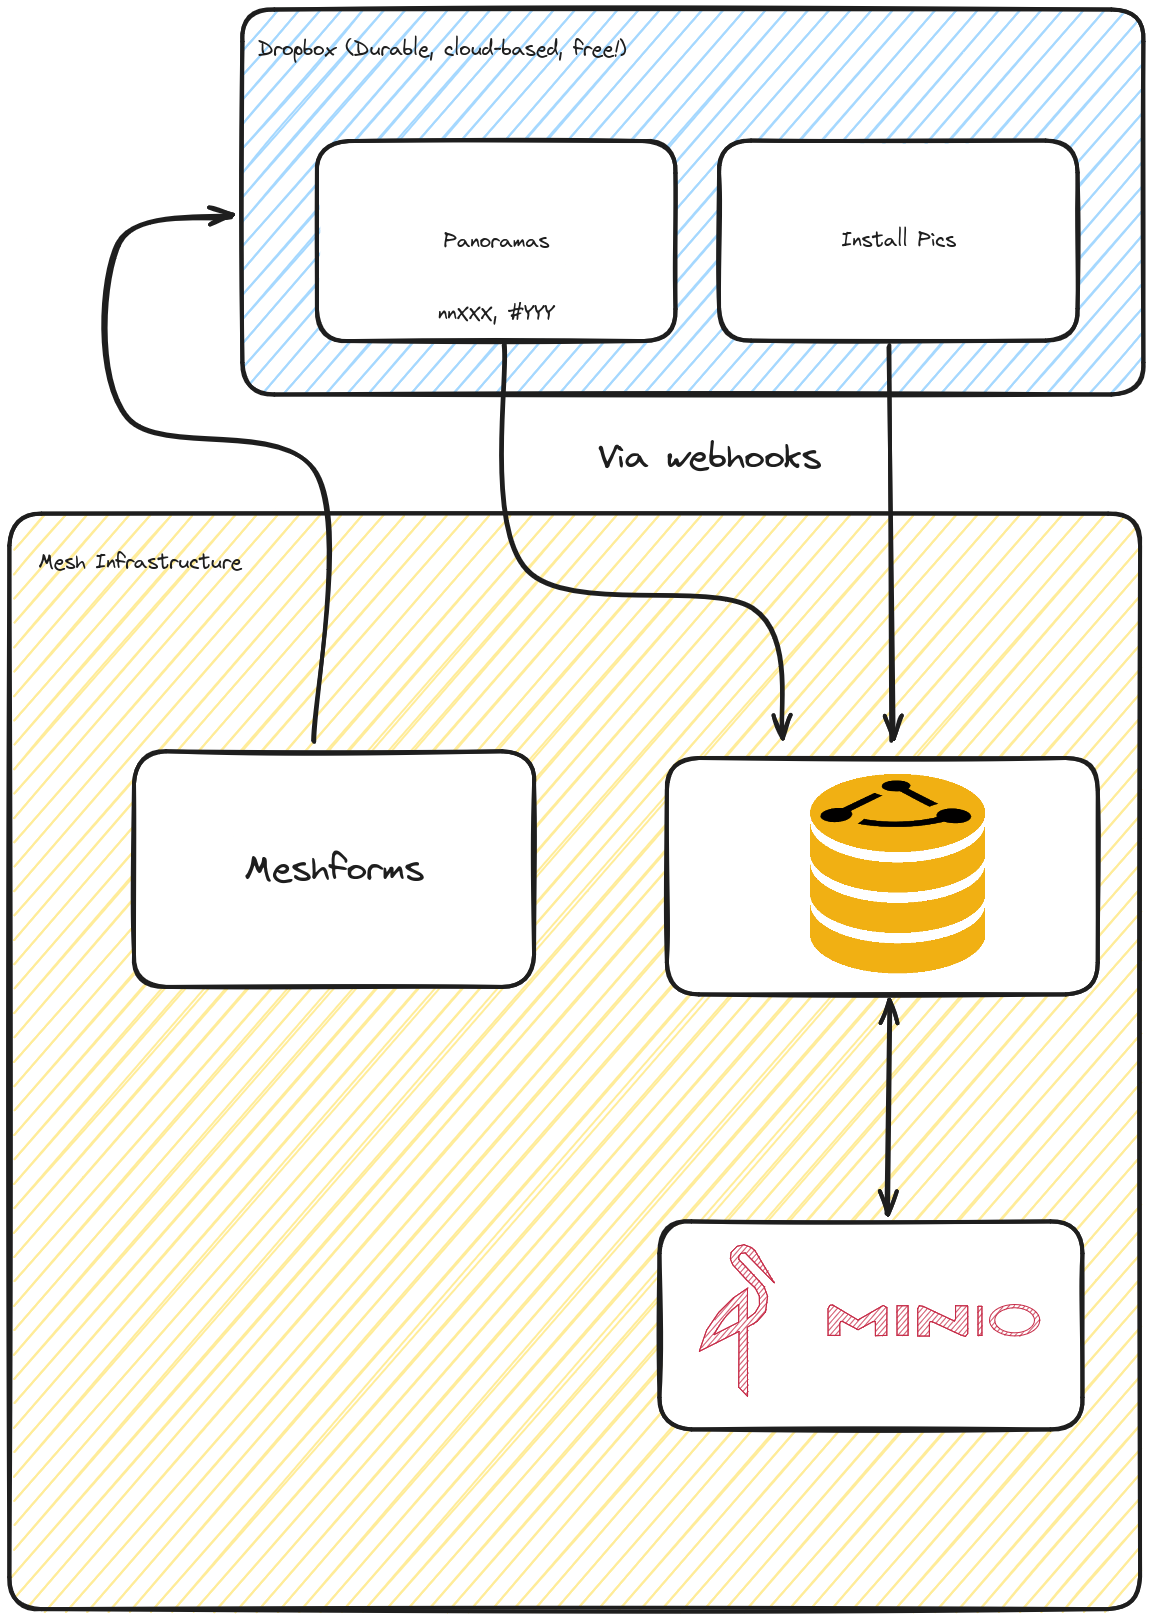
How to Import/Export CSV files of MeshDB data
The data in MeshDB is best viewed using the tooling available at db.nycmesh.net:
- Admin Panel: https://db.nycmesh.net/admin
- Legacy Query form: https://forms.nycmesh.net/query
- SQL Explorer: https://db.nycmesh.net/explorer/play/
However, for some applications these resources may not provide all of the required query and filtering functionality. In these cases, users may want to export meshDB data for direct editing/analysis in spreadsheet editors or other local tools. This page summarizes the options available to do that.
CSV Export in MeshDB Format
To export individual MeshDB tables in the format used by MeshDB, such as the Members table, first open the MeshDB Admin Panel. Next select the table of interest, Members in this case:
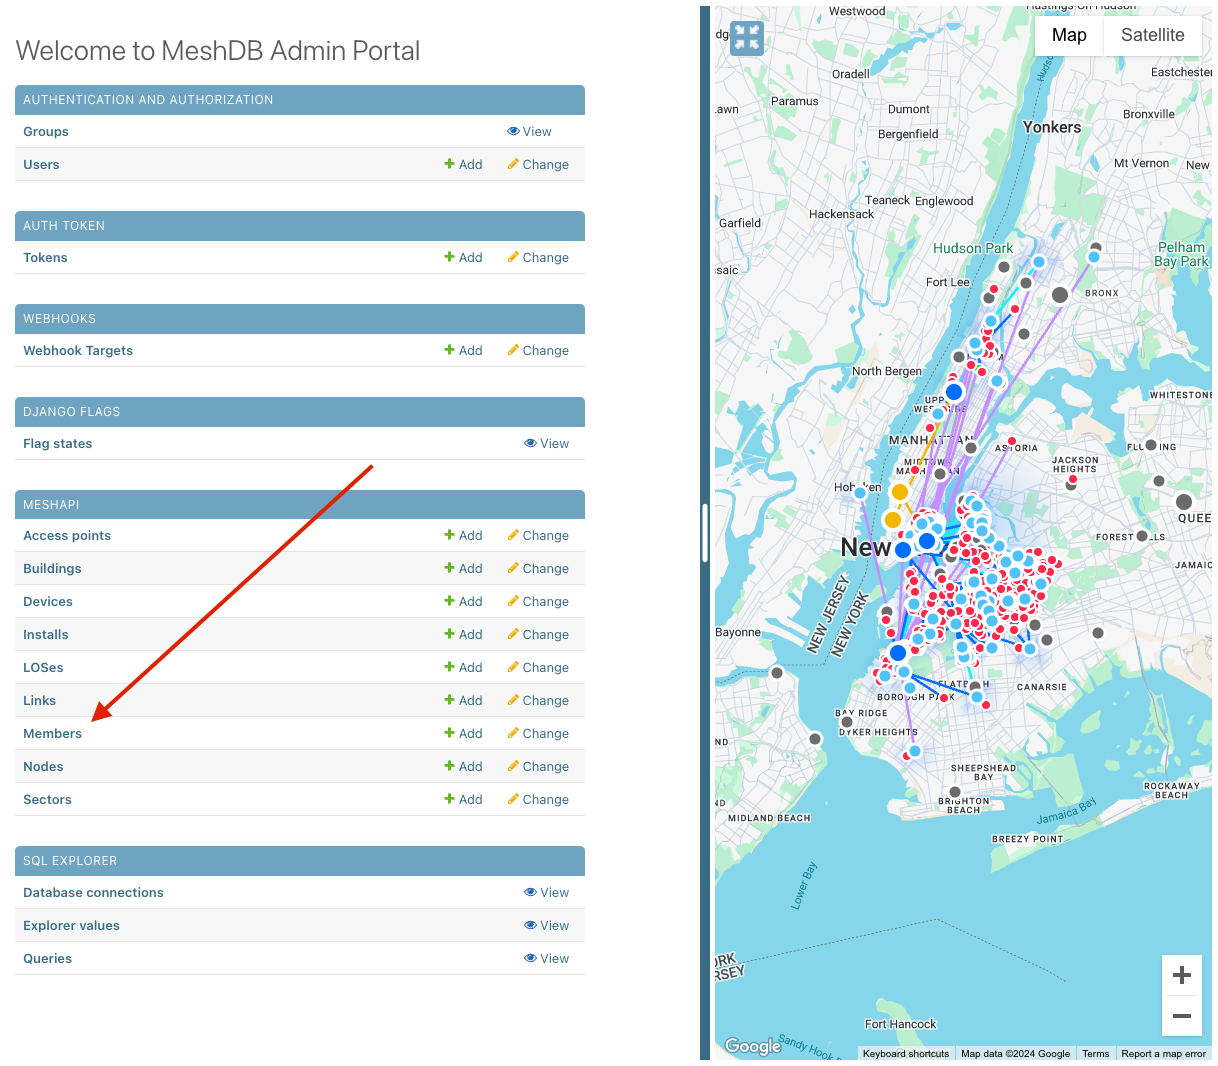
On the next page, select "Export" to enter the export dialog:
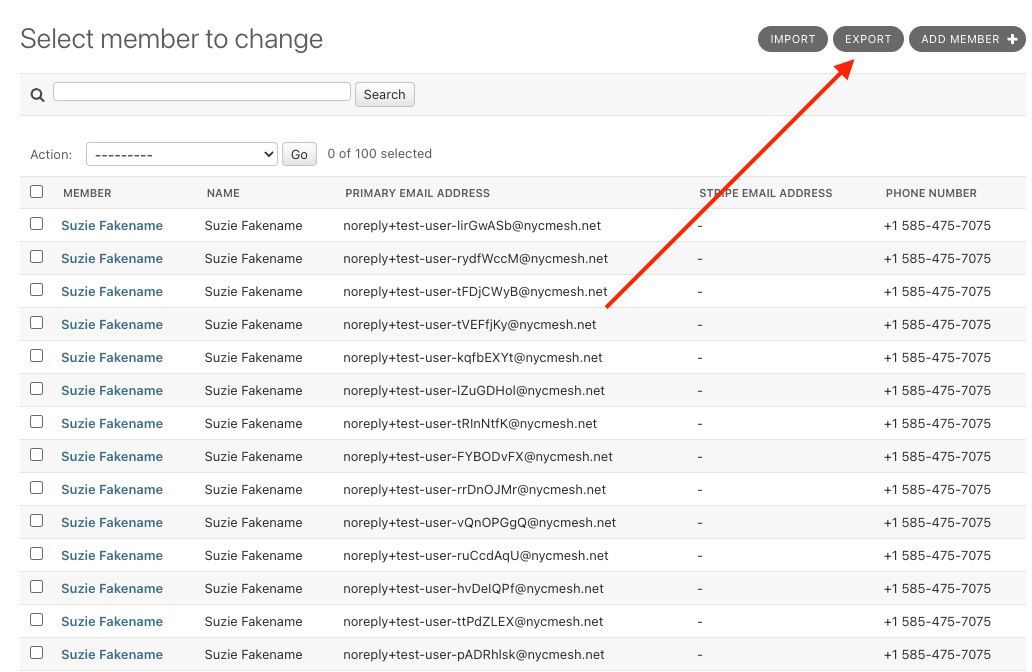
Finally, select "csv" as the output format, click "SUBMIT", and the data will be downloaded:
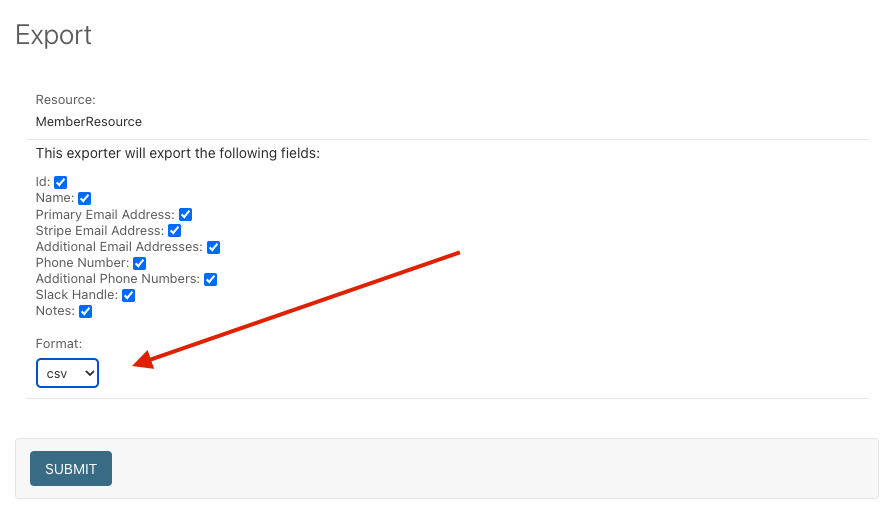
Since we chose to export the data in MeshDB format, it does not include related columns such as install number or node number. These other columns would need to be downloaded separately from their respective tables an joined together with the id column on the member table. This is not trivial, so for common cases, like looking up a member's install by their email address, we provide CSV exports that combine these tables automatically, see below.
CSV Export in Legacy Spreadsheet Format
For convenience and compatibility with legacy scripts and workflows, MeshDB provides a CSV export capability which approximates the columns available in the "New node form responses" spreadsheet
The CSV exports provided in this section are an approximation of the legacy spreadsheet, but are not a perfect recreation. In particular, the notes fields do not match 1:1 with the original spreadsheet due to the way that the notes are parsed, split, and automatically created during the spreadsheet import process. Some smaller details like the exact install used for the `X-` pointer on NN re-use may also vary a bit. This query should not be used to replace the contents of the existing spreadsheet wholesale without careful consideration
To access this capability, use the following links, or navigate via the SQL Explorer homepage:
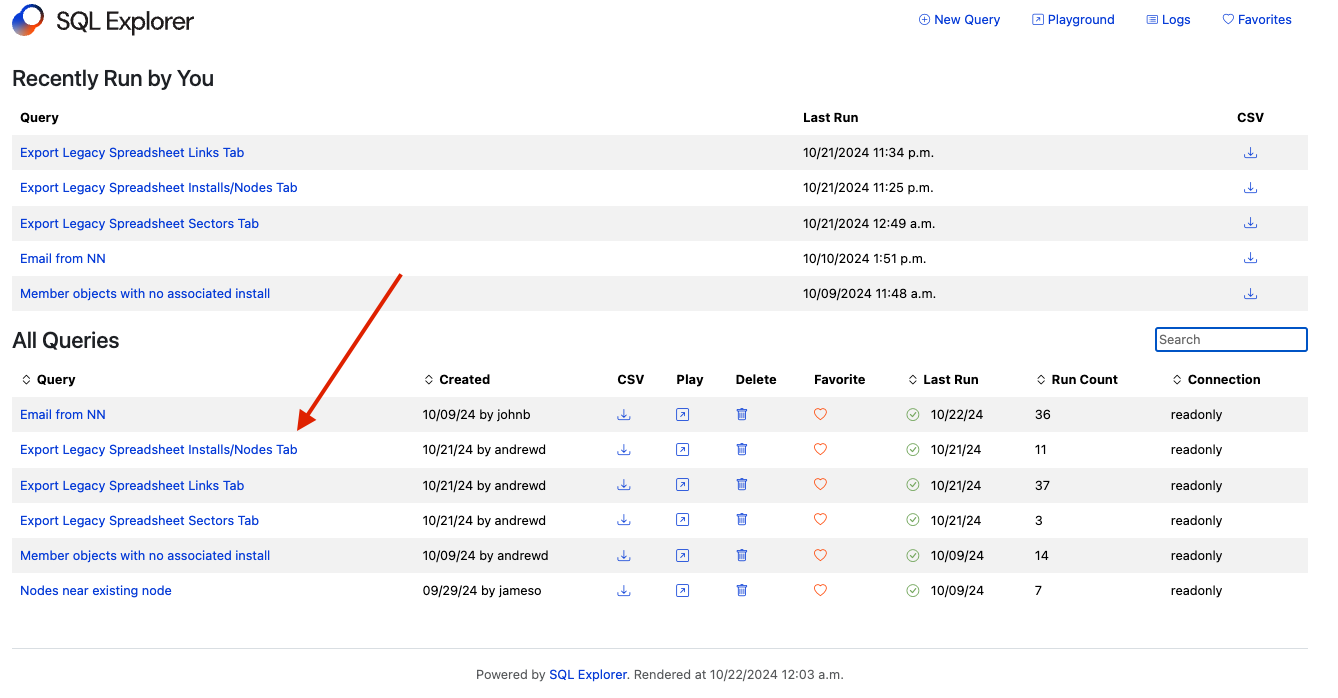
These queries can also be accessed by the following direct links:
- Export Legacy Spreadsheet Installs/Nodes Tab
- Export Legacy Spreadsheet Links Tab
- Export Legacy Spreadsheet Sectors Tab
Use the "Download" button and select "CSV" as the type:
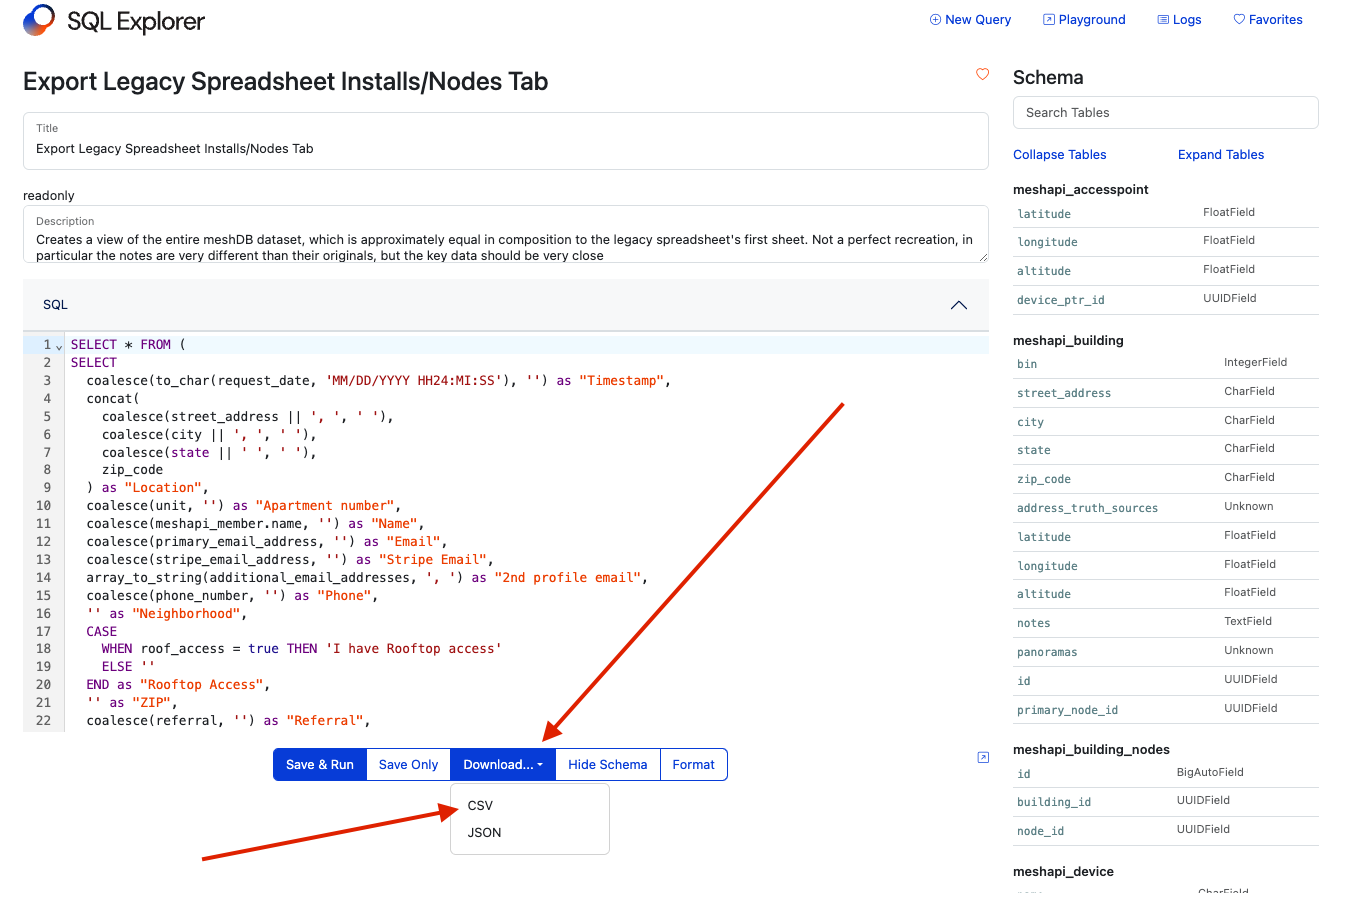
CSV Import in MeshDB Format
These instructions cover the general process for importing a CSV into MeshDB, for a bulk import of partner data for example. For creating many installs in a large building, there is a more specific guide here
Editing large quantities of MeshDB data using CSV import can unintentionally have a large impact on the quality of MeshDB data. Though edits using this feature are supported, this process should primarily be used for imports of new data, rather than edits to existing data. For bulk edits to existing data, a Django Migration in the source code should probably be used instead
To import data to individual MeshDB tables in the format used by MeshDB, such as the Members table, first open the MeshDB Admin Panel. Next select the table of interest, Members in this case:
On the next page, select "Import" to enter the import dialog
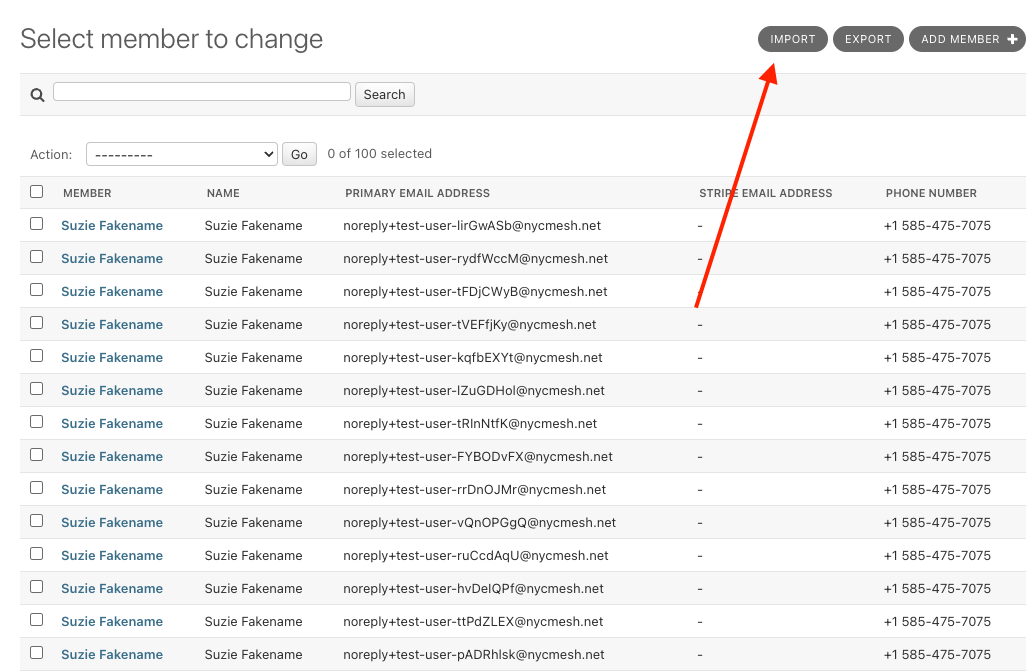
In the import dialog, select the CSV file you would like to import from (likely an edited export created using the instructions above):
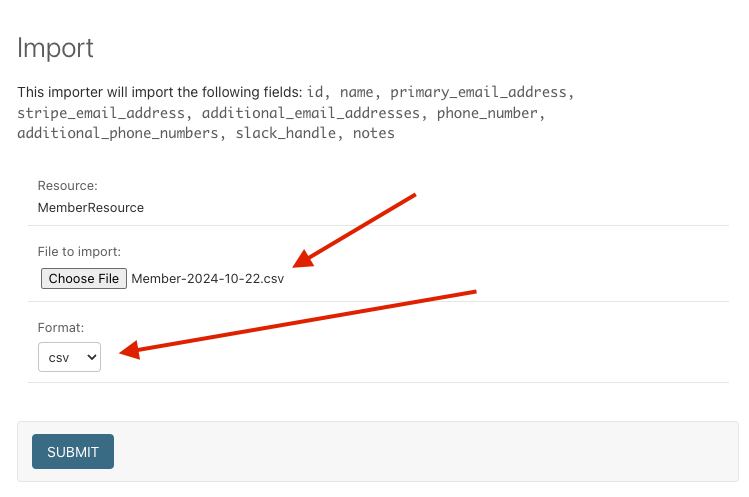
On the following screen, confirm the accuracy of the data, including that the rows are showing as either "Update" or "Create" as expected based on the desired editing:
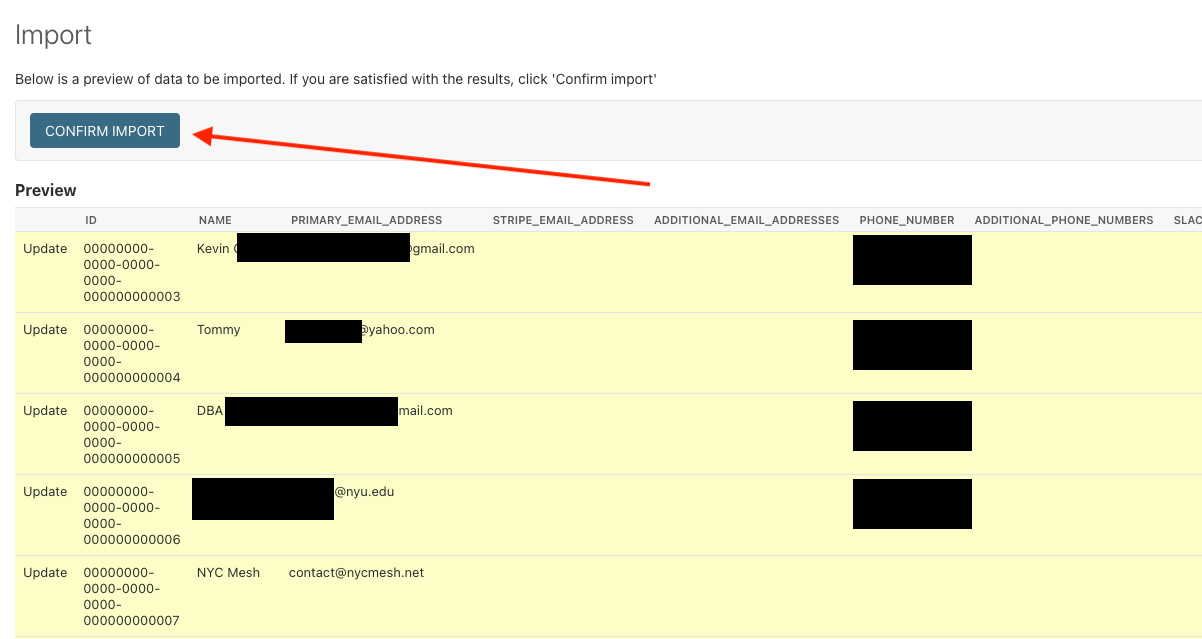
How to View the Edit History for an Object in MeshDB
MeshDB tracks the changes to all objects from all actors. Any change via the admin panel, API, or any automated process, will trigger an entry in the History table. To view the history for an object, navigate to the edit view for that object in the admin panel. In the top right, select the "History" button:
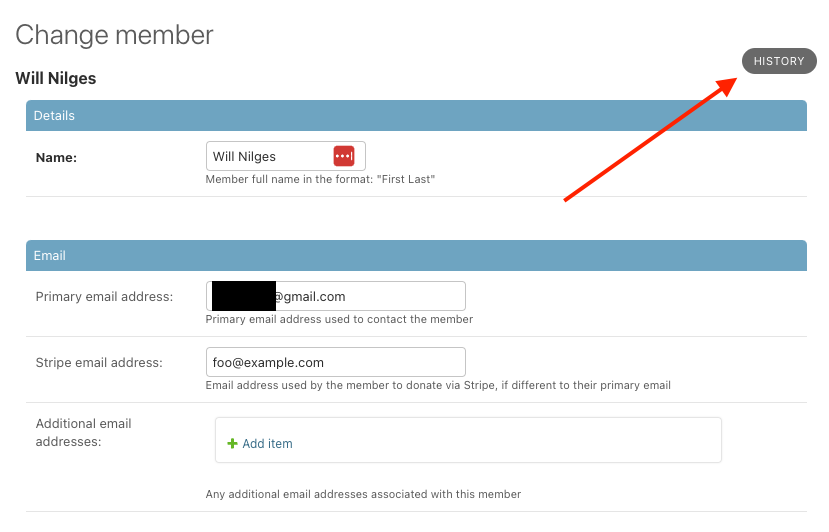
The history page shows every time the object was changed, what fields were edited, and who made the change:
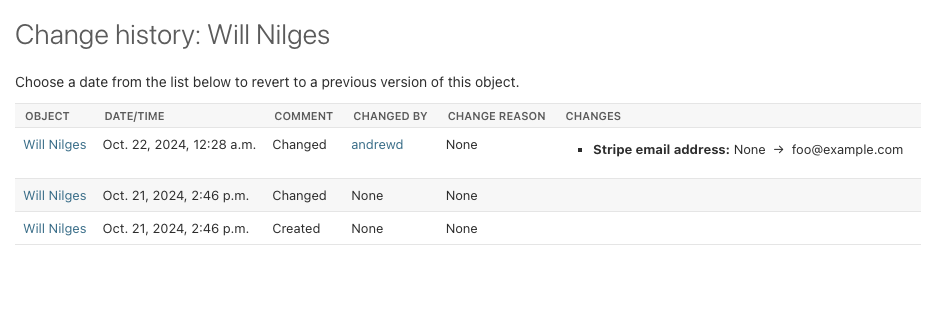
Restoring an Older Object Version
To revert a change to a specific object, navigate to the history page as described above, then select the revision that you are interested in restoring by clicking the name of the object in the "Object" column:
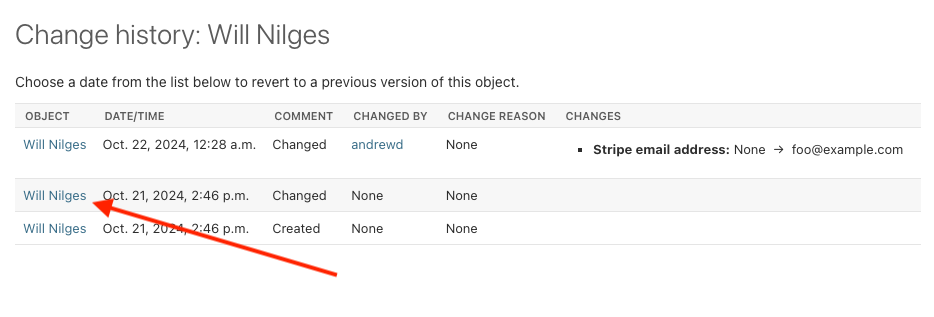
On the revision page, you can see the state of this object at the selected revision. Confirm that the fields are as expected, and then click "REVERT" to restore this version of the object
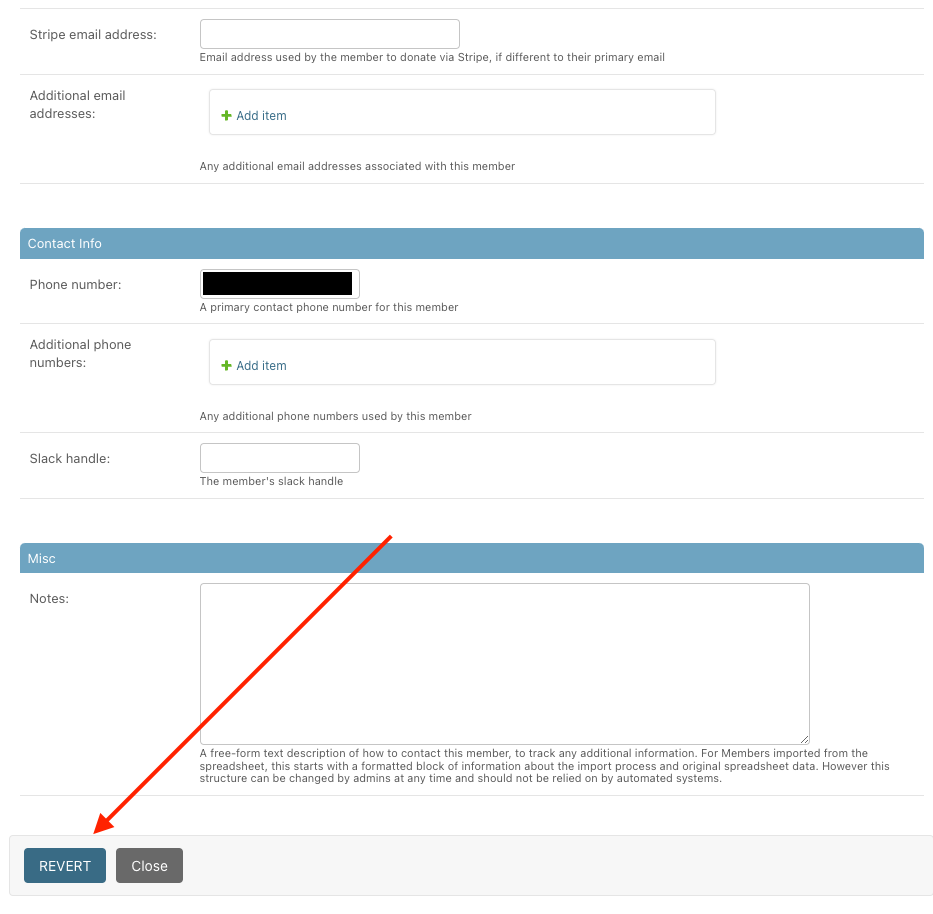
For transparency, the history page reflect the change that you just made:
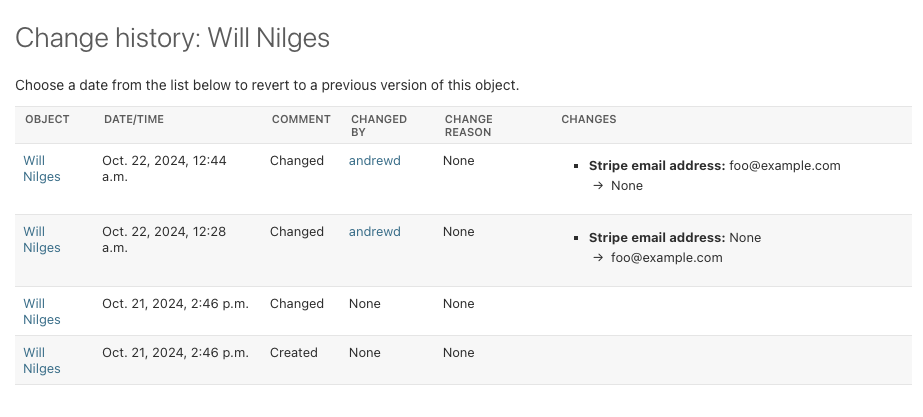
Grand Street Services
GSG
Community Room Computers
Components
As part of our ongoing engagement and outreach for our fiber deployment at the Grand Street Guild, NYC Mesh hosts a Tech Hours session for all residents in the community center where users can receive tech support for their internet services and other needs, and freely use the internet and print documents using two high-speed terminals. This document outlines the technical specifications of the setup.
Architecture
Hardware
-
Dell Precision Tower 3420
- 4 x Intel(R) Core(TM) i5-6600 CPU @ 3.30GHz
- SK Hynix 512GB PC401 NVMe SSD
- NVIDIA Quadro P1000 PCI-E GPU
- NVIDIA Quadro K1200 PCI-E GPU
- TP-Link Archer TXE70UH AXE5400 Tri-Band Wi-Fi 6E USB Adapter
- Brother HL-L2300D Monochrome Laser Printer
- x2 monitors (w/ mini-DisplayPort adapters), keyboards, and mice
Hypervisor
- Proxmox Virtual Environment 8.1.4
- VM 100: computer1 (left station)
- 8 GB RAM
- 2 CPUs
- 64 GB Disk
- Quadro P1000
- VM 101: computer2
- 8 GB RAM
- 2 CPUs
- 64 GB Disk
- Quadro K1200
- VM 102: bridge
- 4 GB RAM
- 2 CPUs
- 32 GB Disk
- Archer TXE70UH
- HL-L2300D Printer
- VM 100: computer1 (left station)
Virtual Machines
VM 102: bridge
Operating System
Tiny10 was used to provide a Windows environment with as little overhead as possible. The installation has most UWP functionality removed and is extremely lightweight compared to a standard installation.
To access the system, RDP is enabled and reachable at 10.70.188.194, with username admin.
USB Network Adapter
The Wi-Fi 6E Network Adapter requires Windows to operate at maximum speed. To pass the device through to the Virtual Machine, the port that the device is on needs to be selected in the "Hardware" tab. Mapping based on USB Vendor/Device ID will not work reliably due to the Wireless Card switching modes when the driver initializes the device to Wi-Fi 6E mode, which happens during every connection.
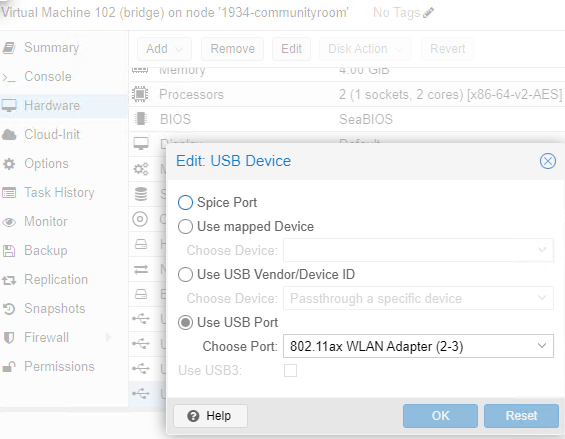
Networking and Routing
Due to inconsistency with the Network Bridge function in Windows, Internet Connection Sharing (ICS) is used to NAT traffic from the "Ethernet" interface (connected to the vmbr0 bridge on Proxmox) to the Wi-Fi 6E interface. A tradeoff of this method is that Proxmox and the virtual machines are unreachable from the Mesh but can be accessed inside of the bridge VM. A future goal would be to research port forwarding within ICS to access open ports on the other virtual machines.
- Mesh IP Address: 10.70.188.194
- Why does it have this address?
root@nycmesh-1934-core# show | compare [edit access address-assignment pool oob family inet] host nycmesh-1934-community-omni { ... } + host nycmesh-1934-communityroom-bridge { + hardware-address e4:fa:c4:a7:36:10; + ip-address 10.70.188.194; + }
- ICS IP Address: 192.168.137.1
- Why does it have this address?
- In Windows, the default subnet for ICS is 192.168.137.1/24. Upon enabling ICS on the Wi-FI 6E interface, Ethernet was given this static IP address, and will be the gateway for the other virtual machines.
Print Server
The Brother printer's only interface is USB, so in order to share the printer with multiple terminals, we need a print server to manage the printer and receive jobs from the network.
- Turn on SMB 1.0/CIFS (Note: this is bad practice, but CUPS was not working on Debian with SMB 2.0 and maybe should be revisited in the future.)
- Install Printer
- Drivers can be sourced from Brother website
- Enable Sharing and Permissions in Devices and Printers
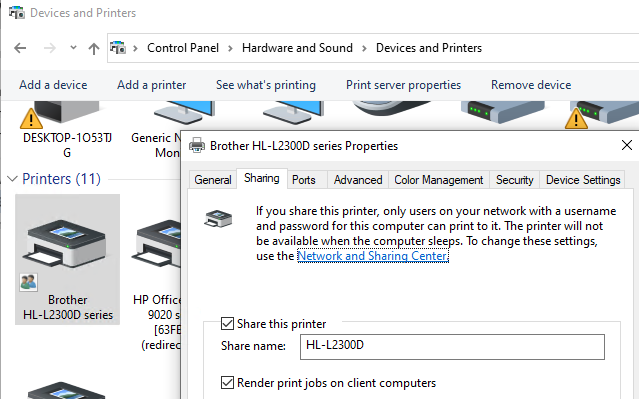
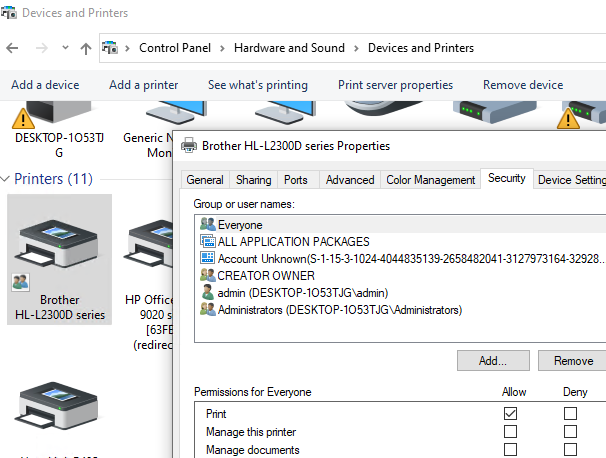
- Confirm printer is being shared via SMB
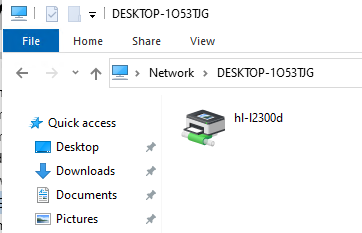
VMs 100-101 (computers)
Operating System
A plain install of Debian 12.5.0 is used for the two terminals. A NixOS image file has been crafted with built-in kiosk functionality and may be deployed in the future.
Graphics Cards
Each virtual machine is provisioned an NVIDIA graphics card for display, and the open source nouveau driver is used to drive the displays. These are connected to the monitors using Mini-DisplayPort to DisplayPort cables.
Networking and Routing
- VM 100 (computer1)
- 192.168.137.2/24
- Gateway: 192.168.137.1
- VM 101 (computer2)
- 192.168.137.3/24
- Gateway: 192.168.137.1
- VM 102 (bridge)
- 192.168.137.1/24
Printers
Debian comes with CUPSD, a print server that allows interfacing with multiple types of printers. SAMBA is also installed on both virtual machines which allows connection to the Windows SMB Share on the bridge VM, at endpoint smb://192.168.137.1/HL-L2300D. The IPP file from Brother is installed in the print server which provides the application with the supported features of the Brother printer.