Mikrotik
Made by our favourite Latvian friends
- MikroTik NetPower 15FR
- MikroTik OmniTik 5 POE AC
- MikroTik PowerBox Pro
- MikroTik Specifics
- Mikrotik SXTsq 5 ac
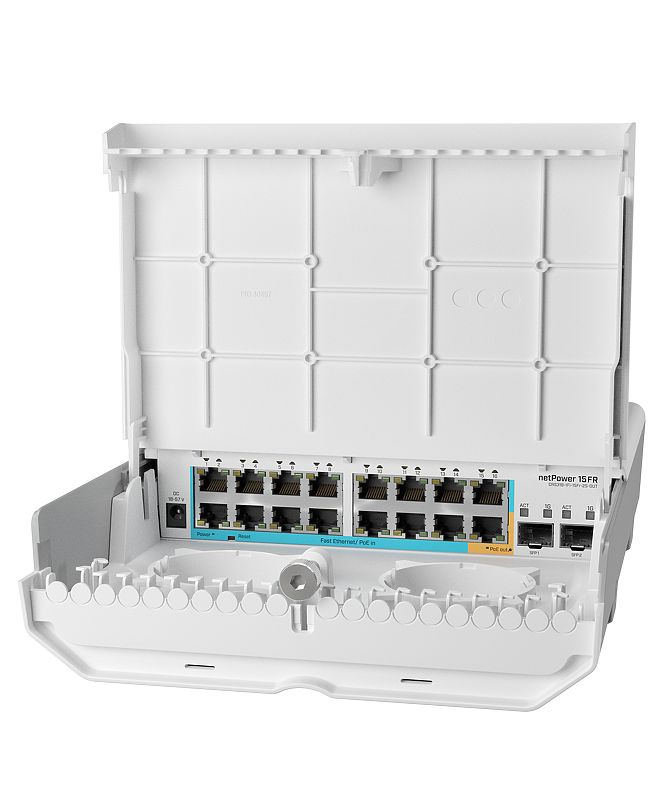
MikroTik NetPower 15FR
The NetPower 15FR is an outdoor 16 ethernet ports switch with PoE output on one port. Since the device has a waterproof outdoor case, you can mount it on a tower, or in other outdoor locations.
It supports passive PoE input on 15 ports and passive PoE output on one. We have successfuly used this POE output to power a OmniTik POE 5 AC which in turn powered an SXTsq G-5acD.
Recently, we have been phasing out and avoiding installing 15FRs for new installs. The ethernet ports on this device are 100mbps max, not gigabit ethernet. As speeds increase across the network and we are installing more high speed 60GHz links, the 100mbps ports have become the limiting factor for many members. For this reason we have been removing them and replacing them with NetPower 7Rs where practical.
Device specs are available at mikrotik.com.
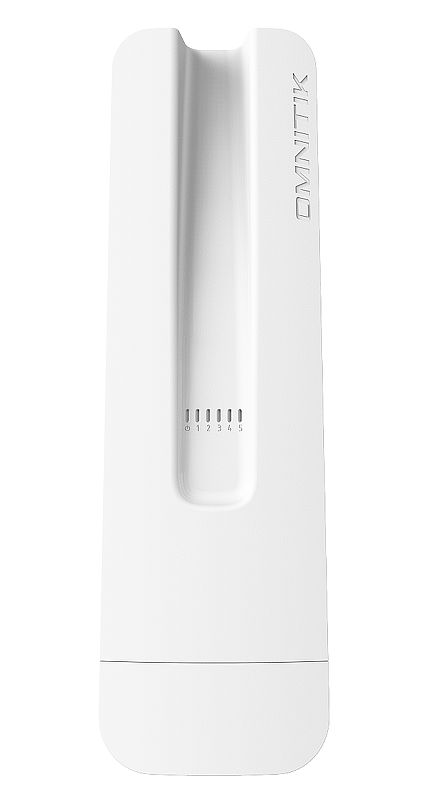
MikroTik OmniTik 5 POE AC
The Omnitik 5ac is an outdoor switch/router with a built-in 5Ghz 802.11ac access point, omnidirectional antenna, and 5 gigabit ethernet ports. Be sure to get the POE version.
The OmniTik serves as a central rooftop router with several purposes:
- As a switch to connect multiple apartments or other rooftop devices (LiteBeam, SXTs etc.)
- Can output POE power to power LiteBeams or other antennas.
- It acts as an WiFi Access Point for the rooftop, and runs our config of WDS and OSPF so it will mesh with other OmniTiks or SXTsqs within a few blocks
- Provides remote management, a console interface and allows speed/traceroute/ping testing of the hub.
Please be sure to see MikroTik Specifics for extra info about Mikrotik devices, how to connect, etc.
The PoE version accepts 12-57V passive PoE on port 1 and can be configured to provide PoE out to ports 2-5.
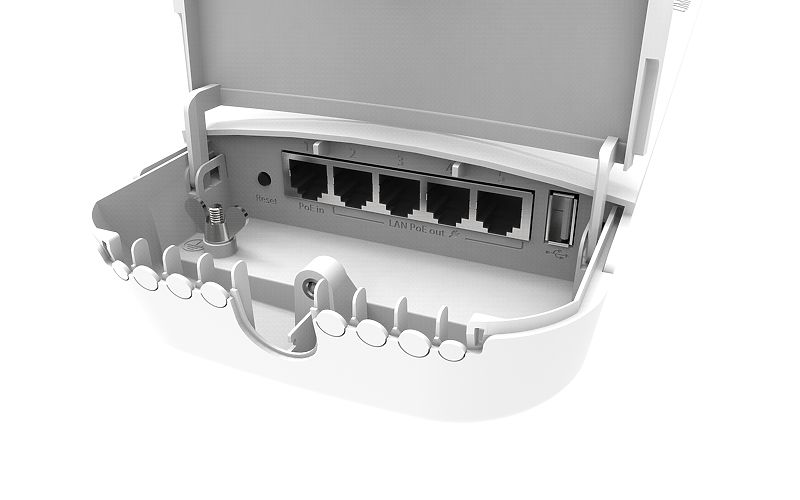
The small round plastic tabs, shown in the picture above, should be removed for those cable ports you will use - push them firmly inwards to remove. Leave the tabs in unused ports to prevent water/critter entry.
Device specs are available at Mikrotik.com
Uses
- Hub node routing or AP ( for standard 802.11ac hubs )
- Rooftop installations for multi-tenant houses
- Providing public access via the omnidirectional antenna
How to reset
- Press reset
- Apply power
- Watch the power led, once it blinks, STOP pressing the reset button
- It will beep one time
- Once you hear two beeps, you should be able to access it.
How to upgrade the firmware
- Upload the routeros-mipsbe-x.x.x.npk file in http://192.168.88.1/webfig/#Files
- Select System Reboot
How to downgrade firmware
- Upload the routeros-mipsbe-x.x.x.npk file in http://192.168.88.1/webfig/#Files
- Go to Terminal and type
/system package downgrade;
Configuration Instructions
Omnitik Configuration with Terminal
Here is a slideshow guide of configuring an OmniTik.
1. Download Stable Firmware and Generate Configuration
Don't use version 7 of firmware. It won't work with the configgen file! Make sure your firmware is v6.x.x.
You will need your Network Number or NN. You can find out your NN using your Install Number (request number) received by email when you registered. To find out what is your NN please see Network Number.
If you do not have a NN (the tool returns "No NN assigned") please reach out on Slack to have one assigned to you.
- Download the latest stable v6 firmware - see Mikrotik Firmware for the currently recommended version.
- Generate a configuration file for your Network Number by going to the NYC Mesh configuration generator.
- Confirm you have selected the correct device and version of the config file.
- Type in your Network Number (NN).
2. Connect to the Router
- To connect to the Omnitik wirelessly, find the router’s default SSID (Mikrotik-XXXX) and connect to it.
- To connect with a cable, plug one end of a patch cable into the Omnitik’s Port 2 and the other end into your computer’s LAN port. Set your computer to DHCP (automatic) and it will get an address like 192.168.88.xxx.
- Navigate to the default Mikrotik IP of 192.168.88.1 in your web browser. This will open the Mikrotik GUI. The default username is admin and there is no password.
3. Upload Firmware
- Open the Mikrotik GUI in your browser.
- Click “Webfig” in the top right corner.
- Click “Files” in the left side menu.
- Click “Choose File” at the top.
- Navigate to where you saved the firmware, select the file and click “Open”. You will see the file appear in the interface.
- Wait for the firmware to fully upload (you will see the upload progress in the bottom left corner). This firmware will automatically be installed when you reboot with the new configuration (see next section).
4. Upload Configuration
- If you are using a Mac or Linux operating system, go into Terminal, navigate to the folder where you’ve saved the config and enter the following command:
scp -o StrictHostKeyChecking=no rooftop-ospf.rsc admin@192.168.88.1:flash/
- If you are using a Windows operating system, go into Command Prompt, navigate to the folder where you’ve saved the config and enter the following command. You must download pscp.exe from PuTTY (64-bit or 32-bit) to the same folder then run:
pscp -scp rooftop-ospf.rsc admin@192.168.88.1:flash/
If asked “Dangerous Reset anyway?”, type in Y and return/enter.
Reopen the Mikrotik GUI in your web browser and navigate back to “Files” as described in section 3 above. You should see the config file you just uploaded.
-
- Click “System” in the left side menu.
- Click “Reset Configuration” in the left side menu dropdown. Select the following options:
- No Default Configuration
- Run After Reset: flash/rooftop-ospf.rsc (click the popup on the right to select this)
- Click "Reset Configuration"
- The Omnitik will now reboot (and install new firmware if you uploaded it). If it plays some beeps, ending with a short tune Kernkraft 400, the configuration was a success!
The Omnitik IP address has changed to a 10.69.x.x address. This is generated from the network number, e.g. for network number 1234 the IP address will be 10.69.12.34. Please see Network Number for additional information about finding your devices IP if needed.
5. Change the Password
- Click “System” in the left side menu, then click “Password”.
- Leave the "Current Password" blank and enter the standard omni password in "New Password" and "Confirm Password".
6. Confirm POE output is on if required
Most installs have a LiteBeam or other device that's connected to the Omni. This device uses power from the omni's port, so POE out on that port must be turned on. Typically a LiteBeam is connected to Port 5, so POE out must be turned on for ether5.
If you used the omni-poe-ether5 template on configgen, this will already be done for you.
- Click on "Interfaces" in the left sidebar menu.
- Click on ether-5 (or whichever port the device that needs power is on)
- Set "POE Out" to "forced on"
Omnitik Configuration with Winbox
You can configure OmniTik routers and all MikroTik equipment with their WinBox software and associated apps.
1. Download WinBox for your device:
First you will need to download a WinBox-compatible client to configure the OmniTik.
Windows
On the MikroTik website, you can navigate to the WinBox button to download the version of WinBox that suits your computer.
MacOS
Joshaven Potter has complied a version of WinBox with Wine which you can download from their website and run without any additional configuration.
Android
The MikroTik Pro app uses the same WinBox protocol to upload files and configure your router without a computer. You can download it from the Play Store.
iOS (Apple Devices)
The MikroTik app uses the same WinBox protocol to upload files and configure your router without a computer. You can download it from the App Store.
2. Download Stable Firmware and Generate Configuration
Don't use version 7 of firmware. It won't work with the configgen file! Make sure your firmware is v6.x.x.
You will need your Network Number or NN. You can find out your NN using your Install Number (request number) received by email when you registered. To find out what is your NN please see Network Number.
If you do not have a NN (the tool returns "No NN assigned") please reach out on Slack to have one assigned to you.
- Download the latest stable v6 firmware - see Mikrotik Firmware for the currently recommended version.
- Generate a configuration file for your Network Number by going to the NYC Mesh configuration generator.
- Confirm you have selected the correct device (Omnitik5AC) and version of the config file (omni-only or omni-poe-ether5).
- Type in your Network Number (NN).
- Note the downloaded file with your config, ending in .rsc
- Confirm you have selected the correct device (Omnitik5AC) and version of the config file (omni-only or omni-poe-ether5).
2. Connect to the router
You can connect to the router using an Ethernet cable or through Wi-Fi. There are caveats to both, but configuring wirelessly is the easiest to do when doing the install outside.
Wired
Assuming your Ethernet adapter is setup to get an IP from the router using DHCP (probably default), all you have to do is plug an Ethernet cable from your computer to a Port 2-4 on the router.
Do NOT plug the computer into the PoE injector (Port 1) as the default configuration blocks all inbound connections to this port, including WinBox.
Do NOT plug the computer into Port 5, as we may be configuring this later to do PoE-Out which will damage any devices plugged in here that are not expecting power.
Wireless
Assuming your Wi-Fi adapter is setup to get an IP from the router using DHCP (probably default), all you have to do is look for a network in your Wi-Fi settings named MikroTik-xxxxx. This network will only appear after the router has fully powered on (two short beeps).
If you are on a phone, sometimes you will have to turn off your Mobile data/turn on airplane mode in order to reach the router that technically does not have any internet yet.
Make sure any VPN software you have is disabled at this point, as it will likely block any connections to the router.
From your WinBox software, find the "Neighbors" tab on the lower-half of the screen. On the MikroTik app, click on the "Discover" tab. You should see an entry on the list with Identity MikroTik. If you do not see anything, click "Refresh" or swipe down to rescan for devices. Double-check your connections and confirm you are getting an IP from the router (will be in the 192.168.88.*** range).
Double-click or tap on the entry to load the IP into the software. On the App, you will be prompted to select either MAC or IP; select IP. Now, the default login admin/[no password] will be displayed and you can hit "Connect".
You will get a prompt saying "RouterOS Default Configuration". Hit OK to get out of here (do NOT remove configuration or use quick setup). Now for the fun part.
3. Upload the configuration
From your WinBox software, drag and drop the firmware routeros-mipsbe-***.npk file into the blank space in the window. You should see the file transfer take a few seconds before it finishes. Next, drag and drop the rooftop-ospf.rsc file onto the flash folder. You should see the uploaded file labeled flash/rooftop-ospf.rsc.
From your phone, hit the upload arrow button on the bottom-left of the screen and select the routeros-mipsbe-***.npk file. You can save as the original name and hit OK. You should see the file transfer take a few seconds before it finishes. Next, do the same with the rooftop-ospf.rsc file, but this time make sure you prepend the file name with flash/ and hit OK. You should see the uploaded file labeled flash/rooftop-ospf.rsc.
4. Flash the config and party
5. Confirm settings and configuration
WinBox will inform you that the router has been disconnected. Hit Cancel. If you are connecting wirelessly, look in your Wi-Fi settings for nycmesh-****-omni. Connect to that wireless network with the password nycmeshnet. If you are connecting via Ethernet, you can test this on another device to make sure the Wi-Fi is working correctly. If you are not planning on adding devices or changing the configuration further, you are done! 🎉
If you are planning on connecting a LiteBeam to your router or just want to learn about the configuration, go back to "Neighbors" or "Discover" depending on your platform; you should see an entry on the list with Identity "nycmesh-****-omni". Login to it like before.
Wireless interface explanation
With the default NYC Mesh configuration loaded, the OmniTik transmits a number of wireless networks.
To see these networks, go to "Wireless" in the left sidebar menu.
Here's what each of these networks does:
wlan1- SSID example:
nycmesh-136-omni - AP bridge (MikroTik term)
- manually connected to by other Omni's to avoid route flapping behavior exhibited by the automatic mesh (
wlan3)
- SSID example:
wlan2- SSID example:
-NYC Mesh Community WiFi- - Also ap bridge
- only difference to
wlan1is bridge filter and and ip firewall rule
- SSID example:
wlan3- SSID example:
nycmesh-wds - wds slave
- all automatic mesh connections communicate through this interface
- wds bridge
- is not running a dhcp server
- OSPF will route to other connections first since bridge for this interface is higher at 100
- SSID example:
wlan4- station bridge for connecting to another omni's access point. (That Omni's wlan1 interface)
- has a lower cost of 10 versus the WDS interface. This allows you to force another Omni to be the uplink, overriding the dynamic wds routing. This prevents the Omni from "flapping" between several nearby Omni's.
- station bridge for connecting to another omni's access point. (That Omni's wlan1 interface)
Expand for `OLD nycmesh-omnitik-v3.2.rsc` example
The is our obsolete 3.2 template script which needs some variables filled in.
This script only works on the OmniTik 5ac PoE model
Version 3.2 Changelog:
- Separation of Public vs Tenant subnet
- Fixed BGP sync missed config parameter
- Startup delay ( ref Mikrotik forums )
- Tada sound effect
- Better firewall rules
:global nodenumber 1111
:global bgpasn 61111
:global ipprefix "10.70.111"
:global iptenantsrange 10.70.111.5-10.70.111.119
:global iptenantsgw 10.70.111.1
:global ippublicrange 10.70.111.130-10.70.111.180
:global ippublicgw 10.70.111.129
:global dns 10.10.10.10,1.1.1.1
/delay 15
:for j from=1 to=4 step=1 do={ :for i from=2000 to=50 step=-400 do={ :beep frequency=$i length=11ms; :delay 11ms; } :for i from=800 to=2000 step=400 do={ :beep frequency=$i length=11ms; :delay 11ms; } }
:foreach x in=[/interface wireless find] do={ /interface wireless reset-configuration $x }
:for t from=1200 to=350 step=-50 do={ :beep frequency=$t length=33ms; :delay 33ms; }
:beep frequency=500 length=100ms
/ip address add address=192.168.88.1/24 interface=ether3 network=192.168.88.0
:beep frequency=600 length=100ms
/interface ethernet set [ find default-name=ether5 ] poe-out=forced-on
:beep frequency=700 length=100ms
/interface wireless security-profiles add authentication-types=wpa-psk,wpa2-psk management-protection=allowed mode=
dynamic-keys name=nycmeshnet supplicant-identity=nycmesh
wpa-pre-shared-key=nycmeshnet wpa2-pre-shared-key=nycmeshnet
:beep frequency=800 length=100ms
/interface wireless set [ find default-name=wlan1 ] band=5ghz-a/n/ac channel-width=20/40/80mhz-Ceee disabled=no distance=indoors frequency=auto mode=ap-bridge security-profile=nycmeshnet ssid=("nycmesh-" . $nodenumber . "-omni") wireless-protocol=802.11 wps-mode=disabled add disabled=no master-interface=wlan1 name=wlan2 ssid="-NYC Mesh Community WiFi-" wps-mode=disabled
:beep frequency=900 length=100ms
/interface bridge add auto-mac=yes name=publicaccess add auto-mac=yes name=tenants
:beep frequency=1000 length=100ms
/ip address add address=($ipprefix . ".1/25") interface=tenants network=($ipprefix . ".0") add address=($ipprefix . ".129/26") interface=publicaccess network=($ipprefix . ".128")
:beep frequency=1100 length=100ms
/interface bridge port add bridge=tenants interface=ether1 add bridge=tenants interface=ether2 add bridge=tenants interface=ether3 add bridge=tenants interface=ether4 add bridge=tenants interface=wlan1 add bridge=publicaccess interface=wlan2
:beep frequency=1200 length=100ms
/ip pool add name=tenants ranges=$iptenantsrange add name=publicaccess ranges=$ippublicrange
:beep frequency=1300 length=100ms
/ip dhcp-server add address-pool=tenants disabled=no interface=tenants name=tenantsdhcp add address-pool=publicaccess disabled=no interface=publicaccess name=publicaccessdhcp
:beep frequency=1400 length=100ms
/routing bgp instance set default as=$bgpasn disabled=no
:beep frequency=1500 length=100ms
/routing bgp network add network=($ipprefix . ".0/24") synchronize=no
:beep frequency=1600 length=100ms
/ip dhcp-server network add address=($ipprefix . ".0/25") dns-server=10.10.10.10 gateway=($ipprefix . ".1") netmask=25 add address=($ipprefix . ".128/26") dns-server=10.10.10.10 gateway=($ipprefix . ".129") netmask=25
:beep frequency=1700 length=100ms
/ip firewall filter add action=accept chain=input protocol=icmp add action=drop chain=forward in-interface=publicaccess out-interface=tenants add action=drop chain=input in-interface=publicaccess add action=accept chain=forward add action=accept chain=input
:beep frequency=1800 length=100ms
/system clock set time-zone-name=America/New_York
/system identity set name=("nycmesh-" . $nodenumber . "-omni")
:beep frequency=500 length=200ms;
:delay 500ms;
:beep frequency=500 length=200ms;
:delay 200ms;
:beep frequency=800 length=500ms;
:delay 50ms;
How to apply config:
- Acquire config parameters ( BGP ASN, IP range, node number, etc. )
- Fill in config file parameters at the top of the script.
Save as nycmesh-omni-####.rsc where #### is your node number.
The file must be named with.rscat the end.
- Factory Reset device if needed ( see MikroTik Specifics for details )
( Connect to a port besides Port 1 ) - Update firmware to latest on your device ( see Mikrotik Firmware )
- Upload the rsc file
- The file needs to be in the
flash/folder. However, there is no way to create a folder from the device. - Instead you need to upload the file using scp.
- From a Mac or Linux desktop, upload the file using scp:
scp nycmesh-omni-####.rsc admin@192.168.88.1:flash/
You may need to confirm the SSH key ( typical with SSH ) - From a Windows desktop, you must have PuTTY installed and run the following command from the command prompt:
pscp -scp nycmesh-omni-####.rsc admin@192.168.88.1:flash/ - You should see the file in the WebUI as
flash/nycmesh-omni-####.rsc
- The file needs to be in the
- Factory Reset the device with the option to restore this script.
- From Web UI:
- WebFig > System > Reset Configuration. Select:
- No Defaults
- Run After Reset:
flash/nycmesh-omni-####.rsc - Apply
- Or from CLI:
/system reset-configuration run-after-reset=flash/nycmesh-omni-####.rsc no-defaults=yes- Dangerous Reset anyway? Y
- From Web UI:
MikroTik PowerBox Pro
The PowerBox Pro is an outdoor five gigabit ethernet port router with PoE output on four ports. Since the device has a waterproof outdoor case, you can mount it on a tower, or in other outdoor locations.
It also supports passive PoE input and passive or 802.3af/at PoE output. Ethernet ports 2-5 can power other PoE capable devices with the same voltage as applied to the unit. Less power adapters and cables to worry about! It can power 802.3at and af mode B compatible devices, if 48-57 input voltage is used.

Device specs are available at mikrotik.com.
MikroTik Specifics
Mikrotik routers have a few interesting things to note in order to understand and use them well. This page documents those interesting pieces and might help clarify some things. This page will be referenced by other pages and should be Mikrotik general.
Device variants
License
Mikrotik software usually requires a license, though all Mikrotik devices come with an internal license, which varies with the model. This router comes with a Level 4 license which is sufficient for its use.
US vs International version
The US versions of the OmniTik and SXTsq don't support the DFS range of 5GHz WiFi. We use the US version of the OmniTik. The US version of the SXTsq is not compatible with a LinkNYC kiosk. All LinkNYC kiosks are on DFS channels.
PoE vs non-PoE
There are models that both have PoE and do not. Be sure to buy a PoE model.
Platform how-tos
Reset
To factory reset a mikrotik router, hold down the reset button (located near the PoE-in port), then plug in the power, until the main power ( or USR led ) light starts flashing, then release the button to reset RouterOS configuration (total 5 seconds).
Connecting
The initial IP address out of the box is 192.168.88.1, so set you computer’s local IP to something similar ( 192.168.88.5 ). The username is admin and there is no password.
Note: Many models have ether1 / Port 1 as WAN by default, you may need to connect your computer to a port besides Port 1 for initial configuration
Configurations
Mikrotik devices don't directly work well with the old "restore a file" method of configuration. Instead, you need to generate a script that, when run, alters the config from the default. Technically, yes, it's possible to restore a file, however, the format and ability to restore might change each version, for each devices, and depending what hardware is connected.
Each device should have a config template which needs some blanks filled in. The result is a script that can be run to setup the device after a factory default.
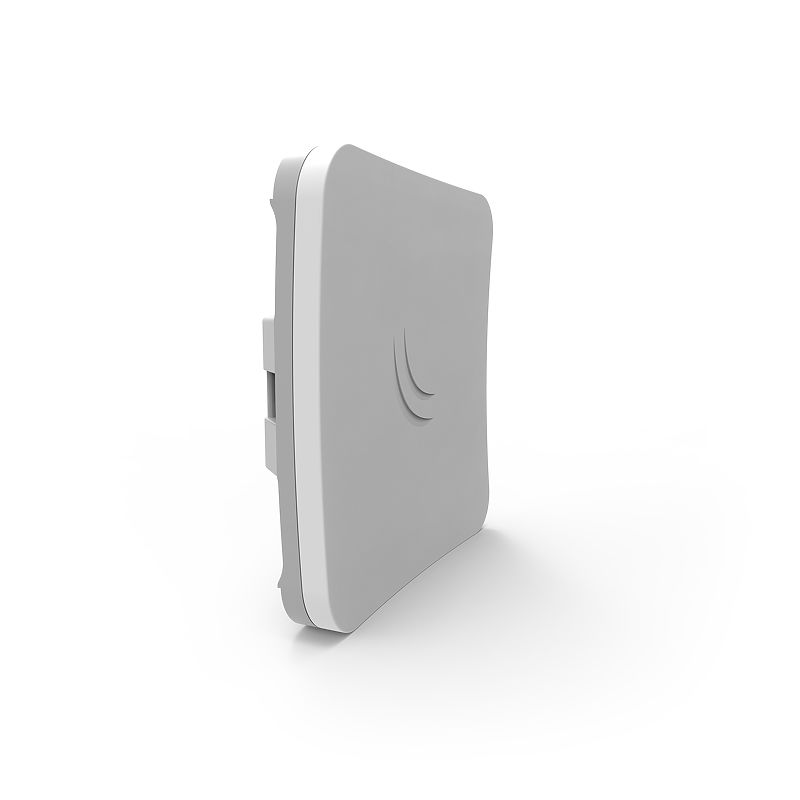
Mikrotik SXTsq 5 ac
The SXTsq 5 ac is a small client access antenna that is 802.11 standards compliant antenna (and also nstream mikrotik if available).
The device was released in early 2018 and is capable of gigabit-level speeds with 80Mhz wide 802.11ac wifi connections.
Please be sure to see MikroTik Specifics for extra info about Mikrotik devices, how to connect, etc.
Device specs are available at mikrotik.com.
Uses
- Wirelessly connect SXTsq to OmniTik (instructions)
- Connect SXTsq to LinkNYC kiosk (instructions) (more info)
- Create a Point-to-Point link (instructions)
- Legacy Client Node (instructions)
Device idiosyncrasies
License
Mikrotik software usually requires a license, though all Mikrotik devices come with an internal license, which varies with the model. This antenna comes with a "Level 3" license which technically only allows it to function as a CPE, not an AP. Therefore this device can not be used as a base station.
US vs International version
On the positive side, it is a great CPE and can connect to DFS channels (international version) and has other interesting features such as EAP TTLS authentication.
Be aware during purchase -- this antenna has a US version and an International version. The US version is locked to "united states3" channels which are the non-DFS range. The international version also has US settings, but it has two additional "united states" channel selections all for valid legal US channels. You cannot connect to a LinkNYC kiosk with the US version.
To function on LinkNYC and other DFS networks, the international version is required, but be sure to put it in "united states2" mode before using it.
Configurations
Wirelessly connect SXTsq to OmniTik
1. Download configuration file
First, download the configuration file for your network number. If you only have an install number, enter this number below. If error: no address for **** is displayed, please reach out to us on Slack at #install or via email to register your installation. If Sorry, unable to open the file at this time is displayed, try using Incognito Mode or Private Browsing.
Once you have your Network Number, go to the Configgen utility to download the correct configuration for your use case.
Plug SXTsq into port 5 of an OmniTik
Plug SXTsq directly into indoor home router
Enter your network number into the "network_number" field and click "Download Config". Make note of the filename for later.
2. Connect to device and upload file
Next, plug in the device to power by connecting an Ethernet patch cable from the device to the POE injector. Plug the other end of the POE injector to your computer's Ethernet port or USB-to-Ethernet adapter.
What if I cannot use Ethernet with my computer?
If your computer does not have Ethernet and you do not have an adapter, plug in the device to a LAN port on your home router.
If you are using the WinBox method, no changes to the proceedure are needed.
If you are using the Terminal method, find the IP address of the device in your router's settings, and use that instead of 192.168.88.1. No need to change your computers's IP settings.
There are two methods you can use to upload the file to the device.
WinBox (Windows and Mac)
Download the WinBox utility from the MikroTik website for Windows, or from Joshaven Potter's website for Mac.
Open the utility and click the "Neighbors" tab on the lower-half of the screen, and click "Refresh".
Double-click on the MAC Address (important!) that appears in the list. When the MAC Address populates into the "Connect To" box, hit "Connect".
You will get a prompt saying "RouterOS Default Configuration". Hit OK to dismiss.
On the left sidebar, click "Files". Open a File Explorer or Finder window alongside winbox and and drop the configuration file you downlaoded earlier into the "flash" folder. You should see the uploaded file have flash/ before the filename (important! if it doesn't have flash before it, make sure you drop the file onto the flash folder and try again).
On the left sidebar, click "System", then "Reset Configuration". Check the "No Default Configuration" box, and click the down arrow next to "Run After Reset" to select the file you uploaded. Finally, hit "Reset Configuration" and you will be disconnected. After a couple of minutes, the LED next to the person icon on the device will turn on, indicating that the configuration has been applied.
Terminal
First, disable any other interfaces such as WiFi you may have on your system other than the Ethernet interface connected to the device. Then, you will have to change your IP address to 192.168.88.5 (this process will vary depending on your operating system).
Open your terminal or command prompt and navigate to the directory where your configuration file is saved. Enter the following command into the terminal, replacing [CONFIG FILE] with the name of the downloaded file from earlier:
scp -o StrictHostKeyChecking=no [CONFIG FILE] admin@192.168.88.1:flash/
After the file transfers, then enter the following command into the terminal to reset the device with the new configuration, replacing [CONFIG FILE] with the name of the downloaded file from earlier:
ssh -o StrictHostKeyChecking=no admin@192.168.88.1 /system reset-configuration no-defaults=yes run-after-reset=flash/[CONFIG FILE]
The device will reboot in the background. After a couple of minutes, the LED next to the person icon on the device will turn on, indicating that the configuration has been applied.
3. Configure the link
Depending on your use case, you will connect to the antenna differently based on the configuration you selected above.
Plug SXTsq into port 5 of an OmniTik
Disconnect the device from the POE injector and plug the device into Port 5 of the OmniTik on the roof. Then, connect your computer to the OmniTik's WiFi or use Ethernet (if you modified your Ethernet adapter to use a static IP, change it to DHCP). Find the Gateway IP from the interface (this process will vary depending on your operating system) and enter it into your browser.
Log into the OmniTik. On the left sidebar, click "Bridge". Click on the "Filters" tab, and disable the first item on the list, so you will be able to access the device locally (important: when you are done, come back here to reenable the filter!). On the left sidebar, click "IP", then "DHCP Server". Click on the "Leases" tab, where you will see a device with the hostname containing "sxt". Type this IP address into a new tab on your browser.
Plug SXTsq directly into indoor home router
Ensure your computer is plugged directly into the SXT's POE injector via Ethernet (if you modified your Ethernet adapter to use a static IP, change it to DHCP). At this point, you will need your device to be outdoors to perform the alignment, so an battery pack is recommended to power the device outside.
Find the Gateway IP from the interface (this process will vary depending on your operating system) and enter it into your browser.
Log into the SXT. On the left sidebar, click "Wireless". Click the item named wlan1.
If you already know what node to connect to
If you already know what node you are connecting to (if you only have the install number, see above to convert the install number to its network number), scroll down to "SSID" and replace the xxxx with the network number of the node you are connecting to. Scroll down to Description and do the same, then scroll to the top and click "Apply".
Roughly align the device towards the desired node. If the alignment is sufficient, the status will change from searching for network to connected to ess, indicating that the connection has been established with the other OmniTik. If the status does not change, verify that the device is aimed towards the other node and that the other node is powered on.
If you do not already know what node to connect to
Look at the map to determine what might be around. If you see a nearby node, click the node and see above to convert the displayed install number to its network number.
Roughly align the device towards the desired node. To verify that the connection will work, click "Scan..." on the top of the screen. Click "Start", and click "Radio Name" twice to bring all of the NYC Mesh nodes to the top. If your desired node does not appear on the list, verify that the device is aimed towards the other node and that the other node is powered on.
Click "Cancel". Scroll down to "SSID" and replace the xxxx with the network number of the node you are connecting to. Scroll down to Description and do the same, then scroll to the top and click "Apply".
4. Align the antenna
Scroll down to "Tx/Rx Signal Strength" and look at the numbers. Align the device to get the values closest to 0. -30s are excellent, -40s are great, -50s are good, -60s are fair, and -70s will be unusable.
Once the device is aligned for best signal, tighten the clamp and secure all cables. Congratulations, the SXT install is complete!
Legacy OSPF configurations
Wirelessly connect SXTsq to OmniTik via WDS
The SXTsq also supports WDS, which allows the device to automatically connect to nearby NYC Mesh OmniTiks. However, if there are multiple OmniTiks in range that have equal-length paths to a supernode, there may be routing issues and performance degradation.
Plug SXTsq into port 5 of an OmniTik
Plug SXTsq directly into indoor home router
Wirelessly connect SXTsq to OmniTik
The SXTsq also has a variation of the first configuration that uses OSPF to communicate with the OmniTik, instead of DHCP. This is only needed if the SXTsq needs to be a router instead of a simple bridge.
Plug SXTsq into port 5 of an OmniTik
LinkNYC Kiosk connection (encrypted)
LinkNYC kiosks have both an unencrypted and encrypted network available. They function similarly and have the same Internet available.
The encrypted version uses a feature marketed as "passpoint" which allows you to roam across an area with a user name and password using EAP TTLS. The encrypted network is more secure because no traffic can be sniffed between the kiosk and your CPE. Another benefit is it skips the captive portal (a webpage that pops up when you connect).
When you login to the LinkNYC unencrypted network, a captive portal prompts you to click a button, and if your device is supported, download a profile and reconnect to the encrypted network. Currently only iPhones are supported with the auto-config feature. However, it's technically possible to connect with any capable device once you have a connection profile. By taking the profile from an iPhone, we can extract the pieces needed to connect a standard antenna such as the sxtsq.
After powering on an sxtsq you should configure it as a CPE with routing, NAT, and DHCP on the internal port.
Then, to configure the radio, apply the following lines on the command line interface (CLI): (This can be performed using the graphical user interface, but it may be faster to paste these lines.)
/interface wireless security-profiles
add authentication-types=wpa-eap,wpa2-eap eap-methods=eap-ttls-mschapv2 group-ciphers=tkip,aes-ccm mode=dynamic-keys mschapv2-password=5fsOpxER mschapv2-username=anonymous@citybridge.com name=linknyc supplicant-identity=anonymous@citybridge.com tls-mode=dont-verify-certificate unicast-ciphers=tkip,aes-ccm

/interface wireless
set [ find default-name=wlan1 ] band=5ghz-a/n/ac channel-width=20/40/80mhz-Ceee country="united states2" default-authentication=no disabled=no frequency=auto security-profile=linknyc ssid="LinkNYC Private" wireless-protocol=802.11

/interface wireless connect-list
add interface=wlan1 security-profile=linknyc ssid="LinkNYC Private" wireless-protocol=802.11
Be sure to shutdown the antenna properly the first time to ensure the config is saved. This is not required, but Mikrotik antennas are especially sensitive to being powered off with no proper shutdown.
Create a Point-to-Point link
The following works with two new SXTsq or a reset SXTsq. To reset an SXTsq, hold the reset button for about 5 seconds while the unit is booting and release as soon as green LED starts flashing (to reset RouterOS configuration to defaults). It is recommended to update the firmware of your SXTsq to the latest. The under has been tested with firmware v.6.43.12
One of the SXT will act as an "AP" but can be associated to only one "client". The second SXT will be the "client".
After the configuration there will be no DHCP Server or Client, thus you will need to configure your laptop IP mannually in the same network range, for exemple 192.168.88.11
The SXT-AP and SXT-Client port address will be change in order to not interfere with another potential SXT default IP.
- AP will be ether1: 192.168.88.2 and bridge1: 192.168.88.3
- Client will be ether1: 192.168.88.4 and bridge1: 192.168.88.5
Connect to the SXTsq via ethernet and DHCP. You will get a 192.168.88.xxx address
In the terminal
ssh -o StrictHostKeyChecking=no admin@192.168.88.1
Say 'yes' to the warning and paste this for the SXT-AP-
# Feb 25th 2019 for RouterOS 6.43.12
# model = RBSXTsqG-5acD

# SXT PtP / This is the AP

# Set the SXT Identity
/system identity
set name="sxt ptp ap"

#add security profile (to secure wifi connection login) and SSID
/interface wireless security-profiles
set [ find default=yes ] supplicant-identity=MikroTik
add authentication-types=wpa-psk,wpa2-psk management-protection=allowed mode=\
dynamic-keys name=sxt-ap supplicant-identity="SXT PtP AP" \
wpa-pre-shared-key=nycmeshnet wpa2-pre-shared-key=nycmeshnet

#set the wireless (wlan1) to USA 2 and the proper band
/interface wireless
set [ find default-name=wlan1 ] band=5ghz-a/n/ac channel-width=\
20/40/80mhz-Ceee country="united states2" disabled=no mode=bridge \
security-profile=sxt-ap ssid=nycmesh-nn-sxtptp

# disable the NAT and disable all the firewall filters
/ip firewall nat
set numbers=0 disabled=yes

/ip firewall filter
set numbers=1 disabled=yes
set numbers=2 disabled=yes
set numbers=3 disabled=yes
set numbers=4 disabled=yes
set numbers=5 disabled=yes
set numbers=6 disabled=yes
set numbers=7 disabled=yes
set numbers=8 disabled=yes
set numbers=9 disabled=yes
set numbers=10 disabled=yes

# disable the dhcp-client and server
/ip dhcp-client
set [find interface=wlan1 ] disabled=yes
/ip dhcp-server
set [find interface=ether1] disabled=yes

#add a bridge and add port ether1 and wlan1 (switch)
/interface bridge
add name=bridge1
/interface bridge port
add bridge=bridge1 interface=ether1
add bridge=bridge1 interface=wlan1

#change IP address of the "sxt ptp client" to not mix with potential other SXT default IP address
/ip address
add address=192.168.88.3/24 interface=bridge1 network=192.168.88.0
set [ find interface=ether1] address=192.168.88.2/24
Say 'yes' to the warning and paste this for the SXT-Client-
# Feb 25th 2019 for RouterOS 6.43.12
# model = RBSXTsqG-5acD

# SXT PtP / This is the Client

# Set the SXT Identity
/system identity
set name="sxt ptp client"

#add security profile (to secure wifi connection login)
/interface wireless security-profiles
set [ find default=yes ] authentication-types=wpa-psk,wpa2-psk group-ciphers=\
tkip,aes-ccm mode=dynamic-keys supplicant-identity=MikroTik \
unicast-ciphers=tkip,aes-ccm wpa-pre-shared-key=nycmeshnet \
wpa2-pre-shared-key=nycmeshnet
/interface wireless security-profiles
add authentication-types=wpa-psk,wpa2-psk group-ciphers=tkip,aes-ccm \
management-protection=allowed mode=dynamic-keys name=sxt-ap \
supplicant-identity="sxt ptp client" unicast-ciphers=tkip,aes-ccm \
wpa-pre-shared-key=nycmeshnet wpa2-pre-shared-key=nycmeshnet


#set the wireless (wlan1) to USA 2 and the proper band.
/interface wireless
set [ find default-name=wlan1 ] band=5ghz-a/n/ac channel-width=\
20/40/80mhz-Ceee country="united states2" disabled=no frequency=auto \
mode=station-bridge security-profile=sxt-ap ssid=nycmesh-nn-sxtptp

/interface wireless connect-list
add interface=wlan1 security-profile=sxt-ap ssid=nycmesh-nn-sxptp

# disable the NAT and disable all the firewall filters
/ip firewall nat
set numbers=0 disabled=yes

/ip firewall filter
set numbers=1 disabled=yes
set numbers=2 disabled=yes
set numbers=3 disabled=yes
set numbers=4 disabled=yes
set numbers=5 disabled=yes
set numbers=6 disabled=yes
set numbers=7 disabled=yes
set numbers=8 disabled=yes
set numbers=9 disabled=yes
set numbers=10 disabled=yes

# disable the dhcp-client and server
/ip dhcp-client
set [find interface=wlan1 ] disabled=yes
/ip dhcp-server
set [find interface=ether1] disabled=yes

#add a bridge and add port ether1 and wlan1 (switch)
/interface bridge
add name=bridge1
/interface bridge port
add bridge=bridge1 interface=ether1
add bridge=bridge1 interface=wlan1

#change IP address of the "sxt ptp client" to not mix with potential other SXT default IP address
/ip address
add address=192.168.88.5/24 interface=bridge1 network=192.168.88.0
set [ find interface=ether1] address=192.168.88.4/24
Legacy Client Node
This configuration is old, and probably won't work anymore/is unsupported. For archival/research use only.
Set your computer to connect using DHCP ("automatic" on PC)
Connect via ethernet and you will get an address like 192.168.88.xxx
Reset
press the reset button WHILE powering on the unit by plugging in the POE cable.
Once one of the LEDs begins to flash white/blue (about 5 seconds), release reset button while it's flashing. After one minute the device will be ready
Connect to GUI
open your browser and connect to http://192.168.88.1/
default username: admin
default password: (leave empty)
Click the button that says "Webfig" in the top right
Name the device
system > identity
"n--". So if your network id is 1000, your device name could be: n1000-sxt-0
Set a password
System > password
IMPORTANT: You must use a unique and strong (at least 8 characters, the longer the better) password to ensure the security of your device!
IP > Services
- Disable telnet
- Disable ftp
- Consider disabling the api and winbox services if you will not be using them.
Other security precautions to consider https://wiki.mikrotik.com/wiki/Manual:Securing_Your_Router
IP > firewall
Find and disable this input rule:
4
;;; defconf: drop all not coming from LAN
Bridge
- add new
set Protocol Mode to "none" - hit apply and OK
IP > DHCP Server
disable by clicking the small [D] button
IP > DHCP Client
- change Interface to bridge1
- hit apply and OK
Wireless > security profiles (tab)
add new
name: nycmeshnet
uncheck wpa psk
leave wpa2 psk checked
write in wpa2 Pre-Shared-Key field: nycmeshnet
apply and ok
Wireless > wlan1
Set mode to station-bridge
Set SSID of the hub you want to connect to e.g. nycmesh-xxx
Set channel width to 20/40/80MHz XXXX
Set frequency to auto
Set security profile to nycmeshnet
(below only if you have SXT international version)
Click Advanced Mode button at top
Scroll down and set country drop down to united states
When all settings are correct and the station connects the status should change from "searching for network" to "connected to ess".
Bridge > Ports
Add new, set interface to ether1, set bridge to bridge1
Add new, set interface to wlan1, set bridge to bridge1
IP > Addresses
- Add new, set address to 192.168.88.1/24 set interface to bridge1
- Delete entry 192.168.88.1/24 on interface ether1
Change your computer network settings back to automatic or DHCP
(Note you must be connected to the access point to proceed beyond this point)
Access GUI via routable IP address
Use the name you used for your device, plus the name of the access point to generate the correct URL. For example if your network id is 1000 and the hub id is 500, the URL would be:
http://n1000-sxt-0.n500.mesh/
Update (2 step process)
- system > packages
- enable ipv6
- update / reboot
- system > routerboard > update
Reboot